| Field / Button | What it does |
|---|---|
| Top of the page and table footer | **You are here** in the path line returns to the home screen. The box at the top left reads like "**Show 25 records**". With no rows the table says **No records**; paging uses **First**, **‹**, **›**, **Last**. |
| Heading (device name) and **Active Guests** | Which device's guests you are looking at. |
| **… active sessions** (green badge) | Number of connections open now. |
| **… records shown** | Number of rows loaded into the table. At most 1000 connections are listed; if there are more, "(ilk 1000, toplam …)" (first 1000, total …) is shown next to it. |
| **Firewall live list (real-time sessions)** | Shown on devices whose firewall is connected to the panel: the list comes straight from the firewall and is the most up to date. In this case the MAC column stays empty (the firewall does not report MAC). |
| **User** | The guest's login name; usually the phone number (masked). For hotel logins it can be a room number or an ID number. |
| **MAC** | Device address, first half visible. If the same person has two devices, there are two rows. |
| **IP** | Local address given to the device. |
| **Started** | Date and time the connection opened. The table is sorted newest first by this column when it opens. |
| **Duration** | How long it has been connected. The units stay Turkish: `sn` seconds, `dk` minutes, `s` hours, `g` days (example: `75g 7s` = 75 days 7 hours). |
| **↓ Downloaded**, **↑ Uploaded** | Data downloaded and uploaded during the connection. |
| **Disconnect** | Only on devices whose firewall is connected to the panel. Ends the connection. |
| Number box at the top left | Rows per page: 10, 25, 50, 100, **All**. 25 when the page opens. |
| Search box (**Ara:**) | Searches all columns instantly. |
| **Toplam: … / … - …** | Total rows and the range shown (label still Turkish: "Toplam" = Total). Change pages with **First**, **‹**, **›**, **Last** at the bottom. |
| Message | Meaning / what to do |
|---|---|
| There are no active guests right now. | Nobody is connected at the moment. |
| No matching records found | No row matches your search. Clear the search box. |
| Firewall live list could not be retrieved; showing the RADIUS record instead. | The firewall could not be reached at that moment. The list is shown from login records; some old connections may still look open. Reload the page a little later. |
| The active device could not be resolved. Select a device from the left menu. | No device is selected. Select one on the [Device Selection](/books/getting-started/page/device-selection) screen. |
| Card "**… RADIUS accounting kapalı görünüyor**" (RADIUS accounting appears to be off) | If the device sent no session data in the last 90 days, a setup guide for your firewall brand is shown instead of the list (Sophos, FortiGate, MikroTik, Palo Alto and others; the card is in Turkish only). Apply the setting or pass it to the company that installed your firewall; the list fills by itself afterwards. |
| Could not be terminated (…) | The connection could not be ended. The guest may have left in the meantime; reload the page and try again. |
| Connection error. | The connection between the panel and the server dropped. Check your internet and try again. |
| Field / Button | What it does |
|---|---|
| Top of the page | The heading **User Lists** with **You are here** under it; **Dashboard** in the path line returns to the home screen. While the table loads it shows **Processing...**, with no records **No Record**; **All** in the number box shows every row. |
| **Search...** | Searches the list. |
| Number box at the top left | Rows per page: 10, 25, 50, 100, **All**. |
| **Username** | The guest's login name, i.e. the phone number (masked). |
| **First Name**, **Last Name**, **Phone** | Details given at sign-up (masked). |
| **E-Mail** | If the guest gave an e-mail at sign-up. |
| **Registration Date** | Day of the first sign-up (day-month-year). |
| **Status** | **Active** (can sign in), **Passive** (blocked) or **Waiting for Approval**. |
| **Location** | The device where the sign-up happened. |
| **Registration Type** | Phone icon means SMS, WhatsApp icon means WhatsApp. |
| **Confirm** | Approves a guest waiting for approval; a login code is sent to the guest. See [Pending Approval](/books/guests/page/pending-approval). |
| **Disable User** / **Enable User** | Blocks / allows the guest's sign-in. A blocked guest appears on [Blocked Users](/books/guests/page/blocked-users). |
| **Delete User** | Deletes the guest's record and login **without asking**. If the guest wants to connect again, they sign up again. Deleting affects only the record on the device selected in the top menu; if the same phone is registered on another of your devices, that record stays. |
| **Edit User** | Opens the edit screen. |
| **User Information** tab | The guest's sign-up details. The **username** box is locked (shown masked) and cannot be changed. Boxes without a label are internal system fields (for example the device IP address); anything typed there is not saved. If you leave a date box empty, or the date cannot be read, the stored date stays as it is. |
| **Group and Password** tab | **Group** (time and speed rules) and a new **Password**. |
| **Save** | Saves the changes; "Successful - Successfully updated" appears at the top. If saving fails, a red **Error - Could not save. Check the details and try again.** appears; the change was not saved. |
| **Toplam: … / … - …** | Total guests and the range shown (label still Turkish: "Toplam" = Total). **No Record** if empty, **Processing...** while loading. |
| Field / Button | What it does |
|---|---|
| **Active device: …** | The device the block applies to. Next to it: "blocked users cannot log in (RADIUS reject)." |
| **Username / phone number** | Number or user name to block. Example: `5321234567`. The example text inside the box is still Turkish ("örn." = e.g.). |
| **Block** | Blocks the number on this device. |
| Note under the card | "You can block a number before it is even registered; logins with that number will be rejected on this device." |
| **Blocked Users (…)** | List heading and total count. |
| **Search...** | Searches the list instantly. |
| **User / Number** | The blocked number (masked). The eye icon reveals the full number (if you are allowed; every reveal goes to the audit log). |
| **Source** | Where the block came from: grey **Manual** (from this screen), blue **SMS**, **ID Card**, **Social**, **Staff** or **Hotel** (blocked from the related guest list). |
| **Action** / **Remove block** | Removes the block after asking. |
| Message | Meaning / what to do |
|---|---|
| Blocked: … | The number is blocked. |
| This user is already blocked on this device. | The number is already on the list. Nothing to do. |
| Username / number cannot be empty. | Type a number in the box. |
| Could not save the block, please try again. | Saving failed; the number is not blocked. Try again; if it keeps happening, contact support. |
| Block removed. | The person can sign in again. |
| No blocked users on this device. | The list is empty. |
| No active device found. Please select a device from the top menu. | Select a device on the [Device Selection](/books/getting-started/page/device-selection) screen first. |
| Field / Button | What it does |
|---|---|
| Top of the page | The heading **User Lists** with **You are here** under it; **Dashboard** in the path line returns to the home screen. While the table loads it shows **Processing...**, with no records **No Record**; **All** in the number box shows every row. |
| **Username** | The guest's login name (masked). Click it to open the edit screen. |
| **First Name**, **Last Name** | The guest's name (masked). |
| **Identity Number** | ID or passport number used at sign-in (masked). |
| **Room Number** | The guest's room. |
| **Check-out Date** | The day the stay ends. Wi-Fi access ends on this date; update it if the stay is extended. |
| **Birth Date**, **Cinsiyet** | Details taken at sign-up (`K` female, `E` male). |
| **Registration Date** | The guest's first sign-in day. |
| **Status** | **Active**, **Passive** (blocked) or **Waiting for Approval**. |
| **Location** | The device the guest connected to. |
| Yellow, red and blue buttons | **Disable User** (green **Enable User** if blocked), **Delete User** (deletes without asking), **Edit User**. A guest waiting for approval gets a green **Confirm** first. |
| **Search...**, number box, **Total** | Search, rows per page (10, 25, 50, 100, **All**) and total records. |
| Field / Button | What it does |
|---|---|
| Top of the page | The heading **User Lists** with **You are here** under it; **Dashboard** in the path line returns to the home screen. While the table loads it shows **Processing...**, with no records **No Record**; **All** in the number box shows every row. |
| **New User** | Opens the new account form. |
| **Username** | The account's login name. Click it to open the edit screen. |
| **First Name**, **Last Name**, **E-Mail**, **Phone**, **Department** | Details entered when the account was created. |
| **Registration Date** | The day the account was created. |
| **Status** | **Active**, **Passive** (blocked) or **Waiting for Approval**. |
| **Location** | The device the account belongs to. |
| Yellow, red and blue buttons | **Disable User** / **Enable User**, **Delete User** (deletes without asking; only the record on the selected device), **Edit User**. On the edit screen the username and device IP address cannot be changed; if saving fails, a red "Could not save. Check the details and try again." appears. Details: [SMS / WhatsApp Users](/books/guests/page/sms-whatsapp-users). |
| **Search...**, number box, **Total** | Search, rows per page (10, 25, 50, 100, **All**) and total records. **No Record** if empty. |
| Field / Button | What it does |
|---|---|
| Top of the page | The heading **User Lists** with **You are here** under it; **Dashboard** in the path line returns to the home screen. While the table loads it shows **Processing...**, with no records **No Record**; **All** in the number box shows every row. |
| **Username** | The guest's login name (phone number, masked). Click it to open the edit screen. |
| **First Name**, **Last Name** | Name given at sign-up (masked). |
| **Registration Date** | The day of the sign-up. |
| **Type** | Sign-up method: **SMS**, **T.C. Kimlik** (Turkish ID) or **Otel Misafiri** (hotel guest). |
| **Location** | The device where the sign-up happened. |
| Green **Confirm** | Allows the guest to sign in. |
| Red **Delete User** | Deletes the record without asking. |
| Blue **Edit User** | Edits the record's details. |
| **Search...**, number box, **Total** | Search, rows per page and total records. |
| Field / Button | What it does |
|---|---|
| Top of the page | The heading **User Management** with **You are here** under it; **Dashboard** in the path line returns to the home screen. While the table loads it shows **Processing...**, with no records **No Record**; **All** in the number box shows every row. |
| **Create New Group** | Opens the new group form. |
| **Search...** | Searches the group list. |
| Number box at the top left | Rows per page: 10, 25, 50, 100, **All**. |
| **Group Name** | Must match the group name on the firewall. Spaces are removed. Example: `Guest-2Hours`. |
| **Group Description** | A note on what the group is for. Shown in brackets next to the group name in lists. |
| **Unlimited** | When on, there is no time limit. |
| **Validity** and **Duration** | How long one sign-in stays valid: a number + **Hours** or **Minutes**. It shows 1 when the form opens. |
| **Validity** (list) | **Unlimited**, **… Minutes** or **… Hours**. Times longer than 60 minutes are shown in hours (example: 90 minutes is **1.5 Hours**). |
| Blue pencil (**Edit Group**) | Opens the edit screen. |
| Red trash (**Delete Group**) | Deletes the group after asking. |
| **Save** | Saves the group and returns to the list. |
| **Toplam: … / … - …** | Total number of groups and the range shown (label still Turkish: "Toplam" = Total). With no groups it says **No Record**. |
| Field / Button | What it does |
|---|---|
| Top of the page | The heading **User Management** with **You are here** under it; **Dashboard** in the path line returns to the home screen. While the table loads it shows **Processing...**, with no records **No Record**; **All** in the number box shows every row. |
| **Search** | Searches the coupon batches. |
| **Coupon Creation** | Opens the New Coupon form. |
| **Bilet Tasarımı** | Opens the design screen for the PDF cards (Turkish only). |
| **Title**, **Description** | Name and note of the coupon batch; may also appear on the printed card. |
| **Number of Coupons** | How many codes to create. 10 by default. |
| **Character Length** | Characters per code. 6 by default. |
| **Character Type** | Which characters the code uses. Numbers only is the easiest for guests to type. |
| **Unlimited** | When on, the code has no time limit. |
| **Validity** and **Duration** | How long one code keeps the guest online. |
| **PDF Language** | Language of the text on the printed cards. |
| **Save** | Creates the codes. |
| **Title**, **Description**, **Validity** (list) | Details of the coupon batch. |
| **Number of Coupons**, **Number of Used Coupons**, **Number of Remaining Coupons** | Total, used and remaining codes. |
| Yellow PDF button | Downloads the codes as a printable PDF. |
| Blue magnifier | **Coupon Detail**: each code with **Coupon Code**, **Validity**, **Title**, **Description** and **In Use** (**Yes** / **No**). |
| Red button | Deletes the coupon batch without asking. |
| Field / Button | What it does |
|---|---|
| Top of the page | The heading **User Management** with **You are here** under it; **Dashboard** in the path line returns to the home screen. While the table loads it shows **Processing...**, with no records **No Record**; **All** in the number box shows every row. |
| **New Bulk Users** | Opens the creation form. |
| **Bilet Tasarımı** | Opens the PDF card design screen. |
| **Title**, **Description** | Name and note of the batch. |
| **Number of Users** | How many accounts to create. 10 by default. |
| **Character Length**, **Character Type** | Length and characters of user names and passwords. |
| **Single Password** | When on, all accounts share one password. |
| **Group** | Time and speed rules of the accounts. |
| **PDF Language** | Language of the text on the cards. |
| **Save** | Creates the accounts. |
| **Bulk User Code** | The batch's system number. |
| **Number of Users**, **Idle**, **In Use** | Total, unused and used accounts. |
| Blue PDF button | Downloads the cards as a PDF. |
| Red button | Deletes the batch and its accounts without asking. |
| Field / Button | What it does |
|---|---|
| **Username** | The name typed at the Wi-Fi login. Required. No quotes or backslashes, at most 50 characters. Choose something short that is easy to type on a phone. |
| **First Name**, **Last Name** | The account holder's name. Required. Shows who is who in reports. |
| **E-Mail** | Optional. |
| Country list and **Phone** | Optional (required for Staff WiFi). Pick the country code on the left, type the number on the right; 7-15 digits. |
| **Department** | Optional unit name. |
| **Group** | The group that sets the account's time and speed rules. |
| **User type** | **Hotspot user (connects with a password)** or **Staff WiFi (certificate)**. |
| **Password** | Required login password for a Hotspot user. Hidden for Staff WiFi, where the password is generated automatically. |
| **Save** | Creates the account. |
| Message | Meaning / what to do |
|---|---|
| This field is required. | A required box is empty. Fill in the box marked in red.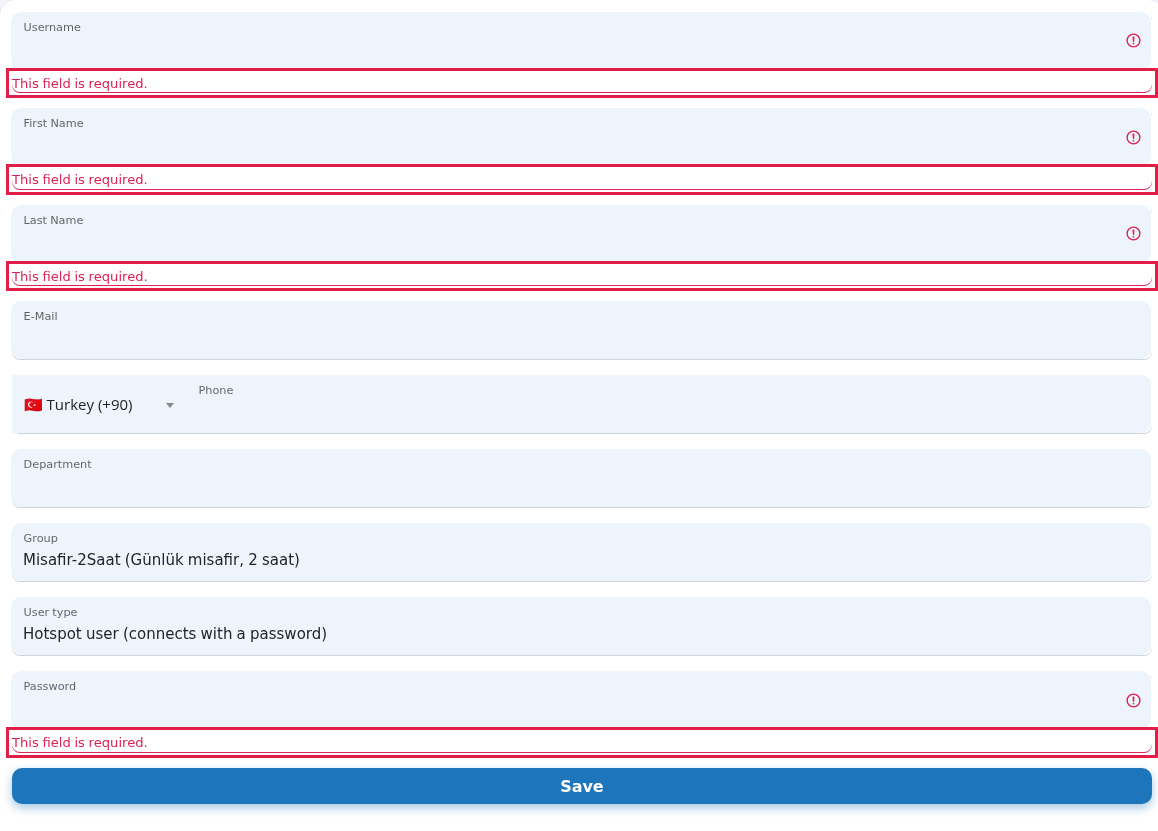 |
| Enter a valid phone number (7-15 digits). | Type the number in digits, without the country code. |
| Mobile phone is required for Staff WiFi (start with + for international numbers). | Fill in the phone if you chose Staff WiFi. |
| This username already exists on this device (source: …). Press the button below to delete it and create the user again. … | An account with the same user name already exists. Use a different name, or press **Delete existing record** to remove the old account; the old record and its login details are deleted and this cannot be undone. The source shows which list the account comes from (example: `StaffUsers` = local users, `SMSUsers` = SMS/WhatsApp guests).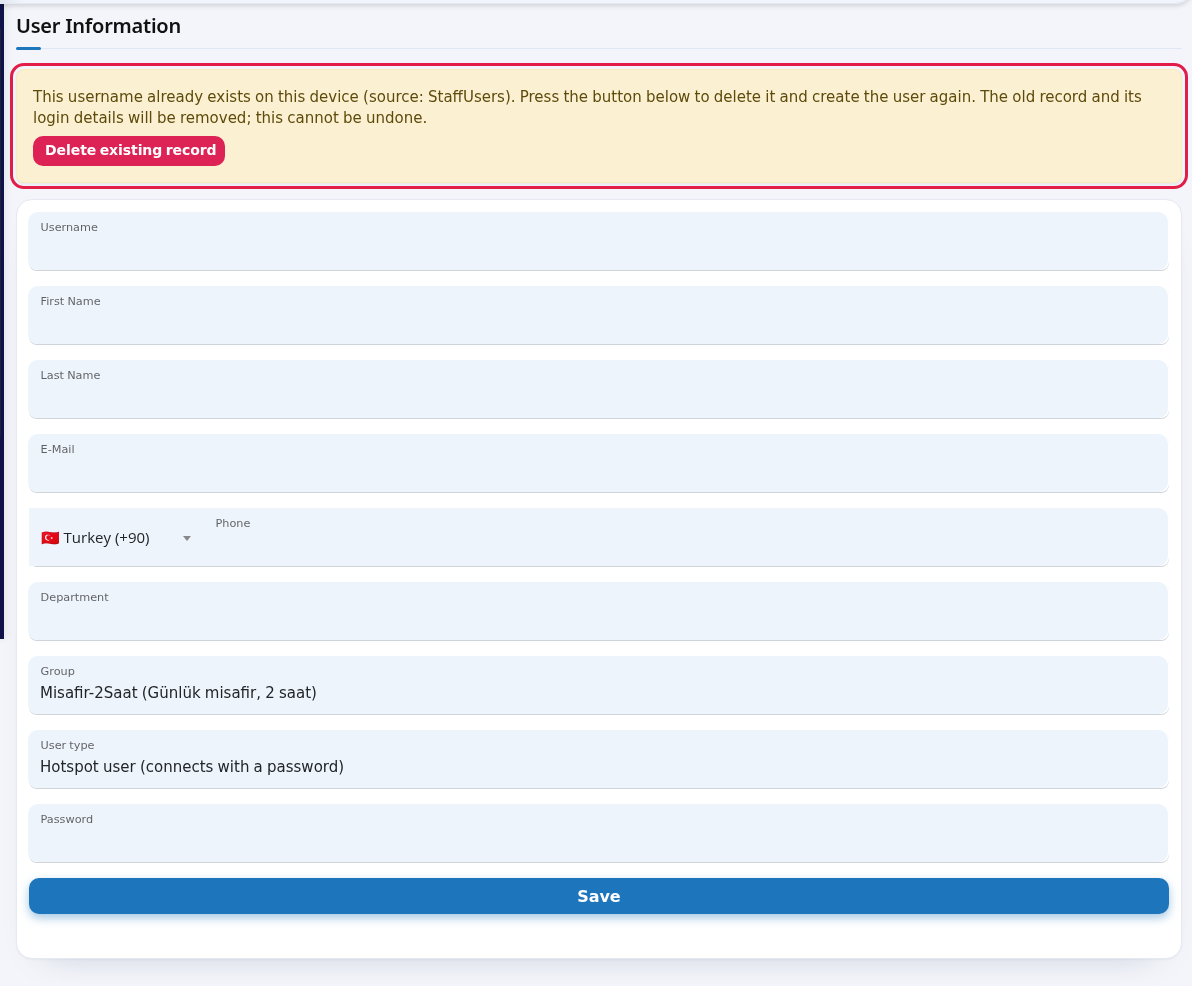 |
| The old record was deleted (…). You can create the user again now. | The old account was removed; fill in the form again and save. |
| The confirmation could not be verified, nothing was changed. Please try again. | The delete confirmation expired. Reload the page and try again. |
| Username not accepted: quote and backslash characters are not allowed, and the maximum length is 50 characters. | Fix the user name. |
| You chose Staff WiFi: enter a valid mobile number (…). The user was not created. | Fix the phone number and save again. |
| The user was created, but the setup link could not be sent via WhatsApp. … | WhatsApp to the international number failed and the link was tried by SMS. Delivery is not guaranteed; pass the setup link to the staff member yourself. |
| The operation could not be completed. Check the details and try again (error code: …). | Saving failed. Check the details and try again; if it keeps happening, contact support with the error code. |
| Field / Button | What it does |
|---|---|
| Top of the page | The heading **User Lists** with **You are here** under it; **Dashboard** in the path line returns to the home screen. While the table loads it shows **Processing...**, with no records **No Record**; **All** in the number box shows every row. |
| **Username** | The guest who tried to sign in (masked). |
| **Connection Date** | Date and time of the attempt. |
| **Status** | **Logged In** or **Login Rejected**. |
| **Type** | An icon; hovering shows **SMS User**, **Hotel User**, **T.C. Identity User**, **Local User**, **Bulk User** or **Unknown**. |
| **Search...**, number box, **Total** | Search, rows per page and total attempts; page numbers at the bottom. |
| Field / Button | What it does |
|---|---|
| **List** / **User report** | Two tabs. List manages the people, the report shows their Wi-Fi usage. The selected tab is blue. |
| **Mobile number** | The employee's mobile number. The only required field. Example: `5301234567`. |
| **Full name (optional)** | To see who is who in the list. Example: `Ahmet Yılmaz`. |
| **Department (optional)** | Unit name. Also used by search. Example: `Accounting`. |
| **Add** | Adds one person to the list. |
| **Have many people? Paste the list here** | Opens the bulk box. Lines can be one under another, or separated by commas, semicolons or tabs; leading 0 and 90 and spaces are removed automatically. |
| **Add list** | Processes the pasted list. At most 2000 lines. |
| **Search...** | Searches phone, name or department. |
| **Status** | **All**, **Active** (currently employed) or **Left**. |
| **Filter** / **Clear filter** | Applies / removes the search. |
| **… users (… active)** | Total and active people on the list. **Page 1 / 1** is shown next to it; 50 people per page, page numbers appear below. |
| **Phone** | The number is masked (example: `5591****28`). If you are allowed to see full numbers, open it with the eye icon next to it; every reveal is written to the audit log. |
| **Full name**, **Department** | What you typed when adding. |
| **Sign-up channel** | How the person signed up to the Wi-Fi: an **SMS** or **WhatsApp** badge. If they never connected: "No login yet". |
| **Last login**, **Login count** | When they last logged in to the Wi-Fi and how many times in total. |
| **Status** (table) | A green **Active** or grey **Left: date** badge. |
| **Mark as left** / **Undo** | Marks the person as left with today's date / undoes it. |
| Trash | Deletes the record completely after asking. |
| **Delete selected (0)** | Deletes the ticked people after asking. |
| **Delete all … records in the list** | Always visible while the list has records. If you applied a search or status filter, it deletes every record matching the filter; with no filter it deletes **the whole list** without selecting page by page. Use with care. |
| **Start**, **End**, **Show** | Date range on the User report tab. The last 30 days by default. |
| **Sessions**, **Distinct days** | Report: number of connections in the range and on how many different days. |
| **First login**, **Last login** | Report: first and last connection in the range. |
| **Total time**, **Traffic** | Report: total connected time and data used. Durations use Turkish short units on the screen (`s` = hour, `dk` = minute). |
| **Open sessions** | Report: number of connections open right now (yellow badge). `-` if none. |
| Message | Meaning / what to do |
|---|---|
| Staff member added. | The person was added. |
| This number is already on the list. | The same number already exists on this device. No need to add it again. |
| Enter a valid mobile number. Example: 5301234567 | The number does not look like a mobile number. Type the 10-digit number starting with 5. |
| An error occurred while saving. | The record could not be saved. Try again shortly; if it keeps happening, contact support. |
| … staff added, … numbers were already on the list. | Summary of a bulk add. |
| … lines were skipped as invalid: … | No phone number was found on these lines. The message lists the first five; fix them and paste only those again. |
| The list was too long, only the first 2000 lines were processed. | Paste the remaining lines in a second go. |
| … records deleted. | Deletion finished. |
| No records selected. | Tick at least one box before pressing **Delete selected**. |
| Record updated. | **Mark as left** or **Undo** was saved. |
| No staff added yet. Use the form above to add one. | The list is empty. Add the first person in the **Add user** card. |
| No records match this filter. | Nobody matches your search. Press **Clear filter**. |