# Hotel Solution
Guest portal, request management, room board, speed packages and lost & found
# Guest Portal
The Hotel Guest Portal is where you configure the **single-QR digital guest page** you offer to staying guests: housekeeping and room-service requests, hotel information, events and the menu all run from it.
> **How do I open this screen?** From the left menu, go to **Bumerang → BUSINESS → Hotel Guest Portal**.
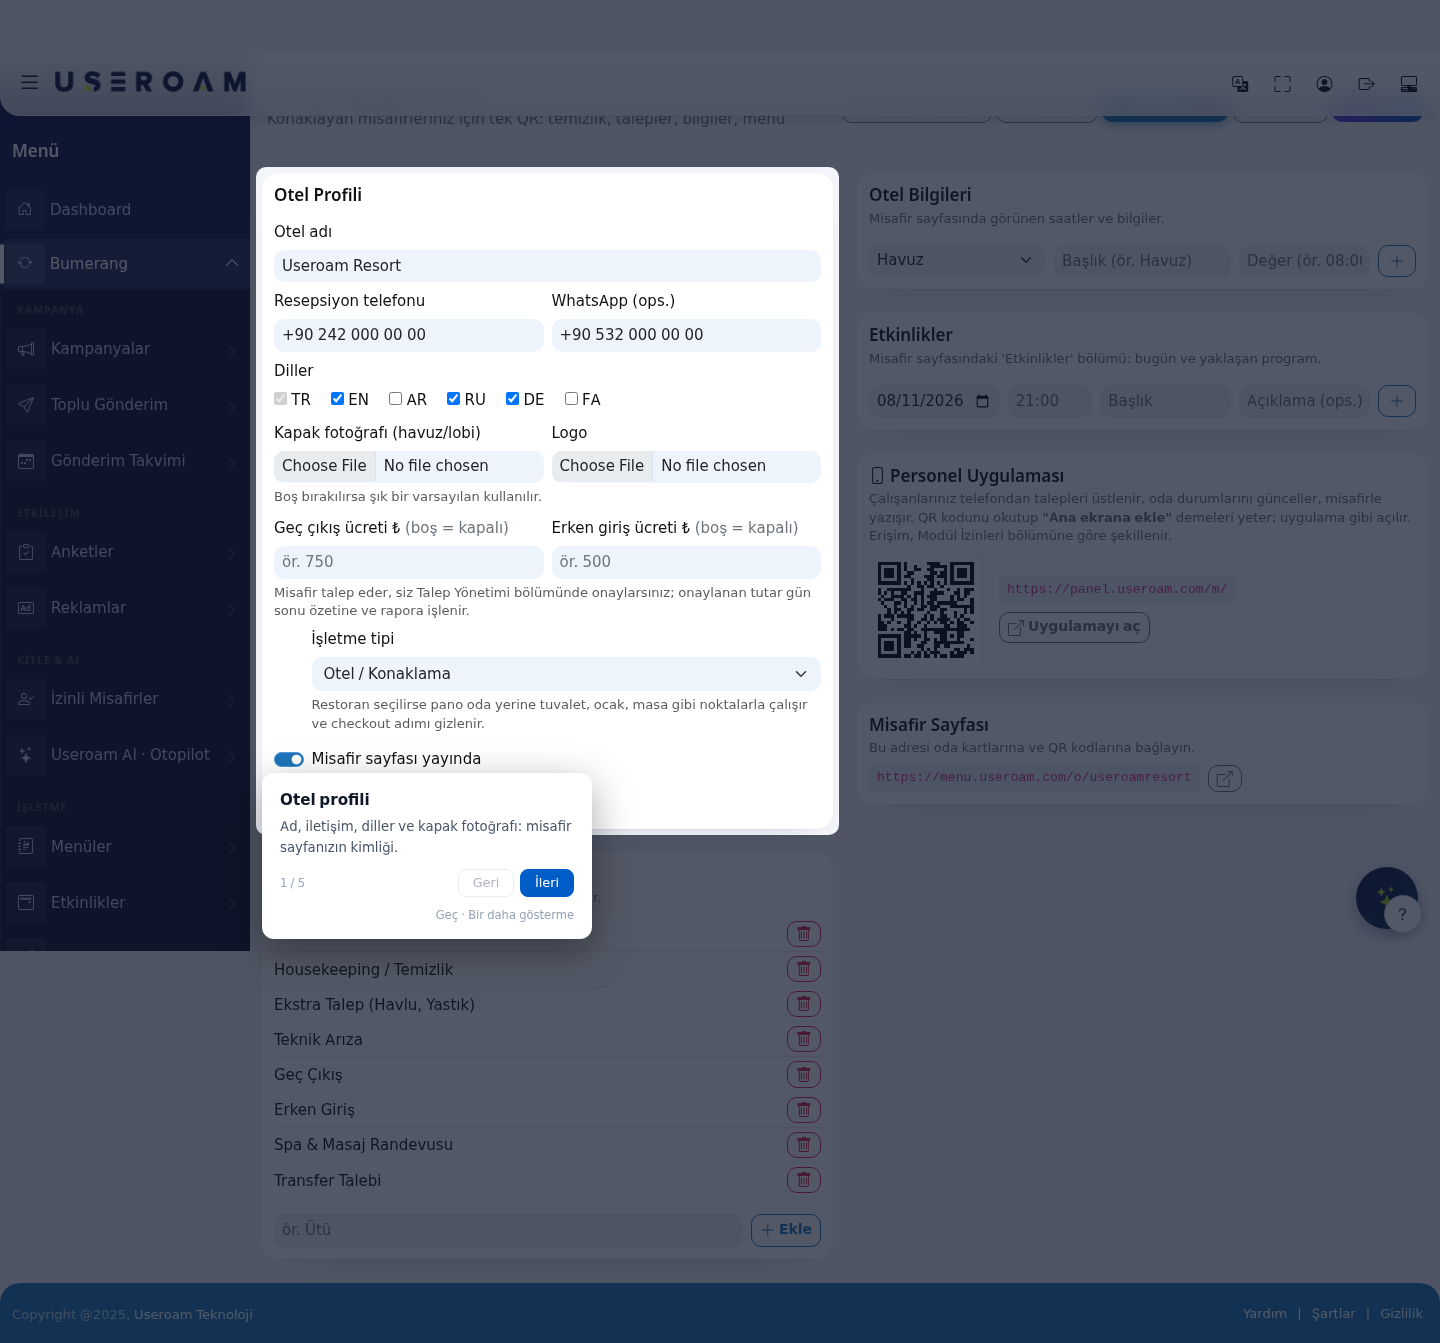
The top bar holds five quick links: **Guest page** (opens the page as the guest sees it), **Management**, **Requests** (with the pending count beside it), **Room QR** and **Studio**.
---
## 1. Hotel Profile
- **Hotel name:** appears in the heading of the guest page.
- **Reception phone:** the number the guest can call in one tap.
- **WhatsApp (optional):** your WhatsApp line, if you have one, so guests can message you instead.
- **Languages:** the languages the guest page is offered in — **TR, EN, AR, RU, DE, FA**. Tick the ones that match your guest profile.
- **Cover photo (pool/lobby):** the large image at the top of the page. If left empty, an elegant default is used.
- **Logo:** your hotel logo.
- **Late checkout fee ₺** / **Early check-in fee ₺:** the price of these services. **Leaving a field empty disables the service** and hides it from the guest page. The guest requests it, you approve it under **Request Management**, and the approved amount is written into the end-of-day summary and the report.
- **Venue type:** *Hotel / Accommodation* or *Restaurant / Café*. **If Restaurant is selected**, the board works with points such as restrooms, stations and tables instead of rooms, and the checkout step is hidden.
- **Guest page live:** publishes or takes down the page.
---
## 2. Request Types
The list of needs the guest can choose on their "Requests" screen. The built-in types are: **Room Service**, **Housekeeping / Cleaning**, **Extra Request (towel, pillow)**, **Technical Fault**, **Late Checkout**, **Early Check-in**, **Spa & Massage Appointment**, **Transfer Request**.
Use **Add** to define your own: a **name** (for example *Iron*) and an **icon** (Pool, Spa, Breakfast, Café, Wi-Fi, Clock, Parking, Laundry, Activity, General).
---
## 3. Hotel Information
The opening-hours and information cards shown on the guest page. Each row is a **Title** (for example *Pool*) and a **Value** (for example *08:00-20:00*). Putting your most-asked details here — breakfast times, pool hours, Wi-Fi information — takes load off reception.
---
## 4. Events
Fills the "Events" section of the guest page. For each entry you set a **date**, a **time** (for example 21:00), a **title** and an optional **description**.
---
## 5. Staff Application
The **Open application** button opens the screen where staff can follow and close requests from their phone. Housekeeping and the technical team use this screen.
---
## 6. Room QR Codes
Generates the QR codes you place in the rooms, in bulk:
- **Room range:** enter the first and last room number (for example 101–120).
- **Generate:** creates a separate QR for every room in the range. Each QR takes the guest to the page already opened with their room number — so the guest never has to type it.
- **Print:** sends the codes to the printer.
> **Tip:** if you also want scanning the QR to connect the guest to Wi-Fi, enable *Embed Wi-Fi in QR codes* on the **Captive Portal → Portal Settings** page.
---
> **Related pages:** **Hotel Solution → Request Management**, **Request Monitor**, **Room Board**, **Hotel Studio**.
# Request Management
Request Management is the **control screen** of your hotel operation: filter every incoming request, assign it to staff, close it and read the end-of-day summary. Use the **Request Monitor** at reception for fast operation and this screen for oversight and reporting.
> **How do I open this screen?** From the left menu, go to **Bumerang → BUSINESS → Request Management**.
---
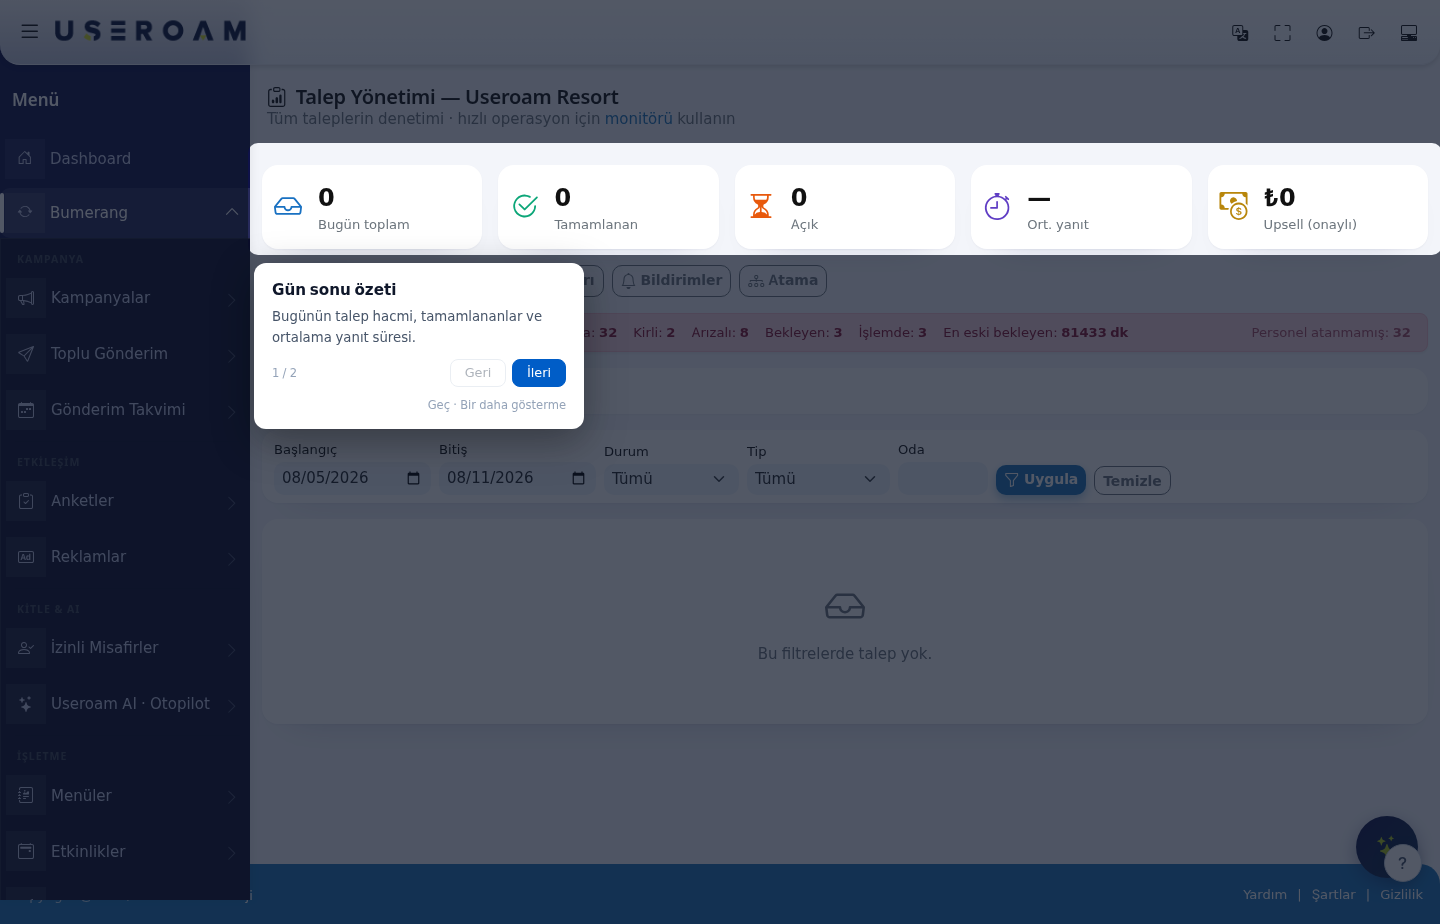
## 1. Headline figures
- **Total today:** requests opened during the day.
- **Completed:** requests that have been closed.
- **Open:** requests still waiting.
- **Avg. response:** the average time taken to fulfil requests — the most direct measure of your operational quality.
- **Upsell (approved):** the revenue from approved paid services such as late checkout and early check-in.
### Status strip
The strip beneath summarises the live operation: **Rooms** (total), **Dirty**, **Faulty**, **Pending**, **In progress**, **Oldest pending** (minutes) and **Unassigned staff**. When something needs priority, a warning appears above (for example *"There is a faulty point, give it priority"*).
---
## 2. Tabs
The screen is divided into five tabs: **Requests**, **Rooms**, **SLA Rules**, **Notifications** and **Assignment**. Rooms, SLA Rules and Notifications are described on their own pages.
---
## 3. Open New Request (reception)
When a guest phones or comes to reception, you open the request yourself:
- **Room:** the room the request came from.
- **Type:** *Room Cleaning*, *Extra*, *Late Checkout*, *Early Check-in*, *Fault* or *Room Service*.
- **Description:** the details (for example *"2x Club Sandwich, 1 Cola"*).
- **Time (optional):** *As soon as possible*, *10:00–12:00*, *12:00–14:00* or *14:00–16:00* — the guest's preferred slot.
- **Assign to staff (optional):** assigns the request directly to an employee. Left as *— automatic —*, it is distributed by the assignment rules.
---
## 4. Filters
- **Start** / **End:** the date range.
- **Status:** *All*, *Pending*, *In progress*, *Completed*, *Cancelled*.
- **Type:** filter by request type.
- **Room:** shows the requests for one room.
**Apply** runs the filter and **Clear** resets it. With no matches, the page reads *"There are no requests for these filters."*
---
## 5. Closing a request
Close a request with the **Close as completed** button. For fault requests, the **Close fault** dialog lets you select or take a **resolution photo** — attaching a record of the work done to the request.
---
## 6. End-of-day summary
The **End-of-day summary** card shows the day's request volume, completions and average response time. It is the summary to read at shift handover.
---
> **Related pages:** **Hotel Solution → Request Monitor**, **Room Board**, **SLA Rules**, **Hotel Notifications**.
# Request Monitor
The Request Monitor is the **operations screen where guest requests land in real time**. A sound plays when a new request arrives. Leave this screen open at reception.
> **How do I open this screen?** From the left menu, go to **Bumerang → BUSINESS → Request Monitor**.
---
## How the screen works
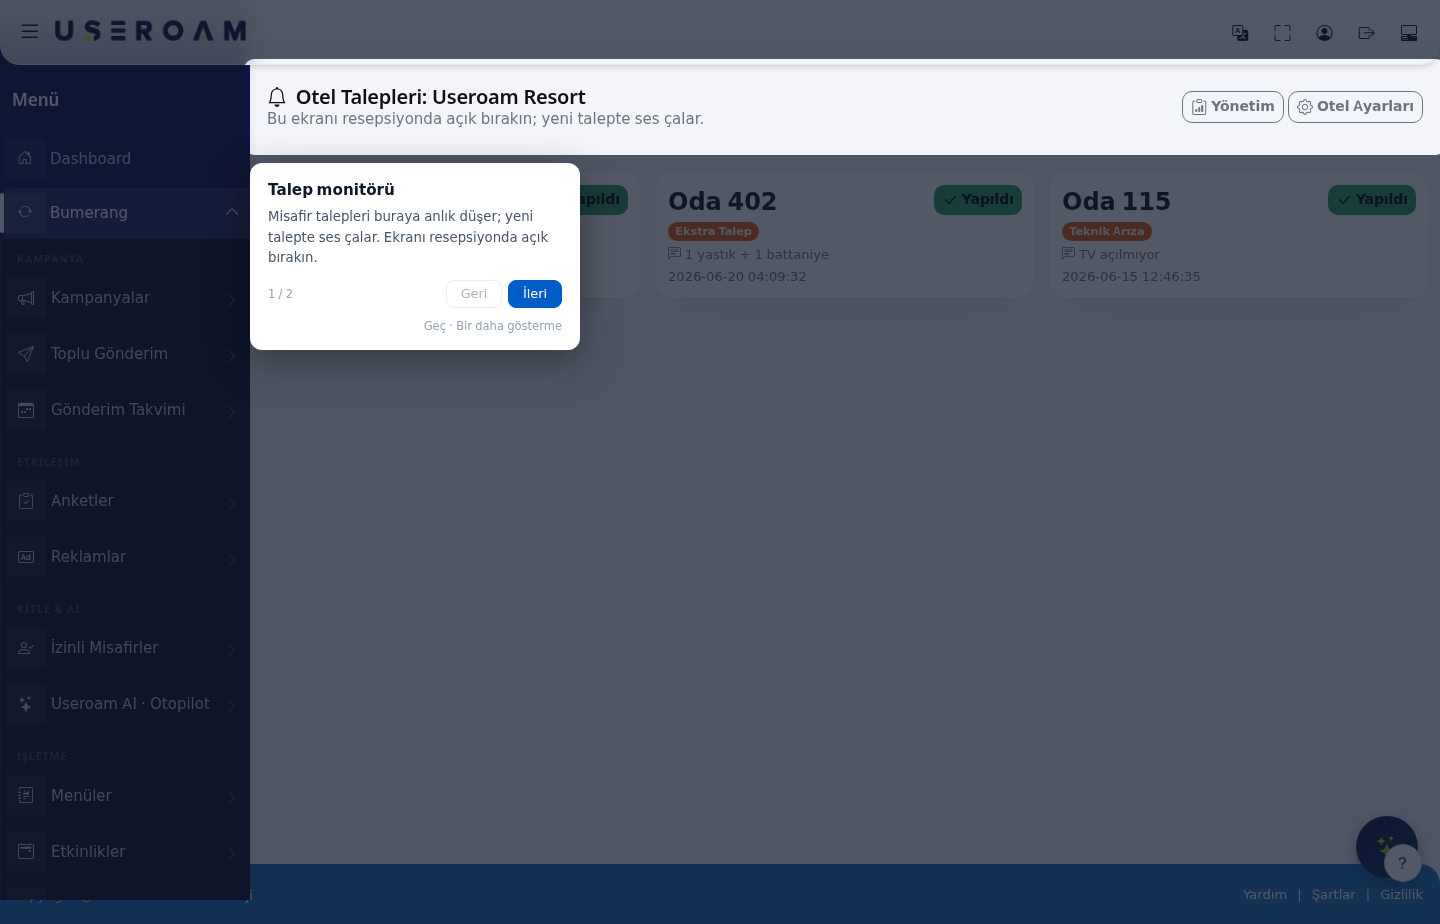
The monitor is a stripped-down version of Request Management: no filters, no reports — just **incoming requests and one-tap closing**. The point is that during a busy moment staff can glance at the screen and act within seconds.
Two quick links sit at the top: **Management** (goes to the Request Management screen) and **Hotel Settings** (goes to the Hotel Guest Portal settings).
---
## What a request card shows
Each request is listed as a card:
- **Room number** — for example *Room 312*.
- **Request type** — for example *Room Service*, *Extra Request*, *Technical Fault*.
- **Description** — the detail the guest wrote (for example *"2x Club Sandwich, 1 Cola, 1 Water"*, *"1 pillow + 1 blanket"*, *"TV won't turn on"*).
- **Date and time** — when the request arrived.
- **Done** button — closes the request as completed.
---
**For the audible alert:** the screen must stay open in the browser. If you close the tab, no sound plays for new requests. We recommend keeping it open in a dedicated tab on the reception computer.
---
> **Mobile use:** for housekeeping and the technical team, use the *Open application* link under **Hotel Guest Portal → Staff Application**; requests can be followed and closed from a phone.
---
> **Related pages:** **Hotel Solution → Request Management**, **Room Board**, **SLA Rules**.
# Room Board
The Room Board shows the **live status of every room** in the hotel on one screen: which rooms are clean, which are dirty, which have a fault, and who they are assigned to. It is the operational map for the floor supervisor and reception.
> **How do I open this screen?** From the left menu, go to **Bumerang → BUSINESS → Room Board**. (It is the same screen as the **Rooms** tab in Request Management.)
---
## 1. Building the room list
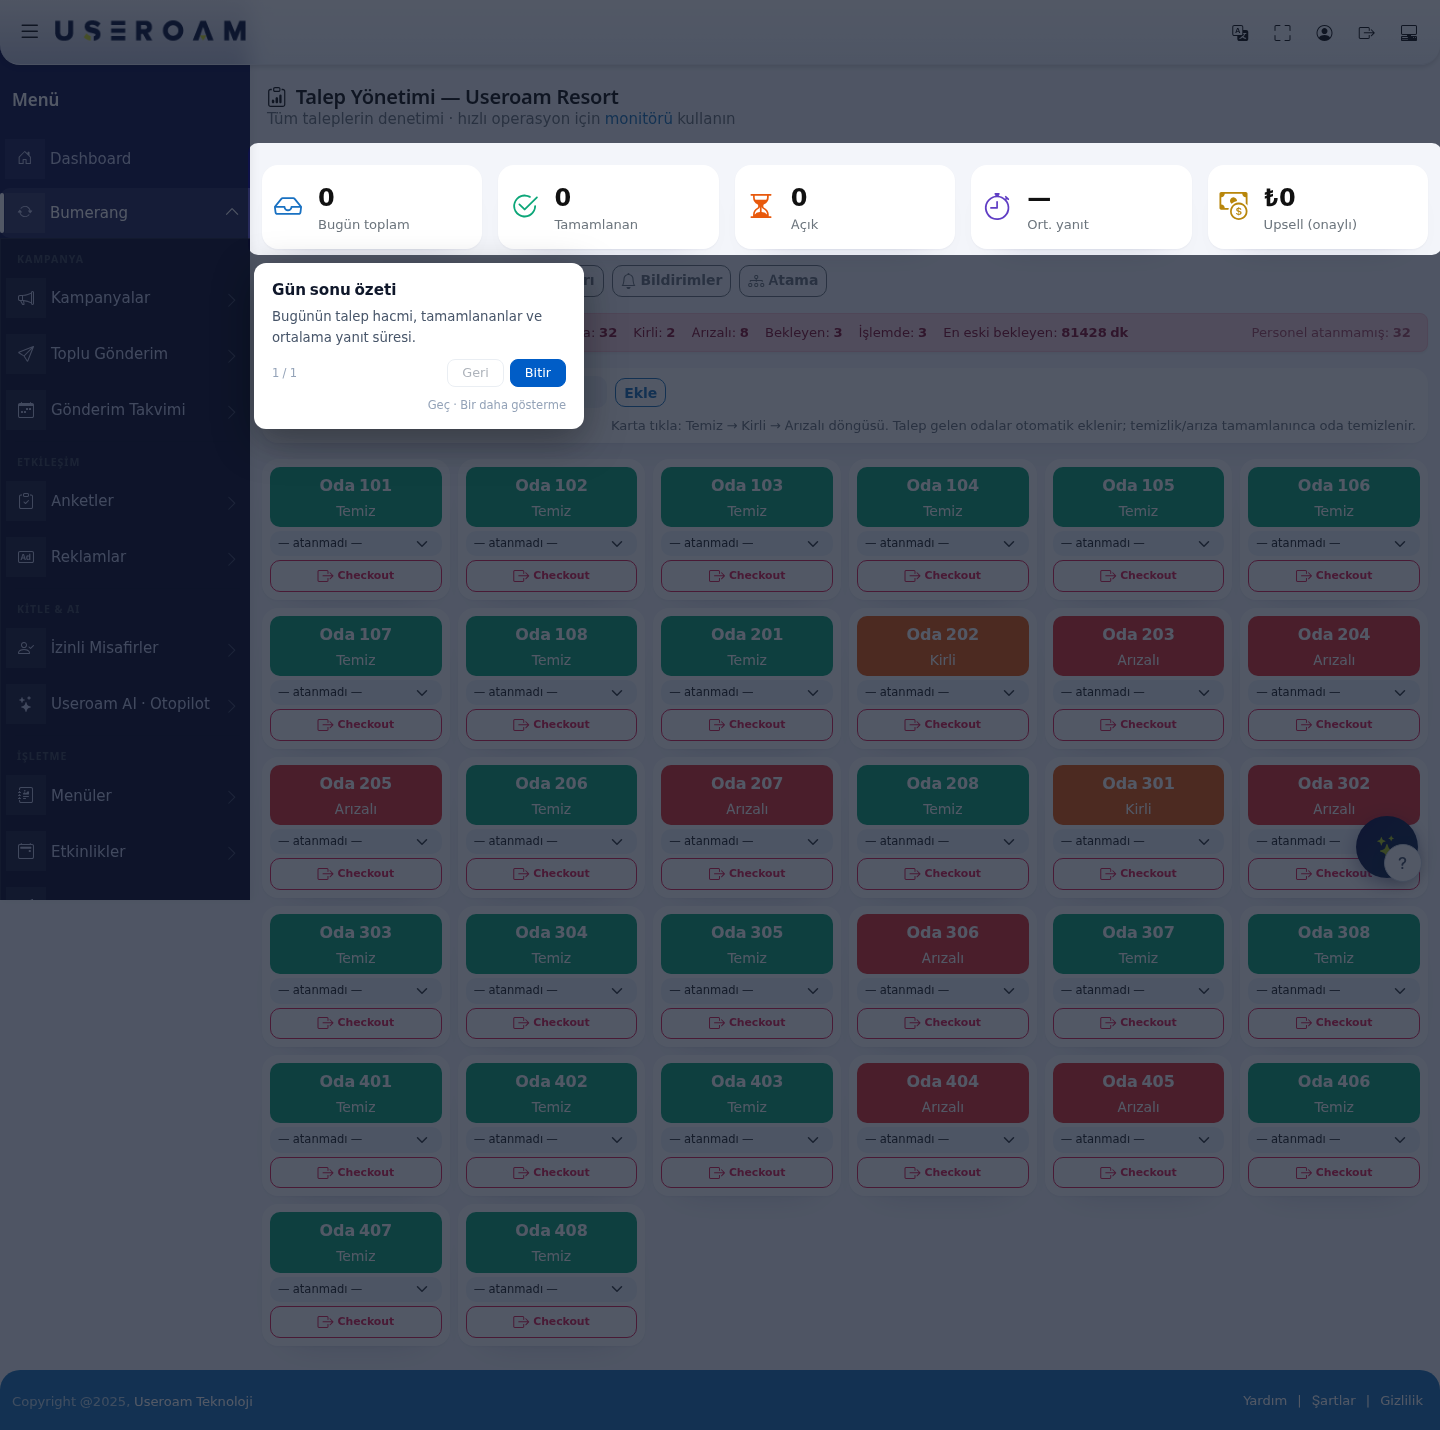
At the top of the board is the **Create room list** field. Enter the first and last room number and press **Add**; every room in between is added to the board.
> **Note:** rooms that raise a request are **added automatically**. When the cleaning or fault record is completed, the room returns to clean.
---
## 2. Room states
Each room appears as a card. **Clicking the card cycles its state:**
**Clean → Dirty → Faulty → Clean**
- **Clean:** the room is ready and can take a guest.
- **Dirty:** awaiting housekeeping.
- **Faulty:** needs technical attention. The warning in the top strip ("There is a faulty point, give it priority") is triggered by rooms in this state.
---
## 3. Assigning staff
Every room card has a **staff selector**. You can leave it as *— unassigned —* or choose an employee from the list. The number of unassigned rooms is totalled in the **Unassigned staff** figure in the top strip.
---
## 4. Checkout
Each card carries a **Checkout** button. Marking a guest's departure puts the room into the cleaning cycle.
> **For restaurant / café use:** if **Hotel Guest Portal → Venue type** is set to *Restaurant / Café*, the board works with points such as restrooms, stations and tables instead of rooms, and the **checkout step is hidden**.
---
## 5. Headline figures
Live counts sit above the board: **Rooms** (total), **Dirty**, **Faulty**, **Pending**, **In progress**, **Oldest pending** (minutes) and **Unassigned staff**. This is the first thing to check at the start of a shift.
---
> **Related pages:** **Hotel Solution → Request Management**, **Request Monitor**, **SLA Rules**.
# Speed Package Sales
Speed Package Sales lets you sell **paid internet packages** to your guests. The guest picks a package, the amount is charged to their room, reception approves it, and the guest's speed is raised.
> **How do I open this screen?** From the left menu, go to **Bumerang → BUSINESS → Speed Package Sales**.
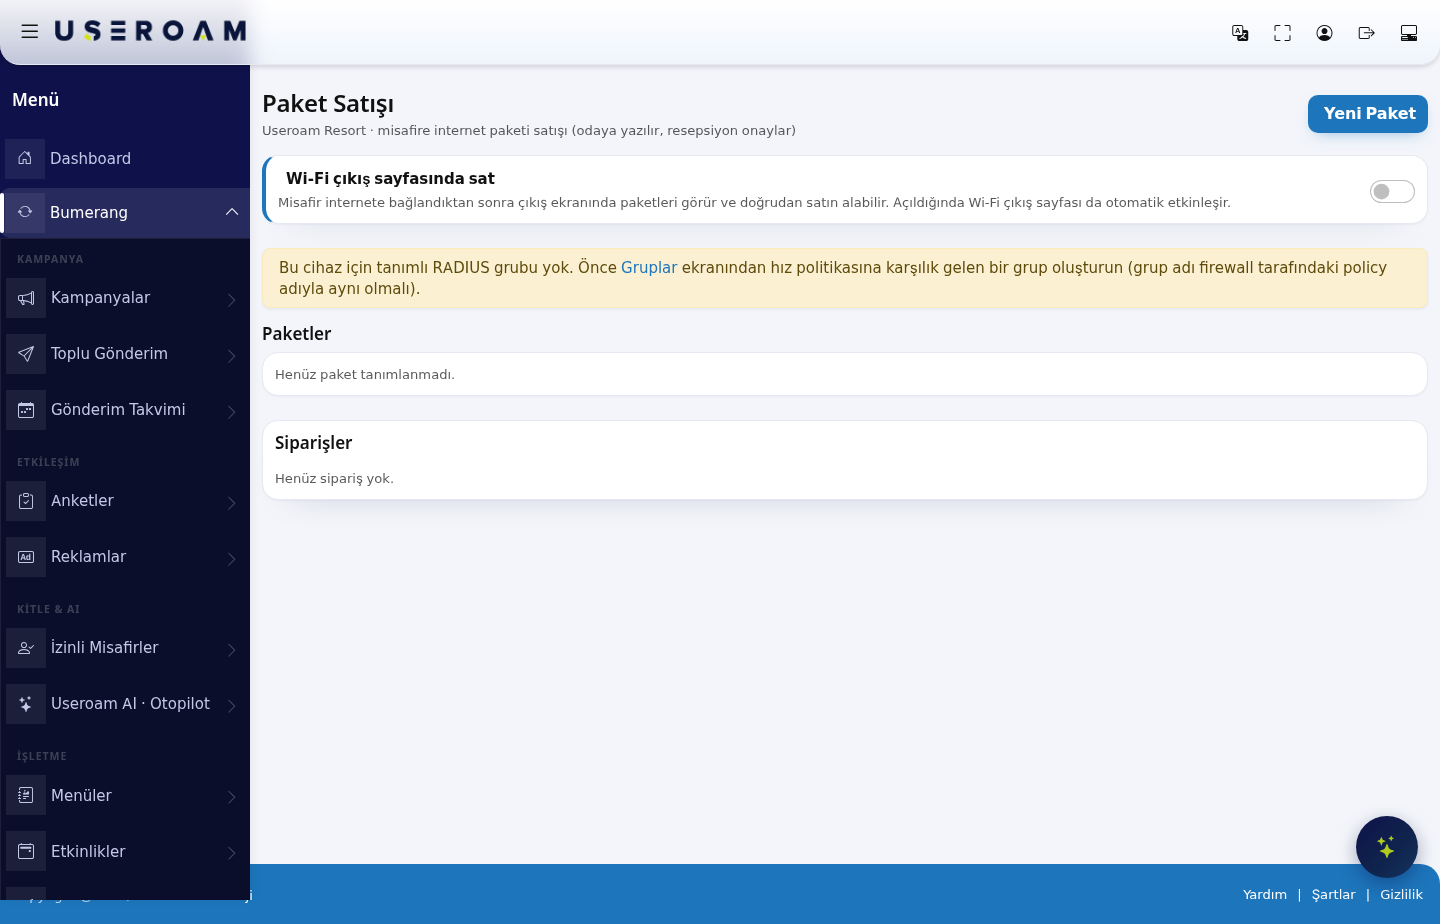
**Prerequisite:** before you can define a package, you must create a RADIUS group matching the speed policy under **Guests → Groups**. **The group name must match the policy name on the firewall exactly.** Without one, the screen warns: *"There is no RADIUS group defined for this device."*
---
## 1. Sell on the Wi-Fi exit page
With this switch on, the guest **sees the packages on the exit screen after connecting and can buy directly**. Enabling it also activates the Wi-Fi exit page automatically.
---
## 2. New Package
Use the **New Package** button to define a package for sale:
- **Package name \*:** the name the guest sees (for example *"Fast Internet 24 Hours"*).
- **Description:** a short text describing the package.
- **Package feature:** free text showing the speed to the guest (for example *"up to 50 Mbps"*).
- **Duration (hours) \*:** how many hours the package is valid for.
- **Price (TRY) \*:** the price.
- **Order:** the order in which packages are shown to the guest.
- **Target RADIUS group \*:** the group the purchasing guest is moved into. **This is the field that determines the speed** — the group corresponds to the speed policy on the firewall.
- **Show to guest (active):** publishes or hides the package. For off-season packages, simply untick this rather than deleting them.
**Save** creates the package; **Cancel** closes the form.
---
## 3. Packages
The list of defined packages. With none defined it reads *"No packages defined yet."*
---
## 4. Orders
Guests' purchase requests land here. Once reception approves one, the amount is charged to the room and written into the *Upsell (approved)* figure on the **Request Management** screen. With no orders it reads *"No orders yet."*
---
> **Related pages:** **Guests → Groups** (RADIUS group), **Hotel Solution → Request Management**, **Captive Portal → Portal Settings** (exit page).
# SLA Rules
SLA Rules define **how quickly requests must be handled**. If a request is not picked up or not completed within the time you set, managers receive a notification — so late work does not slip through.
> **How do I open this screen?** From the left menu, go to **Bumerang → BUSINESS → SLA Rules**. (It is the same screen as the **SLA Rules** tab in Request Management.)
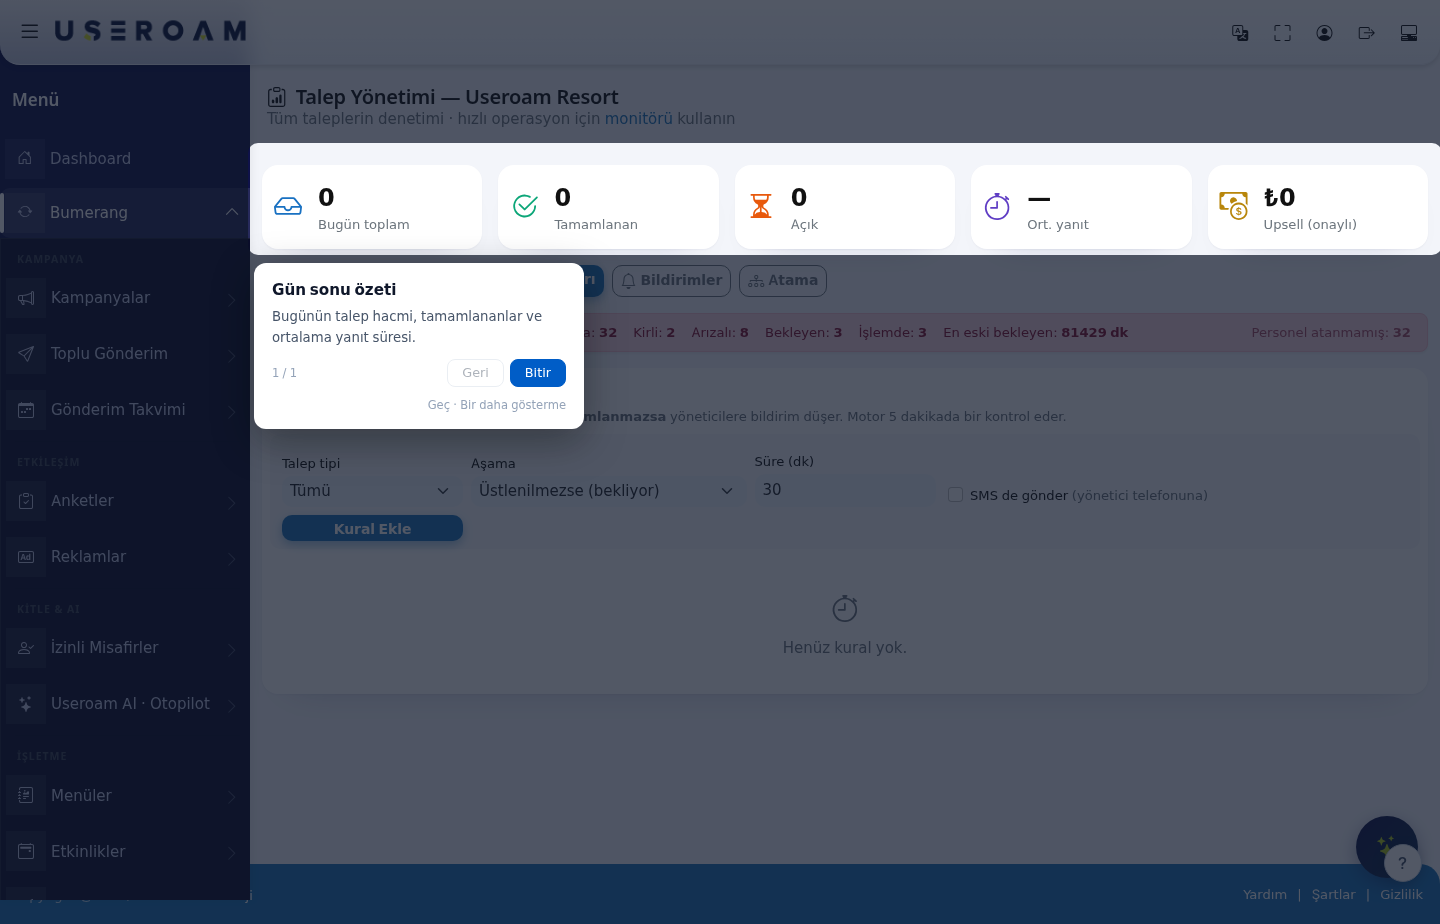
> **The engine checks every 5 minutes**, so a breach turns into a notification within five minutes at most.
---
## Add Rule
- **Request type:** which type the rule applies to — *All*, *Room Cleaning*, *Fault*, *Extra*, *Room Service*, *Late Checkout*, *Early Check-in*.
- **Stage:** which stage the timer runs against. Two options:
- *If not picked up (pending)* — nobody has taken ownership. Catches requests staff never saw.
- *If not completed (open)* — taken but not finished. Catches jobs that are dragging on.
- **Duration (min):** after how many minutes the notification is sent.
- **Also send SMS (to manager's phone):** sends the notification by SMS as well as in the panel. Recommended for critical types such as faults.
The **Add Rule** button saves the rule. With none defined, the screen reads *"No rules yet."*
---
## A recommended starting setup
- *Fault* + *if not picked up* + **10 min** + SMS — technical problems need the fastest response.
- *Room Service* + *if not completed* + **30 min** — guest dissatisfaction grows quickly when food is late.
- *Room Cleaning* + *if not picked up* + **45 min** — a reasonable buffer for floor operations.
> Keep the number of rules small. Too many rules generate constant notifications, and before long nobody reads them.
---
> **Related pages:** **Hotel Solution → Hotel Notifications** (where breaches land), **Request Management**, **Request Monitor**.
# Hotel Notifications
Overdue Request Notifications lists the **requests that breached your SLA rules**. This screen is the single answer to "which job slipped?".
> **How do I open this screen?** From the left menu, go to **Bumerang → BUSINESS → Notifications**. (It is the same screen as the **Notifications** tab in Request Management.)
---
## How the screen works
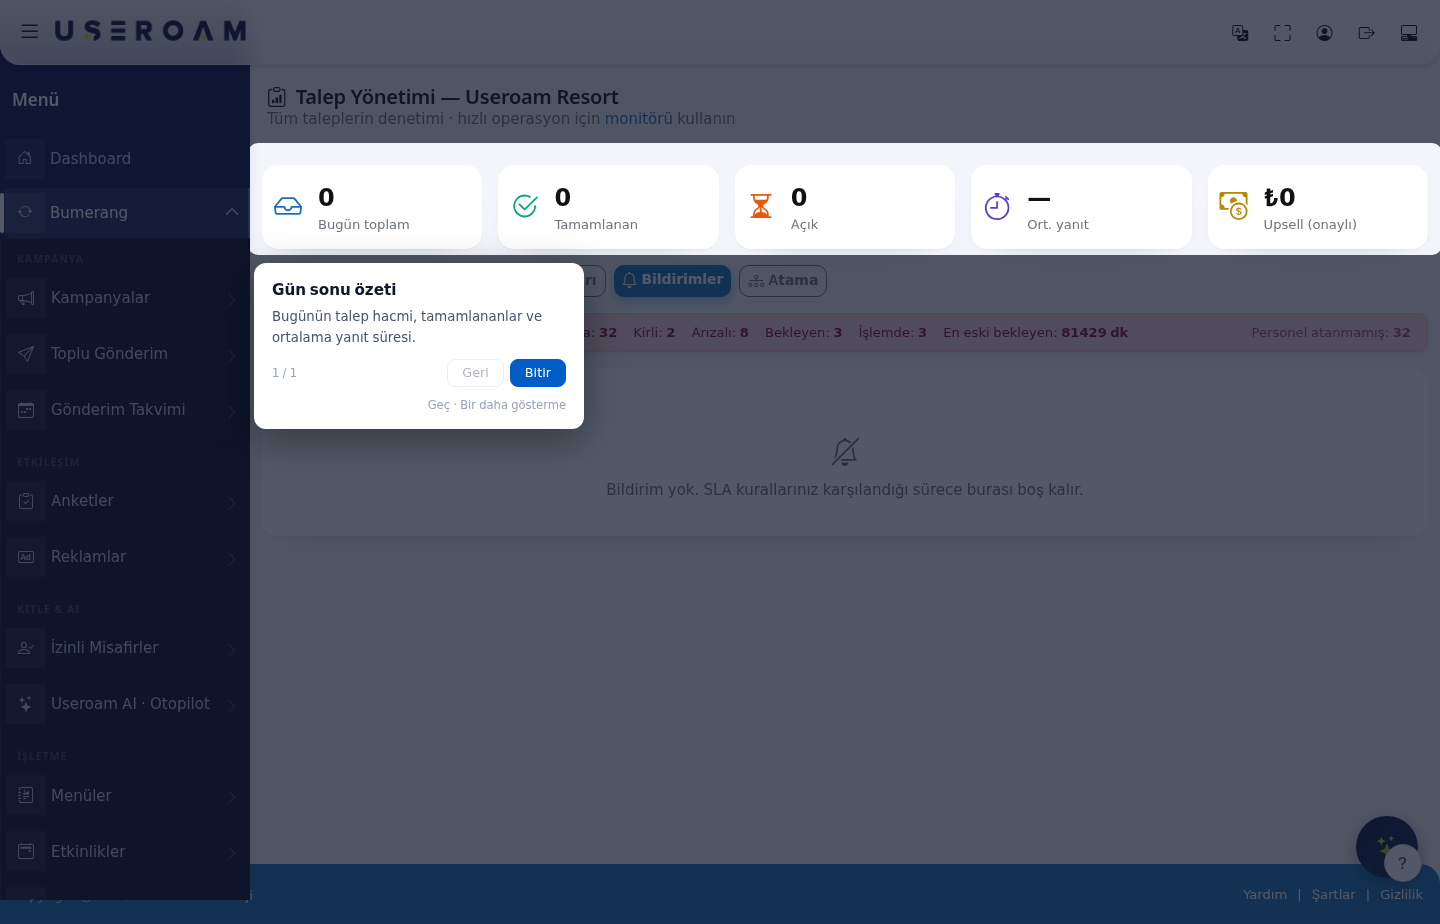
If a request is not picked up or completed within the time defined on the **SLA Rules** page, a notification lands here. The rule engine checks every 5 minutes.
With no notifications, the screen reads:
> *"No notifications. This stays empty as long as your SLA rules are met."*
So **an empty screen is good news** — your operation is running inside the targets you set.
---
## What to do when a notification arrives
1. Open the request from the **Requests** tab.
2. If nobody has taken it, assign it to a staff member from the **Room Board**.
3. If it was taken but is dragging on, contact the employee or hand the request to someone else.
4. If notifications keep repeating for the same request type, either the target is unrealistic or that area is understaffed — review the duration on the **SLA Rules** page.
> **SMS alerts:** to also receive notifications on your phone for critical request types, enable *Also send SMS* on the relevant rule.
---
> **Related pages:** **Hotel Solution → SLA Rules**, **Request Management**, **Room Board**.
# Lost & Found
Lost & Found lets you **record and track items found during cleaning, with a photo**. When a guest calls, you can answer "has anything like that been handed in?" within seconds.
> **How do I open this screen?** From the left menu, go to **Bumerang → BUSINESS → Lost & Found**.
---
## 1. Status counters and filters
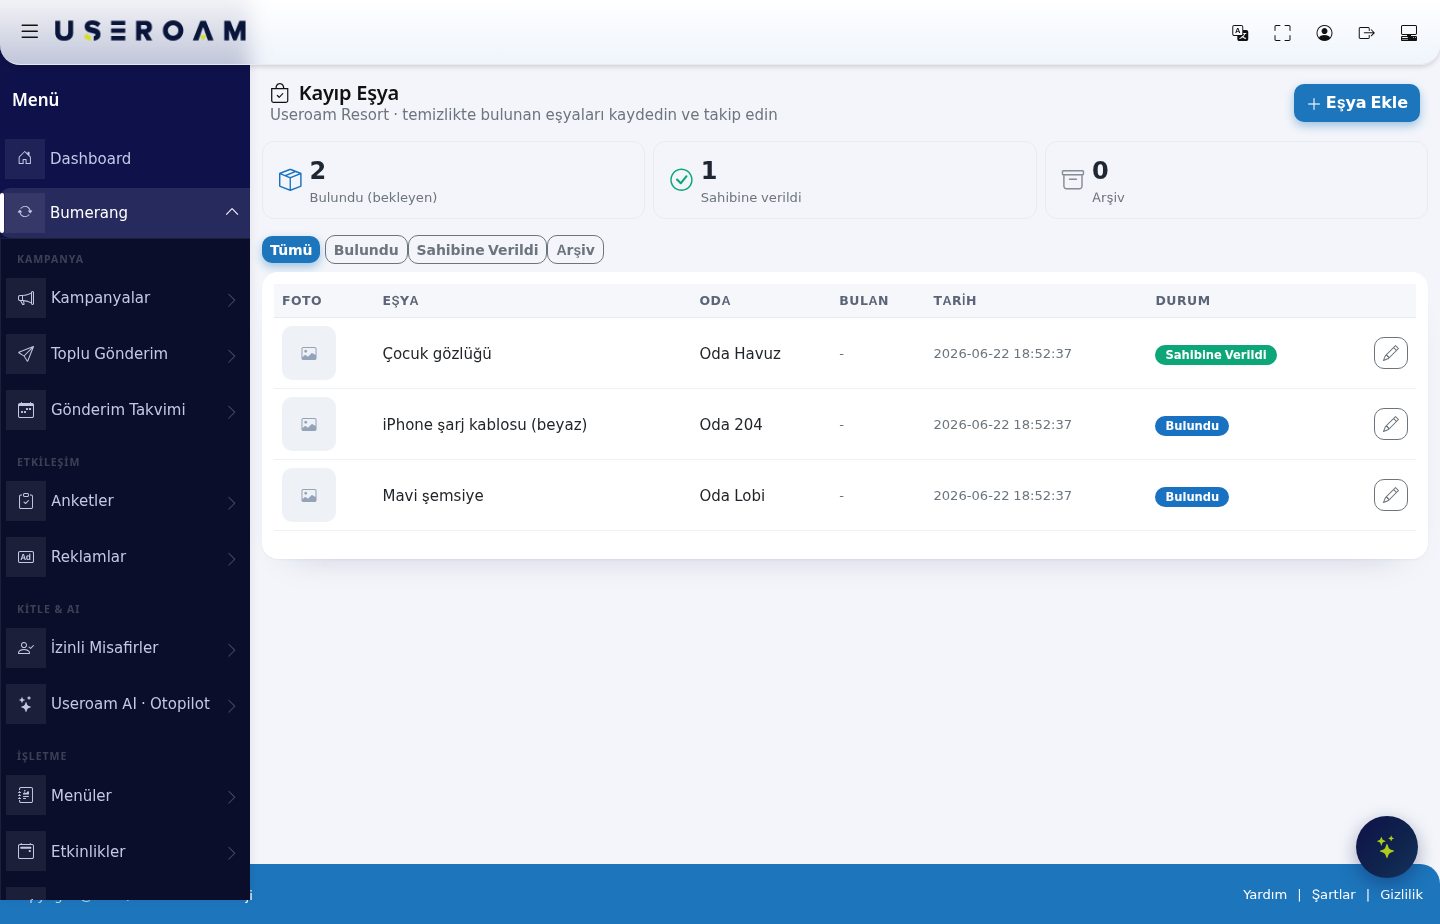
Three counters sit at the top of the page: **Found (pending)**, **Returned to owner** and **Archive**. The **All / Found / Returned to Owner / Archive** buttons underneath filter the list by status.
---
## 2. Add Item
The **Add Item** button opens a new record:
- **Item description \*:** what the item is (for example *"iPhone charging cable (white)"*). Include distinguishing details such as colour and brand so similar items are not confused.
- **Room (if known):** where the item was found. This can be a room number or a shared area such as *Lobby* or *Pool*.
- **Select / take photo:** a picture of the item. **You can take it straight from a phone.** The photo is the most practical way to confirm you are handing over the right item.
---
## 3. Table columns
- **PHOTO:** the item's image.
- **ITEM:** the description.
- **ROOM:** where it was found.
- **FOUND BY:** the staff member who found it.
- **DATE:** the date and time of the record.
- **STATUS:** the item's current status.
---
## 4. Update Status
Opening a record lets you change its status:
- **Found (pending):** you have the item, the owner has not come forward.
- **Returned to owner:** the item has been handed over.
- **Archive:** for items nobody has claimed for a long time. Removes it from the list without deleting the record.
**Note (who collected it, when, etc.):** record the handover here. If a dispute arises later you have a record — we recommend noting the staff member who handed it over, the person who collected it, and the time.
Confirm your changes with **Save**.
---
> **Related pages:** **Hotel Solution → Request Management**, **Room Board**, **Guests → Hotel Guests**.
# Hotel Studio
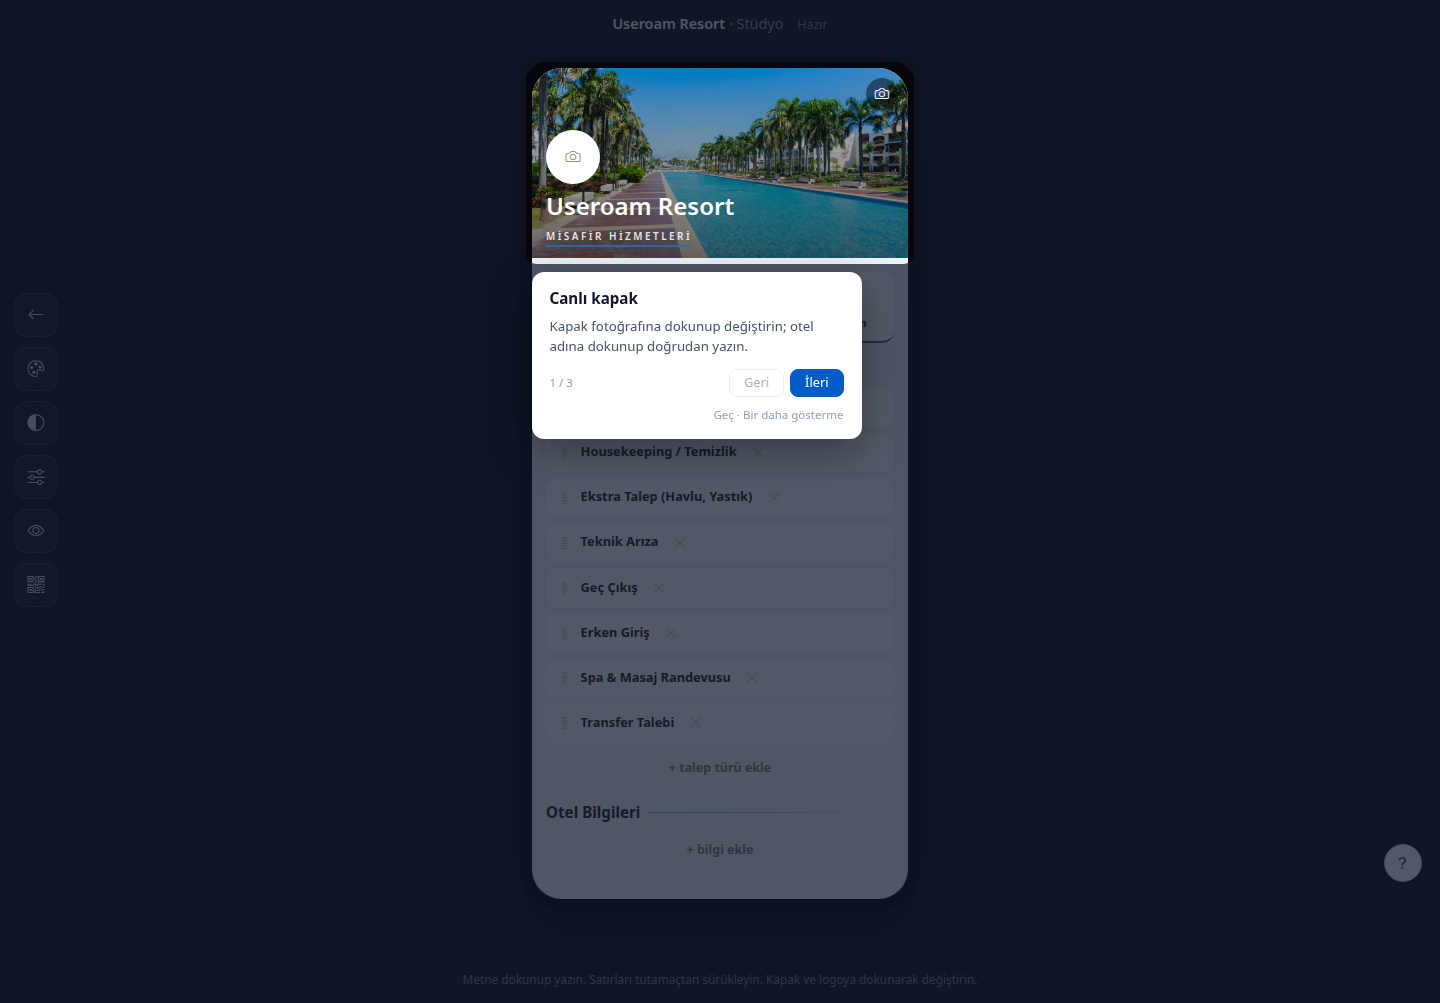
Hotel Studio is where you **edit the design of the guest page directly on a live preview**. Tap the text and type, drag rows by their handle, tap the cover or logo to replace them — no code required.
> **How do I open this screen?** From the left menu, go to **Bumerang → BUSINESS → Studio**. (The **Studio** button on the Hotel Guest Portal screen opens it too.)
---
## 1. Direct editing
- **Text:** tap any text on the page and type straight into it.
- **Order:** reorder rows by dragging the handle on the left.
- **Cover and logo:** tap the cover photo or the logo to replace it.
- **Hotel name:** tap the heading and type.
Page sections are managed here too: **+ add request type** adds a new request type and **+ add information** adds a new hotel-information row.
---
## 2. Ready-made themes
Choosing a theme bundle changes all colours and typography in one move:
- **Automatic / my own theme** — keeps your existing settings.
- **Resort** — warm gold, night tones.
- **Boutique** — anthracite and champagne.
- **Coastal** — pale sand and sea.
- **Business** — navy and brass.
---
## 3. Typography and shape
- **Font:** ready-made pairings for heading and body — *Corporate (Lora + Inter)*, *Editorial (Fraunces + Inter)*, *Clean (Inter)*, *Luxury (Cormorant + Inter)*, *Classic (Cormorant + Nunito)*, *Modern (Oswald + Rubik)*, *Elegant (Lora + Noto Sans)*, *Soft (Quicksand)*, *Plain (Rubik)*.
- **Font size:** Small / Medium / Large.
- **Corner rounding:** Low / Medium / High.
- **Shadow:** None / Light / Pronounced.
- **Spacing:** Tight / Medium / Wide.
- **Secondary accent colour:** set with a colour picker.
---
## 4. Cover settings
- **Cover height:** Short / Medium / Tall.
- **Background:** theme default, solid colour, gradient or pattern.
- **Pattern:** none, dots, lines, squares or diagonal.
- **Cover dimming:** Light / Medium / Dark. This setting determines how readable the text over the image is — increase the dimming on light-coloured photos.
- **Cover text position:** Top / Middle / Bottom.
---
## 5. Buttons
- **Button style:** *Filled* or *Outlined*.
- **Button rounding:** Low / Medium / Full.
---
## 6. Finding images
- **Upload my own photo:** upload your own image.
- **Suggest a free image:** type a keyword in the search box (for example *pool, spa, lobby*) to get royalty-free image suggestions. A practical option when you have no professional photography.
The **Reset to theme** button returns every visual setting to the selected theme's defaults.
---
> **Related pages:** **Hotel Solution → Guest Portal** (content and request types), **Retail Studio**.