Installation Guides
Step-by-step firewall & gateway integration guides for Useroam Cloud Hotspot and 5651 logging.
- Ruijie Integration Guide
- Sophos API Connection
- Fortigate Integration Guide
- Sophos Integration Guide
- Palo Alto Integration Guide
Ruijie Integration Guide
This guide walks you through the complete integration between a Ruijie / Reyee gateway and Useroam Cloud — captive portal authentication (WiFiDog external portal) and legal 5651 syslog forwarding.
Before you start: you need administrator access to the Ruijie web interface, the gateway's active WAN IP address, and the hardware serial number printed on the device label.
1 - Adding the device to the Useroam panel
First, sign in to your panel at panel.useroam.com and add a New Device.
- Device Type: select Ruijie.
- 5651 Logging: tick the 5651 Logging checkbox.
- Device Serial Number: [CRITICAL STEP] enter the original hardware serial number in full, exactly as printed on the label underneath the device or as shown in the web interface. The Ruijie integration will not work reliably unless this serial number is correct.
- Device Address: enter the active WAN IP address the gateway uses to reach the internet.

2 - Allowlist settings for trusted IPs (Allowlist → Dest. IP)
In the Ruijie management interface, go to Object > User Authentication > Authentication Settings from the top menu. Under the Allowlist tab, select the Dest. IP option and allow the Useroam Cloud server IP address (104.247.174.120) together with your hotspot service networks.

3 - Allowlist settings for trusted domains (Allowlist → URL)
Switch to the URL tab in the same menu. Add *.useroam.com to the allowlist — guests must be able to reach it before they authenticate. Also define URL rules for the messaging and operating-system captive-portal detection domains that mobile devices use to verify the hotspot network in the background (for example the WhatsApp networks).

4 - External Portal & WiFiDog authentication template
From the left-hand menu, open Authentication Template and select the External Portal tab. Enable WiFiDog Authentication, then create the template:
- Version: select Wifidog V1.
- Authentication Template Name:
useroam - Server URL:
http://104.247.174.120/ruijie-cloud/ - Permission Mode: select Do Not Permit.
- Sending Source: leave as Default.

5 - Authentication policy (Edit Authentication Policy)
As the final configuration step, go to Authentication Policy in the left menu and either add a new rule or edit your existing guest policy:
- Name:
useroam - Enabled State: set to Enable.
- Src. Security Zone: select the zone your guest network belongs to (for example
Guest). - Src. Address:
any - Authentication Action: tick Authentication.
- Authentication Template Name: select the
useroamtemplate you created in the previous step and save.

6 - Forwarding logs to Useroam (Syslog config)
So that guest internet traffic and hotspot session activity can be legally signed under Turkish Law No. 5651, the logs must be forwarded to the Useroam Cloud server. In the Ruijie management interface go to Advanced > Syslog and use the Add button to define a new syslog server:
- Syslog Server Status: set to Enable.
- Server IP: enter the Useroam Cloud IP address
104.247.174.120. - Server Port:
514(the default syslog port).

Important — integration complete
That's it. Useroam Cloud Hotspot and the legal 5651 syslog integration are now fully configured on your Ruijie / Reyee gateway. Remember to update the Useroam panel whenever the device serial number or WAN IP address changes, otherwise the integration will stop working. For assistance during the process, contact our technical team at destek@useroamteknoloji.com.
Login with WhatsApp — firewall allowlist (walled garden)
For the Login with WhatsApp flow to work while the guest is still behind the captive portal (before internet access is granted), the following addresses must be allowed in your firewall or walled-garden configuration. Without these rules the WhatsApp login screen will not open and the automatic login based on delivery confirmation will not work.
Domains to allow (FQDN)
*.wa.me*.whatsapp.com*.whatsapp.netg.whatsapp.netmmg.whatsapp.netfbsbx.com*.useroam.com
IP addresses to allow
157.240.0.0— Meta / Facebook network block31.13.0.0— Meta / Facebook network block104.247.174.120— Useroam panel
Note: 157.240.0.0 and 31.13.0.0 are typically /16 network blocks (Meta infrastructure); we recommend defining them as blocks in the firewall (157.240.0.0/16, 31.13.0.0/16). 104.247.174.120 is the Useroam panel IP (/32). Use the domain list if your firewall supports FQDN-based filtering; otherwise use the IP blocks.
Sophos API Connection
Useroam uses the Sophos Firewall API to create and remove hotspot user sessions automatically. This page shows how to create the API user and grant the API permission on the Sophos side.
When do I need this? Complete these steps after the Sophos Integration Guide, whenever Useroam has to manage users over the API.
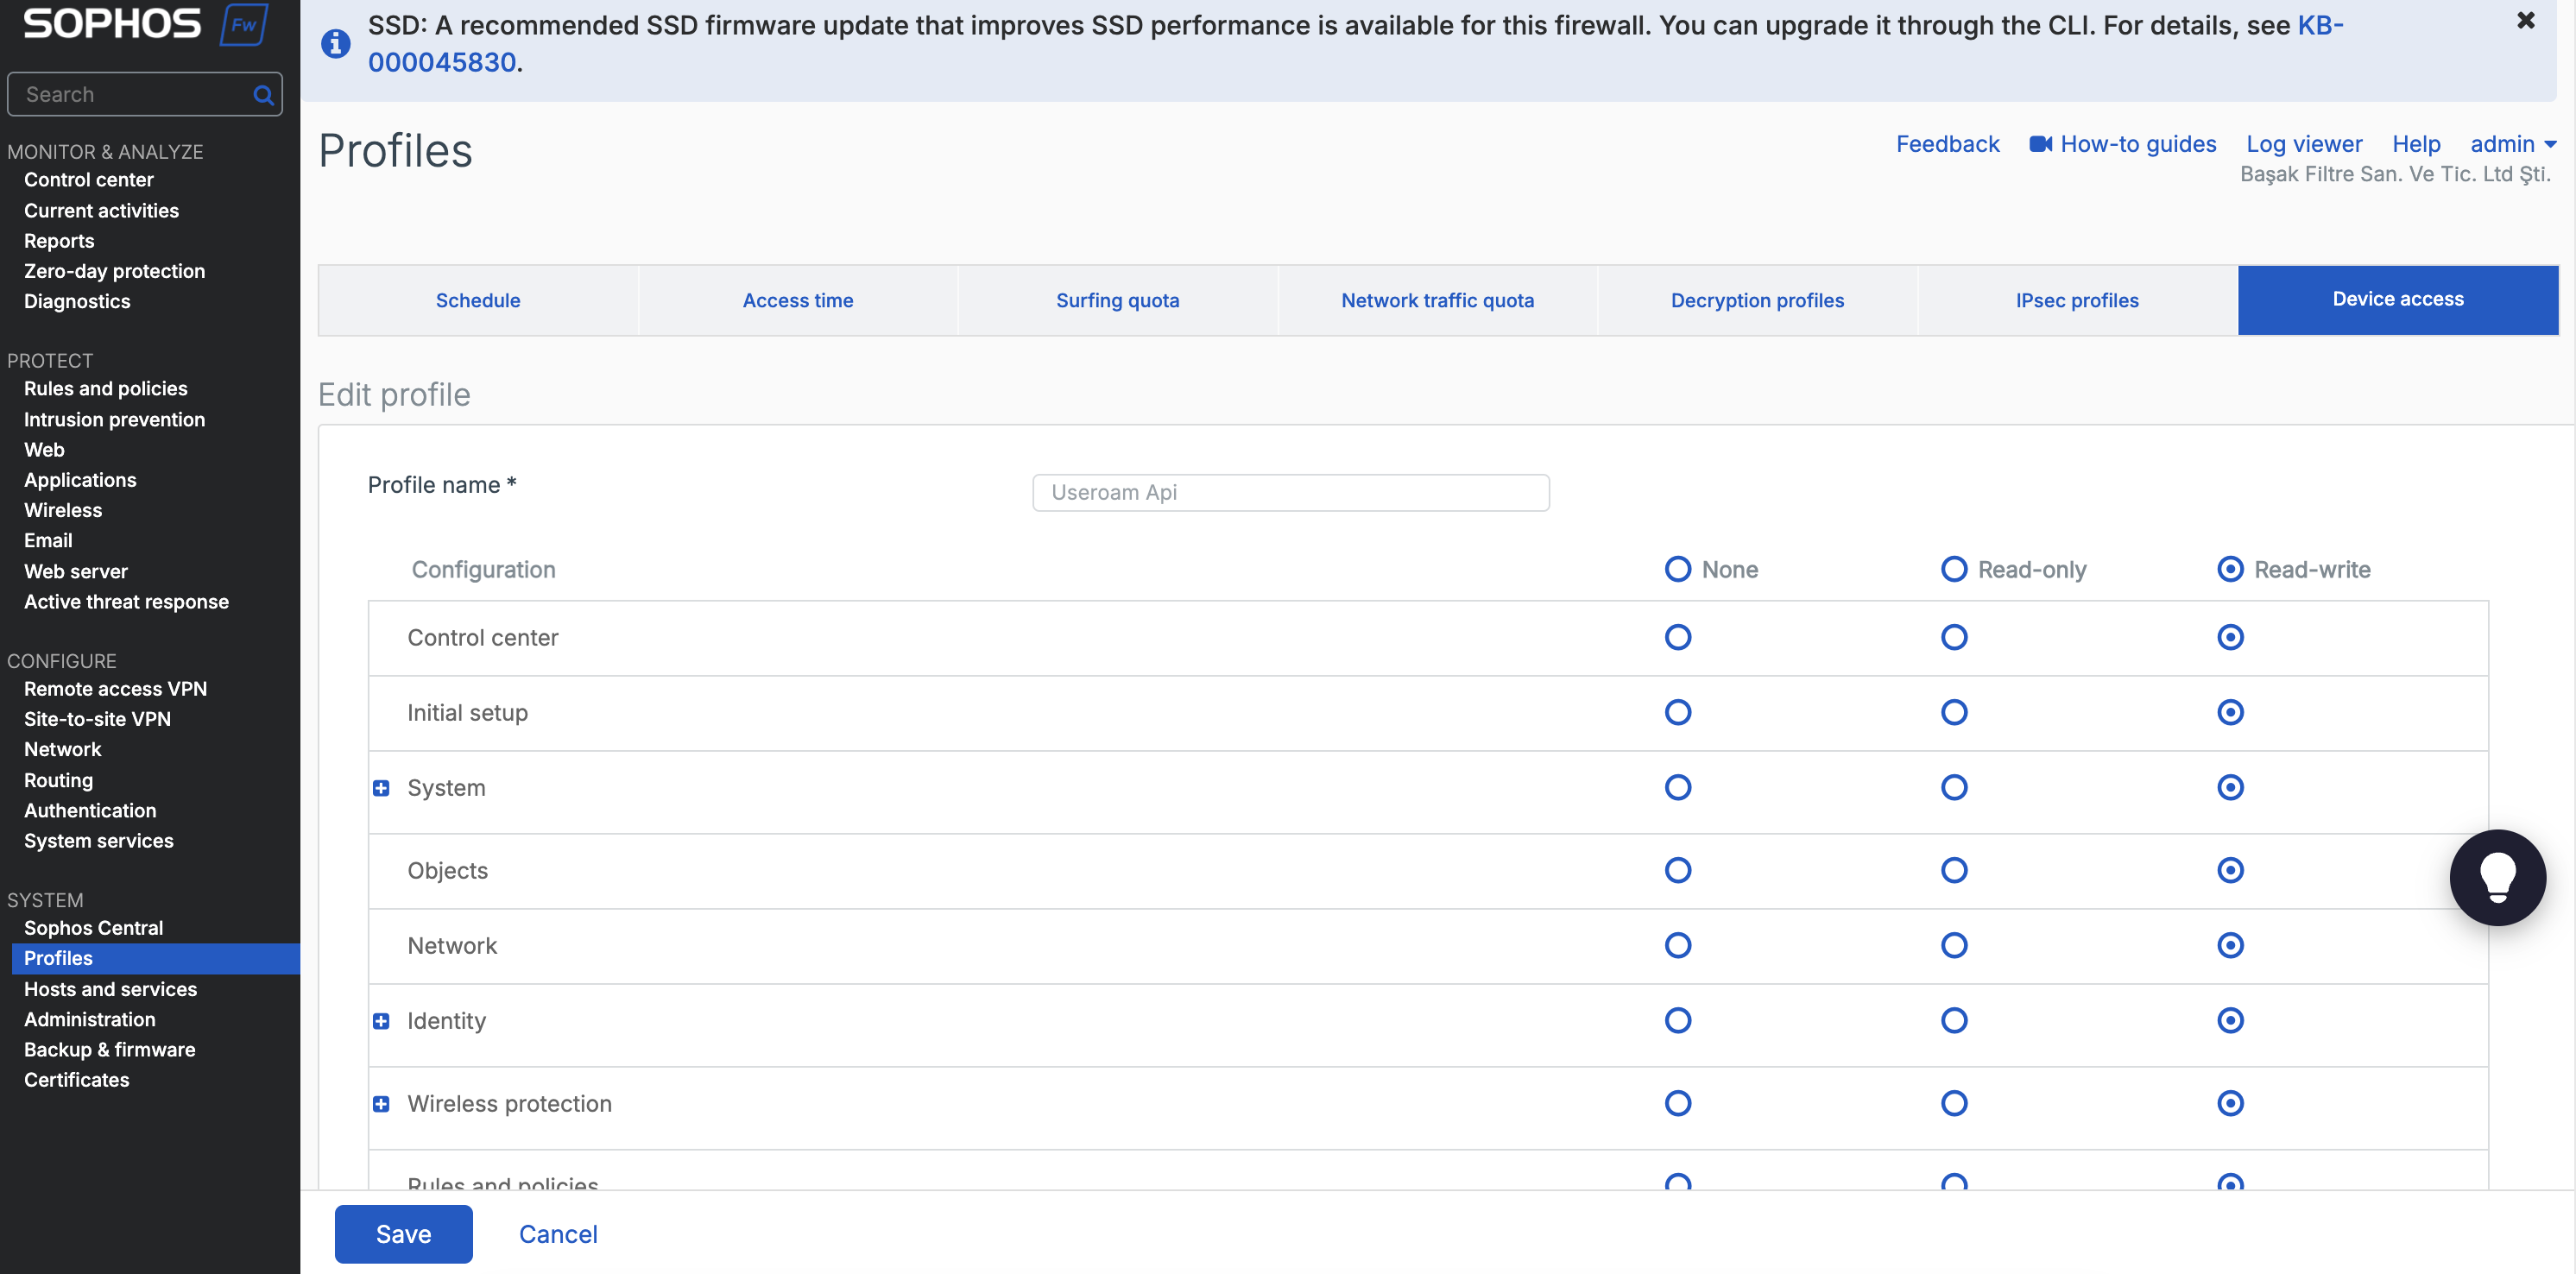
Creating a new profile
In Sophos, go to Profile > Device Access in the left menu and create a new profile. Grant all permissions.
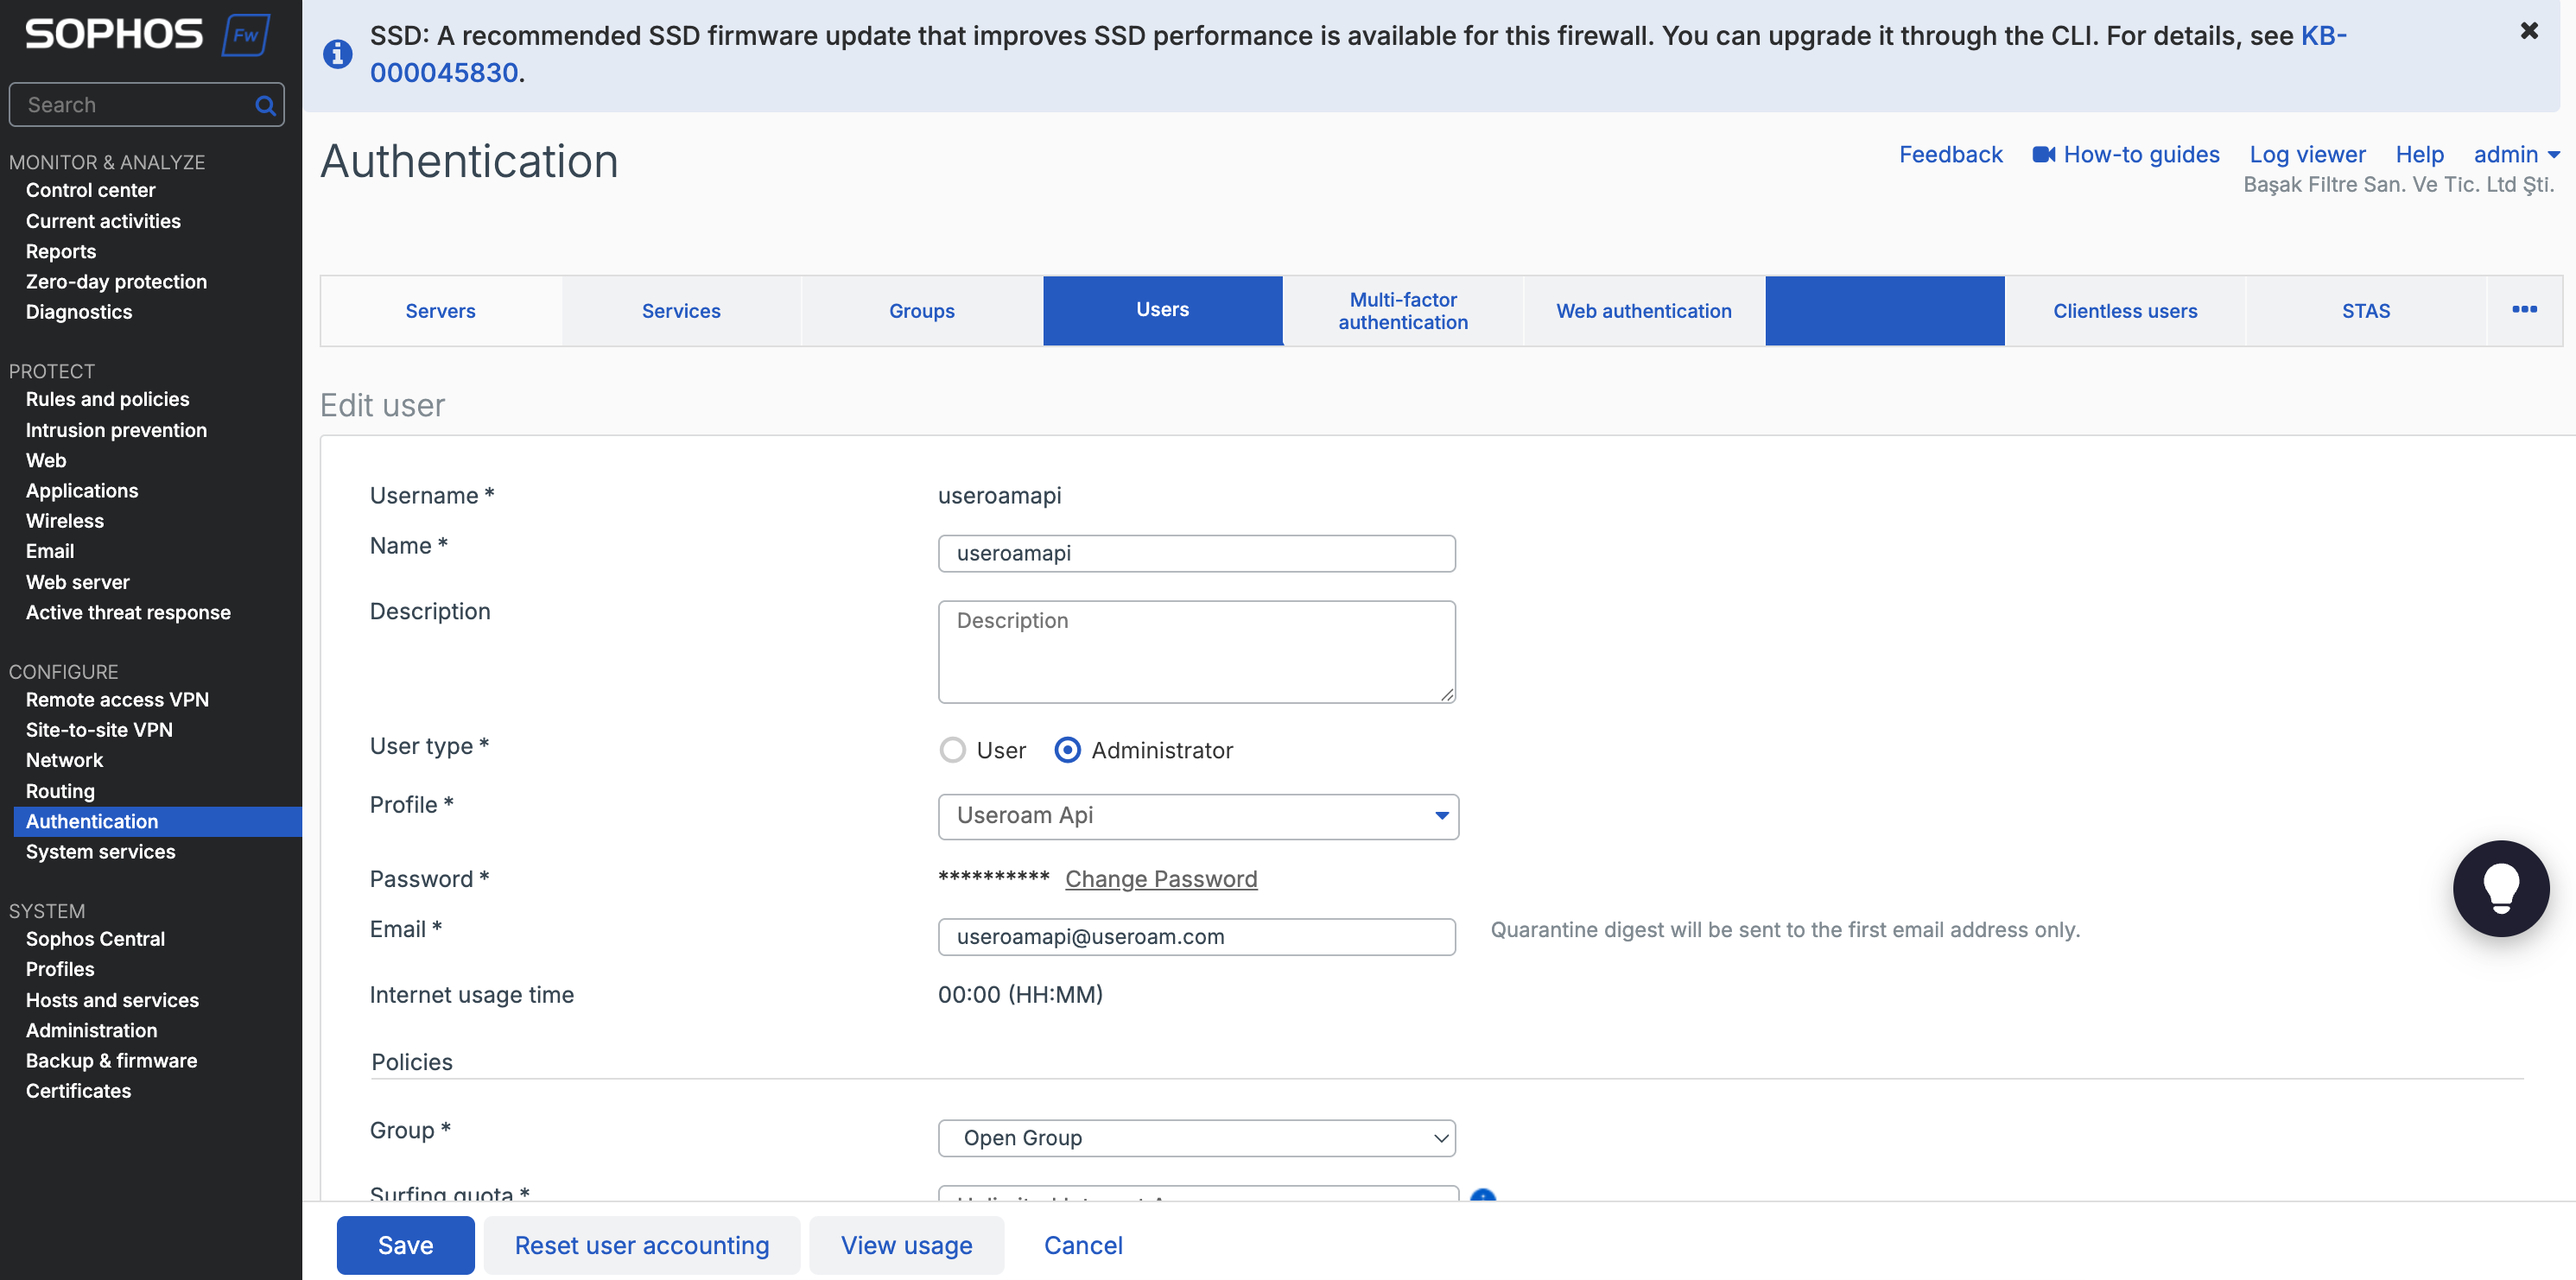
Creating the API user
In Sophos, go to Authentication > Users > New user in the left menu and create a new user. For User Profile, select the profile you created in the previous step.
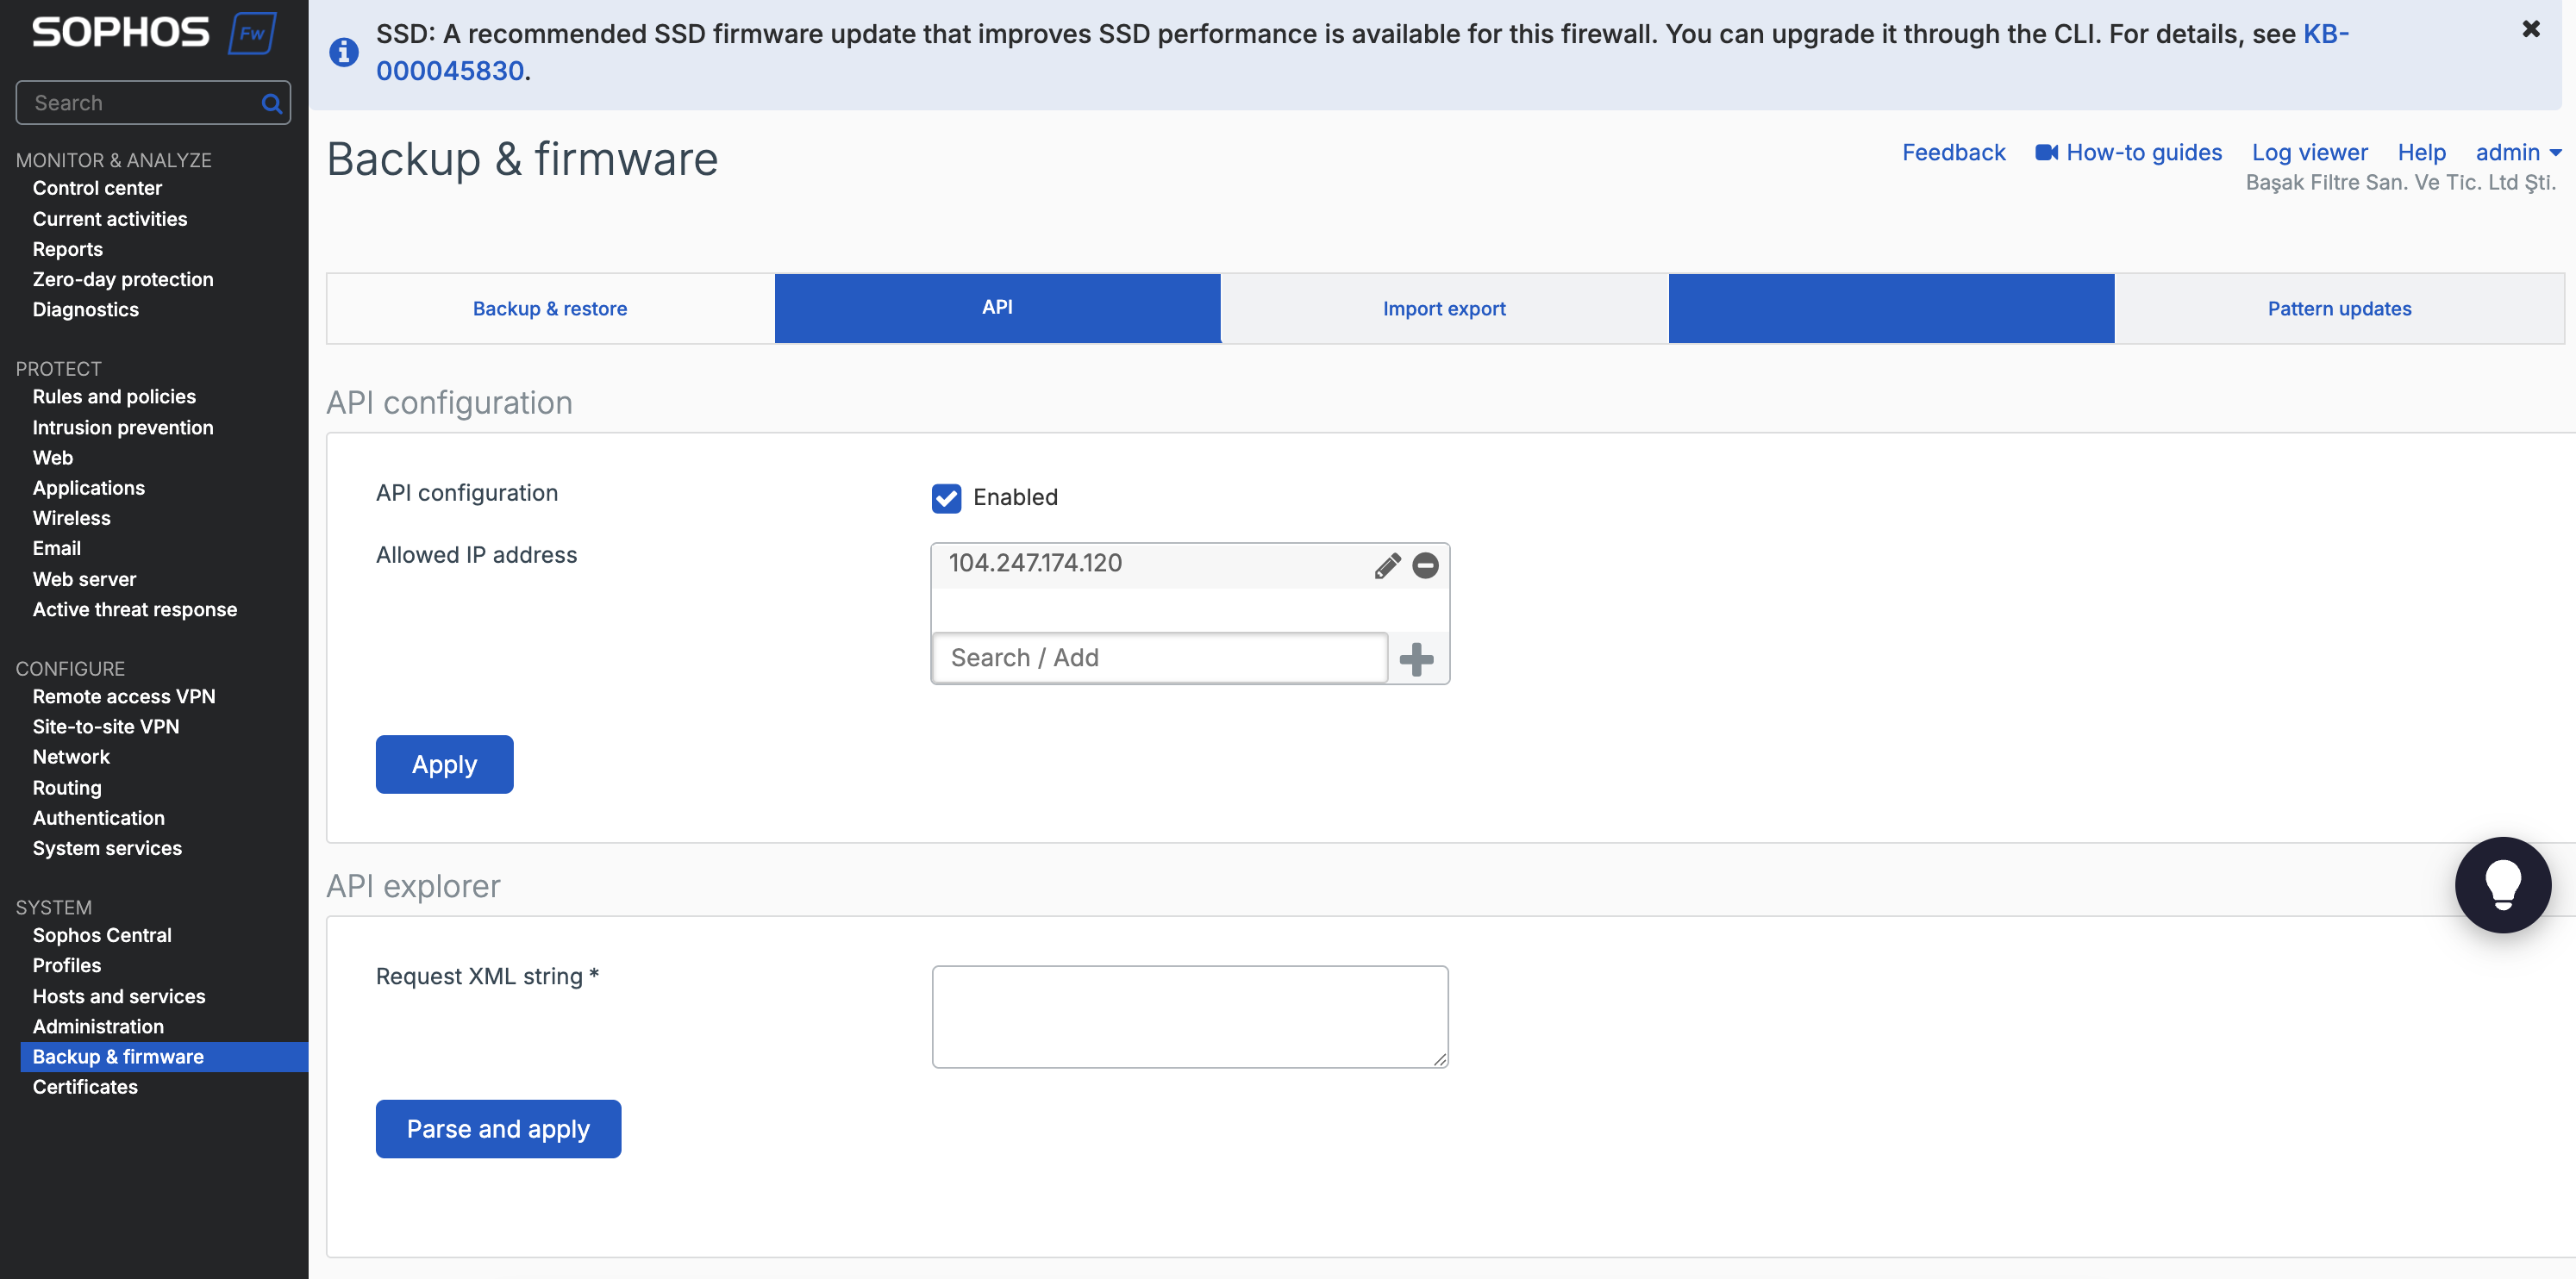
Granting the API permission
In Sophos, open Backup & Firmware from the left menu, switch to the API tab, add the entry below to the API Configuration field and click +.
Tip: the API user's credentials must match the ones entered on the device record in the Useroam panel. If you change the password later, update it in the panel as well.
Fortigate Integration Guide
This guide covers the full integration between a FortiGate firewall and Useroam Cloud: RADIUS authentication, the captive portal replacement messages, the firewall policies, and 5651 syslog forwarding.
Before you start: you need administrator access to the FortiGate web interface (and CLI access if a second syslog server is required), plus the WAN IP address of the firewall.
1 - Adding the device to the Useroam panel
Sign in to your panel at panel.useroam.com and add a New Device. The system selects your license automatically.
- Device type: select Fortinet.
- Device address: enter the WAN IP address of the firewall. If you have more than one WAN IP, the firewall usually sends this request from the first WAN interface by default.
Note: if you want the traffic to leave over a different WAN interface, create an SNAT rule to route it through the interface you want.

2 - Adding the RADIUS server
On your firewall, go to User & Authentication > RADIUS Servers and click Create New to define the Useroam Cloud server.
- Authentication method: Specify / PAP
- Primary Server IP/Name:
panel.useroam.com, or by IP address:104.247.174.120 - Secret: after adding the device in Useroam Cloud, copy the automatically generated device password from Settings > Device Settings and paste it here.
Test Connectivity: you can run a RADIUS test from your firewall against Useroam Cloud.


3 - Captive portal messages (Replacement Messages)
Three fields under System > Replacement Messages need their code replaced. Switch to Extended View from the top-right corner first.
3A - Login Failed Page
Search for Login Failed Page. On the screen that opens, clear the code area on the right, paste in {"Error":"passwordwrong", "ErrorType":"passwordwrong"} and save.


3B - Authentication Success Page & Login Page
Search for Authentication Success Page. Clear the code area on the right, paste in {"Error":"success", "ErrorType":"success"} and save.
Finally, for Login Page, paste the entire code you copied from the Useroam Cloud panel (Settings > Device Settings).

4 - Creating the user group (User Groups)
Go to User & Authentication > User Groups and create a group for Useroam Cloud.

5 - Interface configuration
On the firewall, edit the relevant port from the Interface menu.
- DNS Server: first enter the firewall's gateway IP for this interface, then define the DNS servers.
- Security Mode: enable Captive Portal.
- User Access: Restricted to Groups
- User Groups: select the group you created in the previous step (for example Open Group).
- Exempt destinations/services: create an FQDN object for
panel.useroam.comand select it.

Creating the firewall policies
To create the rules, go to Policy & Objects > Firewall Policy on the FortiGate firewall.
RULE 1: Guest to DNS
Create your DNS rule first. Selecting only the DNS service is enough.

RULE 2: Guest to Useroam
This rule lets users in the zone where you enable Useroam reach the panel.useroam.com panel. Under Service, select the HTTP/HTTPS services.

RULE 3: Guest to Internet
This rule is your general internet access rule. Add the User Group (Open Group) object you created as the Source, and the ALL service under Service.


Forwarding logs to the Useroam device
Under Log & Report > Log Settings, set Syslog logging to Enable. Then enter the server details in the IP Address/FQDN field as panel.useroam.com.

syslogd2 already contains another configuration, you can use the example command block below:config log syslogd2 settingset status enableset server "panel.useroam.com"set port 514set format defaultend
Important — integration complete
That's it — your FortiGate integration is complete. If you run into any problems during the process, contact our support team at destek@useroamteknoloji.com.
Login with WhatsApp — firewall allowlist (walled garden)
For the Login with WhatsApp flow to work while the guest is still behind the captive portal (before internet access is granted), the following addresses must be allowed in your firewall or walled-garden configuration. Without these rules the WhatsApp login screen will not open and the automatic login based on delivery confirmation will not work.
Domains to allow (FQDN)
*.wa.me*.whatsapp.com*.whatsapp.netg.whatsapp.netmmg.whatsapp.netfbsbx.com*.useroam.com
IP addresses to allow
157.240.0.0— Meta / Facebook network block31.13.0.0— Meta / Facebook network block104.247.174.120— Useroam panel
Note: 157.240.0.0 and 31.13.0.0 are typically /16 network blocks (Meta infrastructure); we recommend defining them as blocks in the firewall (157.240.0.0/16, 31.13.0.0/16). 104.247.174.120 is the Useroam panel IP (/32). Use the domain list if your firewall supports FQDN-based filtering; otherwise use the IP blocks.
Sophos Integration Guide
This guide covers the full integration between a Sophos Firewall and Useroam Cloud: RADIUS authentication, web authentication, the captive portal template, the firewall rules, and 5651 syslog forwarding.
Before you start: you need administrator access to the Sophos web interface and the WAN IP address of the firewall. If Useroam will also manage users over the API, complete the Sophos API Connection page afterwards.
1 - Adding the device to the Useroam panel
Sign in to your panel at panel.useroam.com and add a New Device. The system selects your license automatically.
- Device type: select Sophos.
- Device address: enter the WAN IP address of the firewall. If you have more than one WAN IP, the Sophos device sends this request from the first WAN interface by default.
Note: if you want the traffic to leave over a different WAN interface, create an SNAT rule to route it through the interface you want.

2 - Device Access settings
Go to Administration > Device Access. For the zone where you will use Useroam, enable only the Captive Portal and DNS options.

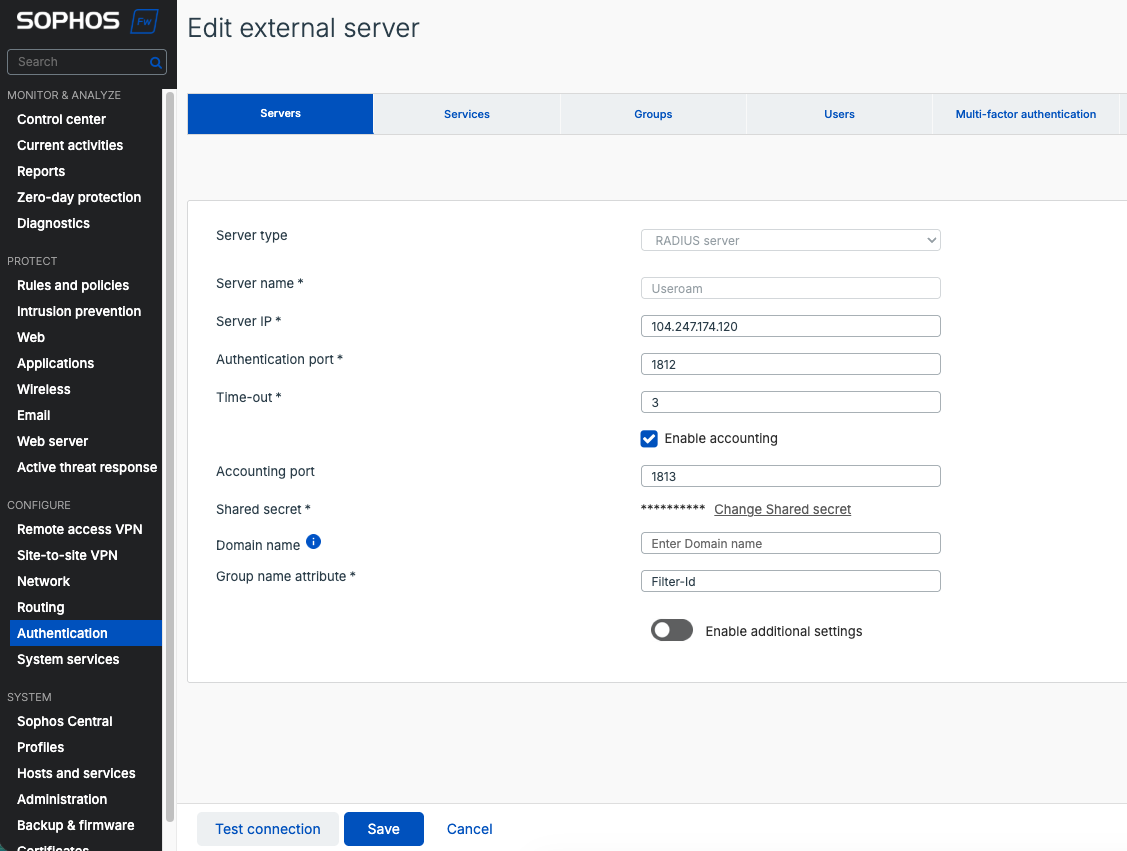
3 - Adding the RADIUS server
Add a new RADIUS server from Authentication > Servers. In the Server IP field, enter the IP address you get when you ping panel.useroam.com.
Then copy the code shown next to Device Password under Useroam > Settings > Device Settings and paste it into the Shared Secret field.

4 - Connection test (optional)
If you want to test at this point: create a new user in the Useroam Cloud panel via Guests > New User, then check the connection with Test Connection inside the RADIUS server settings on the firewall.

5 - Authentication priority (Authentication Methods)
Go to Authentication > Services, move Useroam to the top of the Firewall Authentication Methods list, and click Apply to save.

6 - Web authentication settings
Move on to Authentication > Web Authentication. Under Sign Out User, tick When User is Inactive.
In the Traffic flow section next to it, set 1440 minutes (24 hours) for 100 bytes. With this setting, every connected device stays signed in on the firewall as long as it transfers at least 100 bytes within 24 hours. You can shorten this period if you prefer.
Finally, tick "Use insecure HTTP instead of HTTPS" and save.

7 - Integrating the captive portal design (Custom HTML)
In Useroam, go to Settings > Device Settings and copy the whole block that starts with the <html> line. Paste it into Authentication > Web Authentication > Captive portal appearance > Custom HTML on the Sophos firewall and save.


Creating the firewall rules
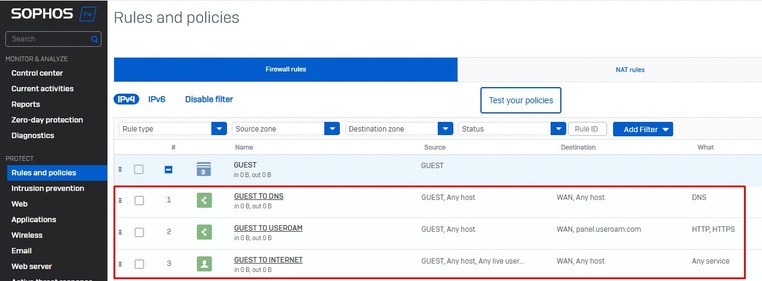
To create the rules, go to Protect > Rules and Policies on the Sophos firewall and open the Add Firewall Rule page.
RULE 1: Guest to DNS
Every device sends a DNS query to a vendor-specific domain to work out whether the network it joined has internet access (for example captive.apple.com).
When the answer comes back, the device concludes it has internet and starts passing traffic. Without it, the hotspot redirect will not happen.
This rule must sit above the guest internet access rule.

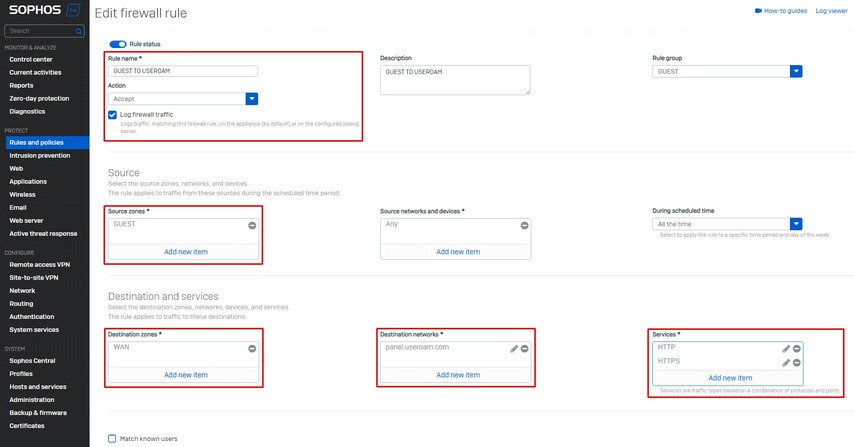
RULE 2: Guest to Useroam
This rule lets devices on your guest network reach *.useroam.com. Selecting HTTP/HTTPS under Services is enough.
RULE 3: Guest to Internet
This rule provides internet access for your devices.
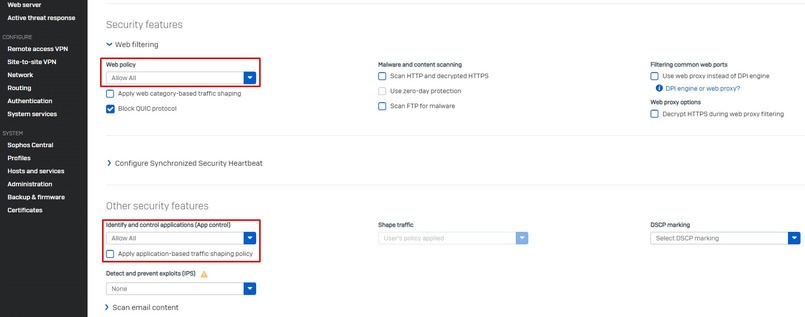
Tick the Log Firewall checkbox. So that unknown users are shown the hotspot screen, also tick Match Known Users and Use Web Authentication For Unknown Users. For Web Policy and Identify And Control Applications (App Control), select Allow All or any policy you prefer.

Forwarding logs to the Useroam device
1 - Defining the syslog server
First go to System Services > Log Settings and define a new syslog server.

2 - Entering the syslog details and starting
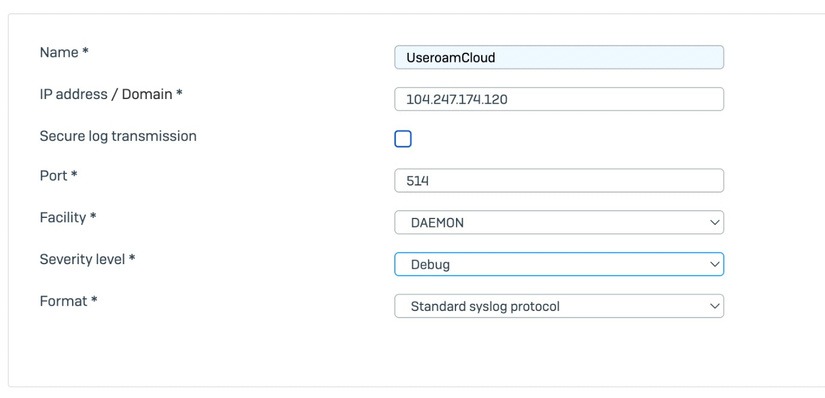
Fill in the following details for the newly added syslog server:
- Name: Useroam Cloud
- IP address / Domain:
104.247.174.120 - Port:
514 - Facility: DAEMON
- Severity level: Debug
- Format: Standard syslog protocol
Then, on the row for the newly added syslog server, select only the Content Filtering fields to start sending logs to Useroam.

3 - Checking the log packets
Afterwards, go back to the Useroam panel to confirm that packets are arriving from the firewall. Check the General Statistics area in the top-right corner and look at the section under Pending Signature.

Important — integration complete
Your Sophos integration is complete. If you run into any problems during the process, contact our support team at destek@useroamteknoloji.com.
Login with WhatsApp — firewall allowlist (walled garden)
For the Login with WhatsApp flow to work while the guest is still behind the captive portal (before internet access is granted), the following addresses must be allowed in your firewall or walled-garden configuration. Without these rules the WhatsApp login screen will not open and the automatic login based on delivery confirmation will not work.
Domains to allow (FQDN)
*.wa.me*.whatsapp.com*.whatsapp.netg.whatsapp.netmmg.whatsapp.netfbsbx.com*.useroam.com
IP addresses to allow
157.240.0.0— Meta / Facebook network block31.13.0.0— Meta / Facebook network block104.247.174.120— Useroam panel
Note: 157.240.0.0 and 31.13.0.0 are typically /16 network blocks (Meta infrastructure); we recommend defining them as blocks in the firewall (157.240.0.0/16, 31.13.0.0/16). 104.247.174.120 is the Useroam panel IP (/32). Use the domain list if your firewall supports FQDN-based filtering; otherwise use the IP blocks.
Palo Alto Integration Guide
This guide covers the full integration between a Palo Alto firewall and Useroam Cloud: zone and interface configuration, RADIUS authentication, certificates, the Authentication Portal, DNS, log forwarding, and the firewall rules.
Before you start: you need administrator access to the Palo Alto web interface, the external interface IP address the firewall will use to talk to Useroam, and your SSL certificate together with its key file and password.
1 - Adding the firewall to the panel
First sign in to your panel at panel.useroam.com and add a New Device. In the Device Address field, enter the external interface IP address the firewall will use to communicate.
- Device type: select PaloAlto.
- 5651 Logging: tick the 5651 Logging checkbox.

2 - Zone settings
For the interface where Useroam will be enabled, create a new zone under Network > Zone and tick Enable User Identification.

3 - Interface and profile settings
On the interface where Useroam will be enabled, create a new profile from the Advanced section. While doing so, tick the Response Pages checkbox.

4 - RADIUS settings
Apply the settings below under Device > Server Profiles > RADIUS:
- Authentication Protocol: PAP
- RADIUS Server / FQDN:
panel.useroam.com - Secret: the device password you obtained from Settings > Device Settings in panel.useroam.com

5 - Authentication Profile
Define the new profile under Device > Authentication Profile.
- Type: RADIUS
- Server Profile: select the RADIUS server profile you created.
- Retrieve user group from RADIUS: make sure this checkbox is ticked.
- Advanced: add the
allobject to the Allow List.

6 - Certificate configuration
Before the certificates are installed on the device, the relevant root certificates (Root CA or Intermediate) must already be added to the system. This completes the certificate trust chain and prevents SSL/TLS errors on the client devices that connect.
6A - Importing the Root CA
As the first step, import the Root CA or CA certificate.

6B - Uploading the certificate and key file
Next, upload the certificate file to the firewall together with the key file and its password.

6C - Verifying the layered certificate chain
Once the upload is complete, the view should show a layered structure — a certificate chain in which the entries are linked to one another.

7 - Authentication Portal settings
Next, open the Settings section under Device > User Identification > Authentication Portal.
- Enable Authentication Portal: tick this option to activate the hotspot.
- Idle Timer and Timer: enter the maximum value, 1440 minutes (24 hours), in both fields. This means a user sees the hotspot screen only once a day. We use this value because we want the hotspot screen to appear once every 24 hours; if you prefer shorter sessions, adjust it to suit your needs.
- SSL/TLS Service Profile: select the SSL profile you created earlier. Note that on some Palo Alto versions, previously created profiles may not appear in this field. In that case, use the New option to create a new SSL/TLS profile from this screen. If your system does let you select one, you can use the existing profile.

If you need to create a new profile, follow these steps:
- Give the profile a name and select the SSL certificate to be used.
- Under Protocol Settings, choose the minimum and maximum SSL/TLS versions you want to support.
- When the settings are complete, click OK to save the profile.
- Authentication Profile: continue by selecting the Useroam profile you created.
- Session Cookie / Timeout: enter 1440 minutes (24 hours) here as well, matching the value set above.
- Redirect Host: enter the subdomain here, since the redirect is performed over the certificate.
8 - Uploading the captive portal design (Comfort Page)
In panel.useroam.com, go to Settings > Device Settings and copy the entire code block that starts with <html>. Paste it into a text editor and save it in HTML format under a name such as captive.html. Then upload that document on the firewall via Device > Response Pages > Captive Portal Comfort Page.

9 - DHCP settings
So that DNS queries from the internal network are handled without problems, the DHCP and DNS Proxy configuration must be updated if you do not have a separate DNS server. Go to Network > DHCP > Options.
- Primary DNS: enter the firewall's own interface IP address.
- Secondary DNS: you can define a global DNS server (for example
8.8.8.8— Google DNS).
Note: if you already have an internal DNS server, add the record required for the domain redirect to your internal DNS as well (in the Static Entries section) and continue from step 11.

10 - DNS Proxy settings
Next, define a new proxy under Network > DNS Proxy so DNS queries resolve correctly.
- Interface: select the interface(s) where Useroam will be active.
- Primary / Secondary DNS: enter the global DNS servers.
- Static Entries: click Add to create a new record. At this stage it is important that the IP used for the redirect is the gateway IP address of the firewall's Management Interface.

11 - Forwarding logs to Useroam (Log Forwarding)
Go to Objects > Log Forwarding and add a new profile with Add. A separate profile must be created for each of the five log types (auth, data, decryption, traffic, url). For every entry, remember to select the Useroam profile in the Syslog section.


Creating the firewall rules
Two sets of rules are needed for the Palo Alto integration. When you first create the rules, Palo Alto needs to learn the traffic — so set Service to Any at first and change it to application-default afterwards.
12A - RULE SET 1: Authentication rules
Go to Policies > Authentication and define the three rules below. Useroam must be selected in the Log Forwarding field on every rule.

- RULE 1 (Allow DNS): created so DNS queries pass through the authentication stage without problems. All DNS queries towards the WAN are allowed by selecting
default-no-captive-portalunder Authentication Enforcement. - RULE 2 (Allow Useroam Cloud): this rule provides trouble-free access to Useroam Cloud. In the Destination Address field, select the
UseroamCloud(panel.useroam.com) FQDN address object you created. - RULE 3 (Captive redirect): the main rule that redirects HTTP and HTTPS traffic of users who have not yet signed in — or who are joining the network for the first time — to
default-web-form, i.e. the captive portal screen.

12B - RULE SET 2: Security rules
Go to Policies > Security. On every rule, Log at Session End must be selected under Log Settings and Useroam must be assigned in Log Forwarding.

- RULE 1 (Allow WAN DNS): lets every device run DNS queries over the WAN without being caught by the captive portal. It is required so the device can reach its own global captive-detection domain (for example
captive.apple.com), conclude that internet access exists, and then trigger the hotspot screen. - RULE 2 (Allow Useroam access): defined so devices in the captive portal zone can reach panel.useroam.com through the firewall without problems.
- RULE 3 (Allow internet access): the final rule that gives your guest network internet access. On this rule, the Source User value in the Source section must be set to
known-user.
Additional technical note (disconnecting a signed-in user): to end an active guest session or clear its cache, sign in to the Palo Alto CLI and run the following commands in order.
To list all signed-in active users and their IP addresses:
show user ip-user-mapping allTo drop the relevant IP address from the network, run:
clear user-cache ip <ip-address>debug user-id reset captive-portal ip-address <ip-address>
Important — integration complete
That's it — your Palo Alto integration and server change are complete. If you run into any technical problems during the process, contact our support team at destek@useroamteknoloji.com.
Login with WhatsApp — firewall allowlist (walled garden)
For the Login with WhatsApp flow to work while the guest is still behind the captive portal (before internet access is granted), the following addresses must be allowed in your firewall or walled-garden configuration. Without these rules the WhatsApp login screen will not open and the automatic login based on delivery confirmation will not work.
Domains to allow (FQDN)
*.wa.me*.whatsapp.com*.whatsapp.netg.whatsapp.netmmg.whatsapp.netfbsbx.com*.useroam.com
IP addresses to allow
157.240.0.0— Meta / Facebook network block31.13.0.0— Meta / Facebook network block104.247.174.120— Useroam panel
Note: 157.240.0.0 and 31.13.0.0 are typically /16 network blocks (Meta infrastructure); we recommend defining them as blocks in the firewall (157.240.0.0/16, 31.13.0.0/16). 104.247.174.120 is the Useroam panel IP (/32). Use the domain list if your firewall supports FQDN-based filtering; otherwise use the IP blocks.