**Before you start:** you need administrator access to the WLC web interface, the **public IP address** the WLC uses to reach the internet, and IOS-XE 17.x. The screens in this guide are from 17.15; menu names are the same in other 17.x releases.
**The Useroam server address is 104.247.174.120 everywhere.** The RADIUS server, the login page address and the pre-authentication allow list (ACL) all use this IP. Do not use any other address.
**Is the controller behind a firewall?** If guest login is handled by a firewall such as FortiGate or Sophos, the WLC settings in this guide are not needed; the WLC only broadcasts an open SSID. Follow the firewall guide instead: [FortiGate](https://help.useroam.com/books/installation-guides/page/fortigate-integration-guide), [Sophos](https://help.useroam.com/books/installation-guides/page/sophos-integration-guide).
### 1 - Add the Device in the Useroam Panel Log in at [panel.useroam.com](https://panel.useroam.com) and open the **New Device** screen. - **Device Type:** select `Cisco`. - **5651 Logging:** enable it if the device doing the internet breakout (firewall or router) sends its logs to Useroam. - **Device Address:** **\[CRITICAL STEP\]** enter the public IP the WLC uses to reach the internet. If the WLC is behind NAT, enter the NAT egress IP. Useroam identifies the device by this IP and RADIUS requests must come from it. Do not enter the WLC's internal IP (192.168.x.x, 10.x.x.x). - **Device Name:** the name you will see in the panel (e.g. "Hotel WLC"). Click **Save**. [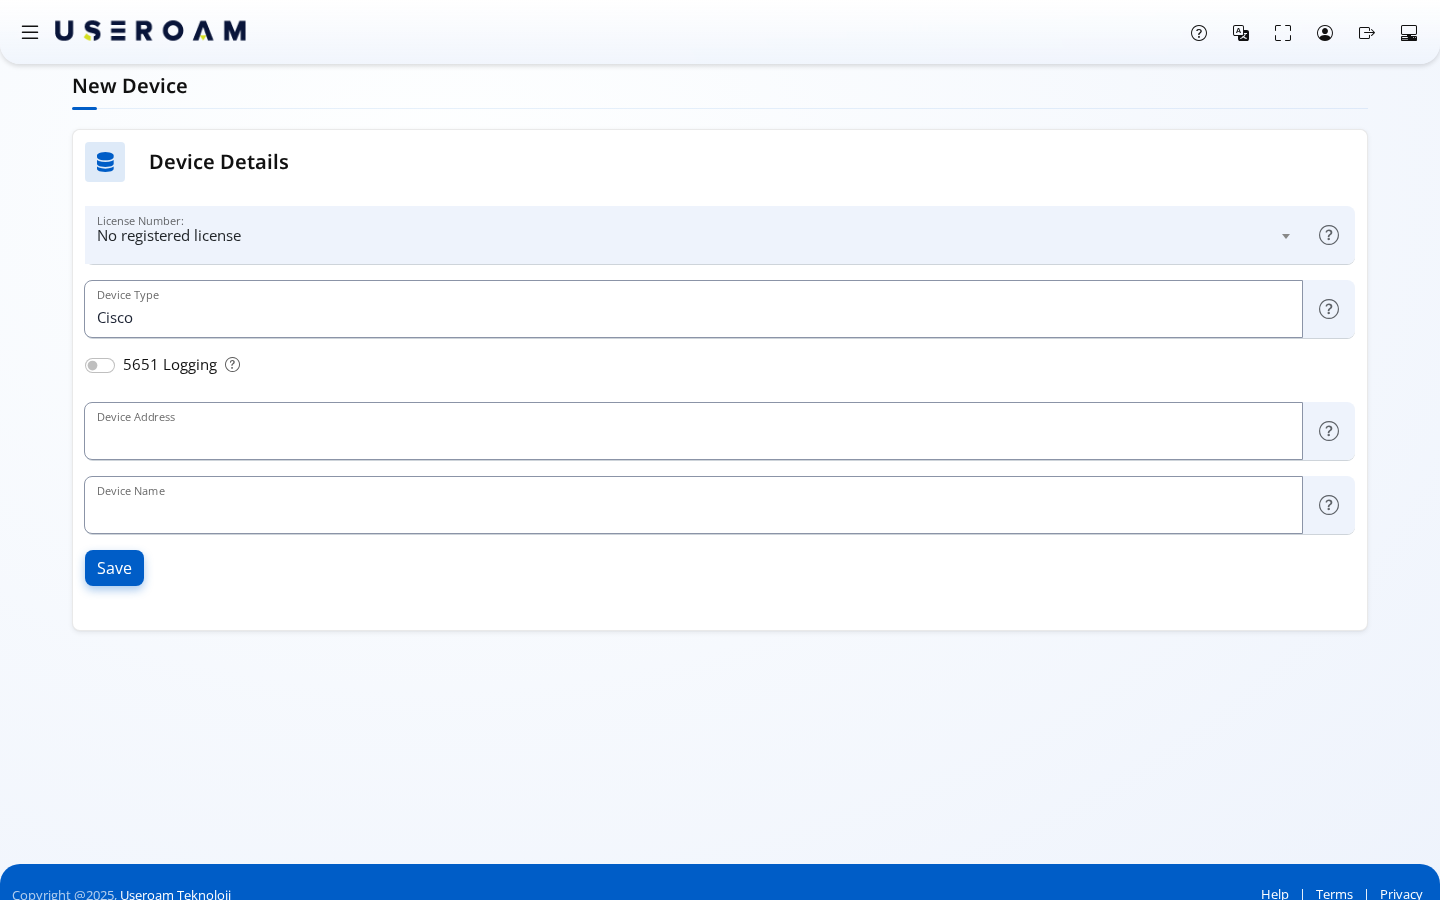](https://help.useroam.com/uploads/images/gallery/2026-11/80en-panel-yeni-cihaz.png) ### 2 - Get the Setup Values from the Panel After saving, open **Settings > Device Settings** and the **Setup** tab. The **Cisco WLC: External Web Auth + RADIUS** card shows three values you will use in the next steps; note them down: - **Web Auth (External) URL:** the login page address **specific to your device**, in the form `http://104.247.174.120/cisco/?u=...`. The code after `?u=` is your device's identity; copy the address exactly as shown. - **RADIUS server and Shared Secret:** server `104.247.174.120`, Auth 1812, Acct 1813, and the shared key specific to your device. - **Pre-Auth ACL:** the addresses the guest must reach before logging in. [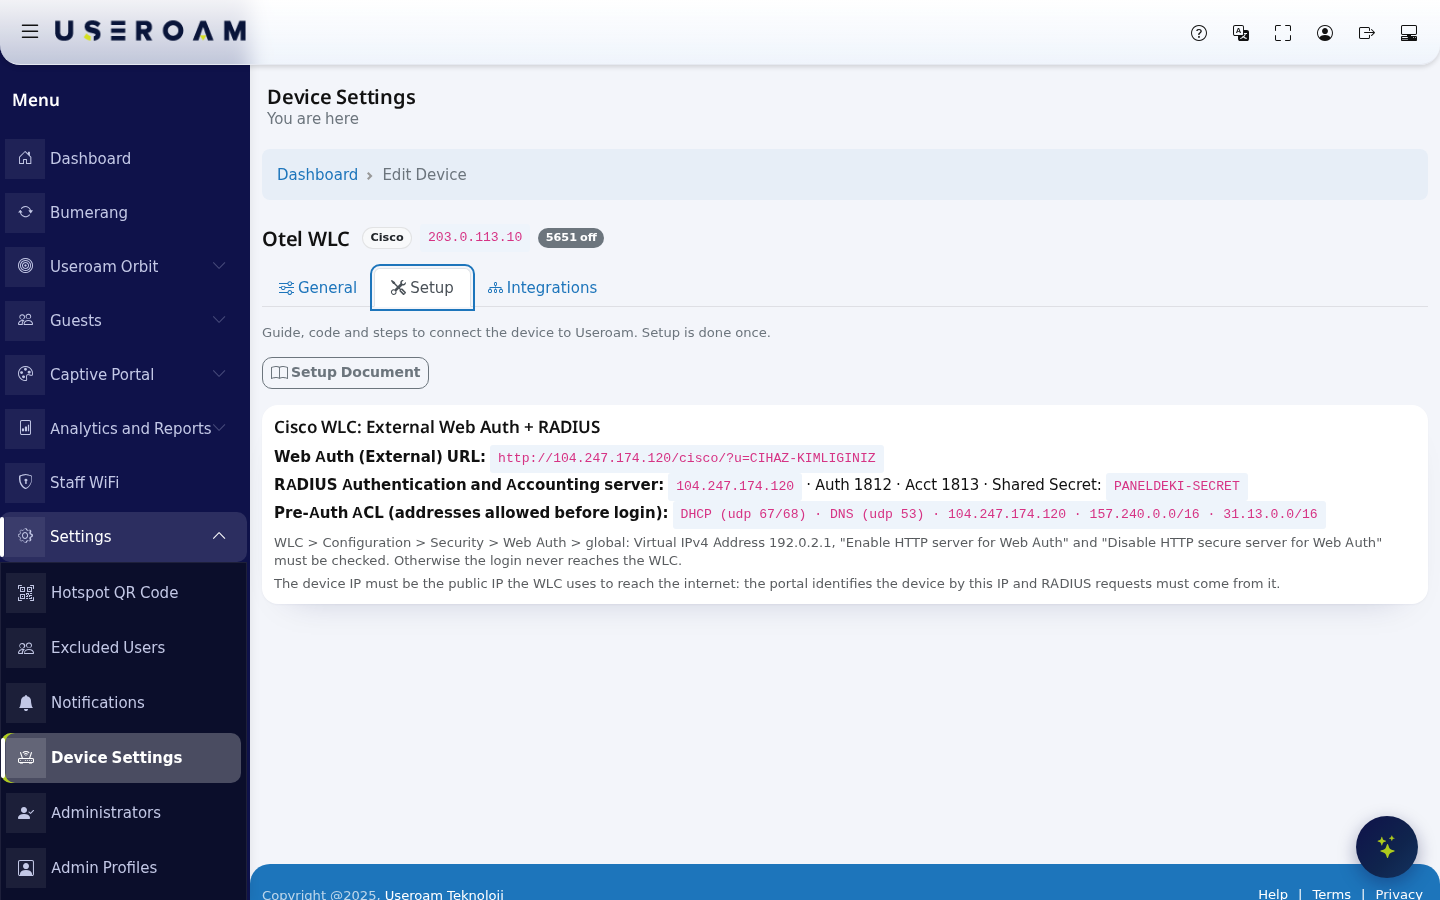](https://help.useroam.com/uploads/images/gallery/2026-11/81en-panel-cisco-kart.png) ### 3 - Define the RADIUS Server In the WLC web interface go to **Configuration > Security > AAA**. On the **Servers / Groups** tab, with **RADIUS** selected on the left and **Servers** on top, click **+ Add**. [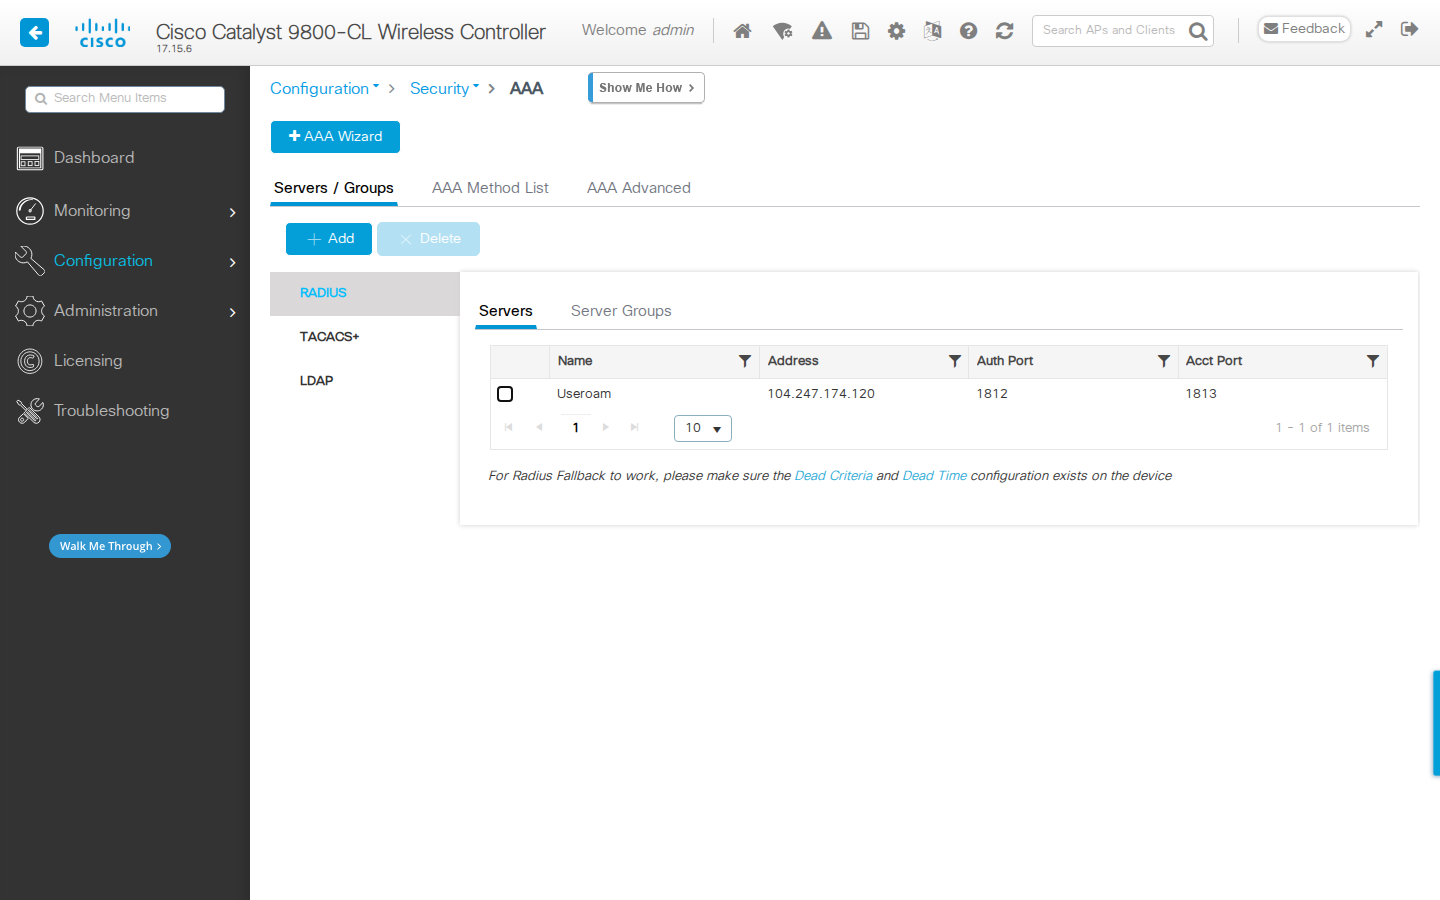](https://help.useroam.com/uploads/images/gallery/2026-11/10-aaa-sunucular.png) - **Name:** `Useroam` - **Server Address:** `104.247.174.120` - **Key / Confirm Key:** the **Shared Secret** from the panel (the same value in both fields). - **Auth Port:** `1812`, **Acct Port:** `1813` - **Support for CoA:** not required. Save with **Apply to Device**. [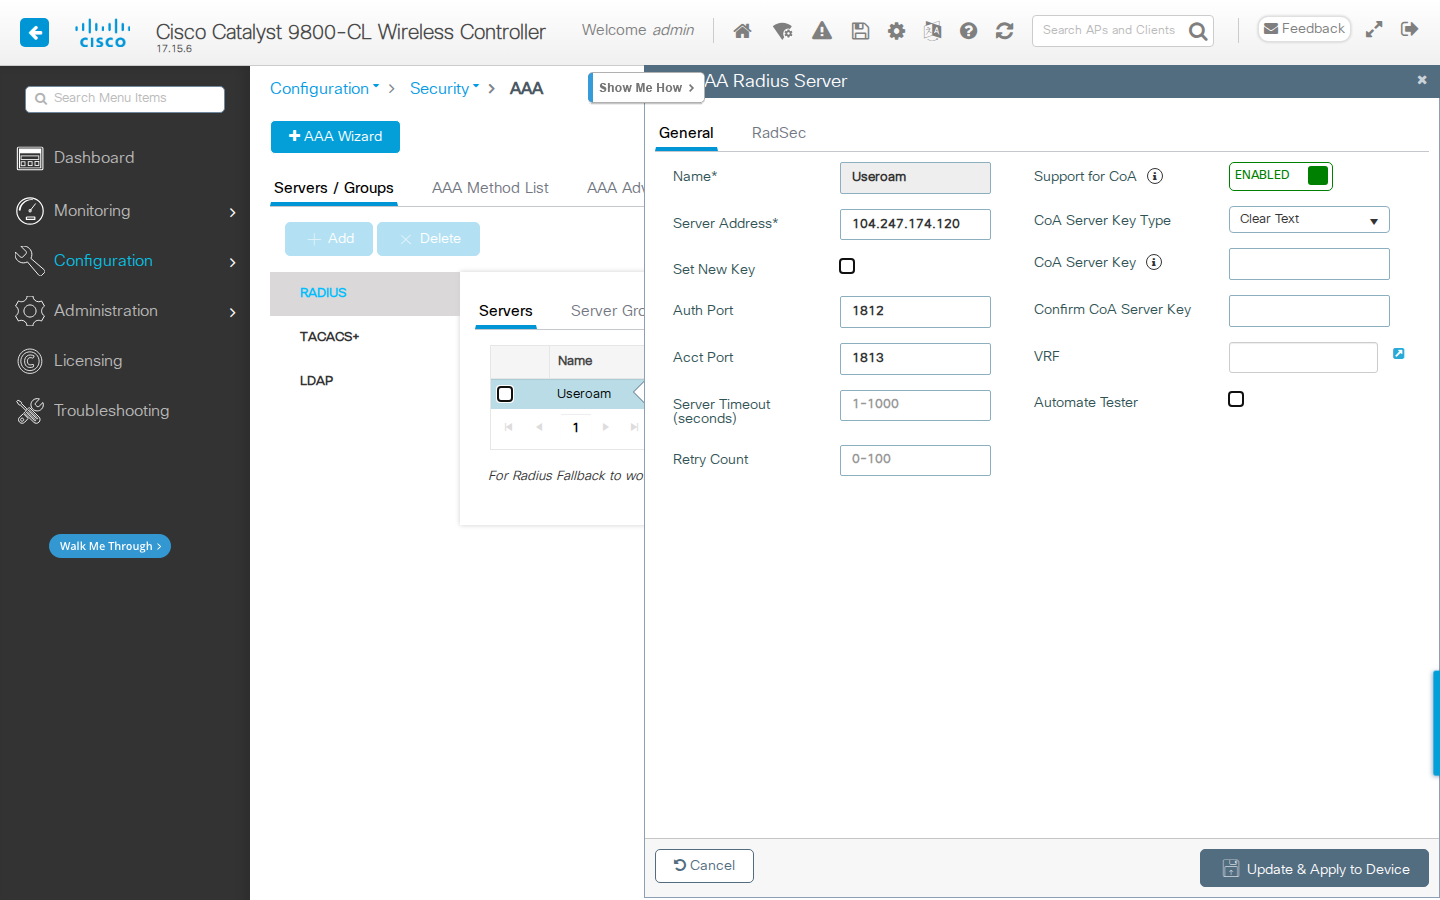](https://help.useroam.com/uploads/images/gallery/2026-11/11-aaa-sunucu.png) ### 4 - Create the RADIUS Server Group On the same screen switch to the **Server Groups** tab and click **+ Add**. - **Name:** `Useroam` - **Group Type:** `RADIUS` - **Dead-Time (mins):** `5` - Move the `Useroam` server from **Available Servers** to **Assigned Servers** with the **>** arrow. Save with **Apply to Device**. [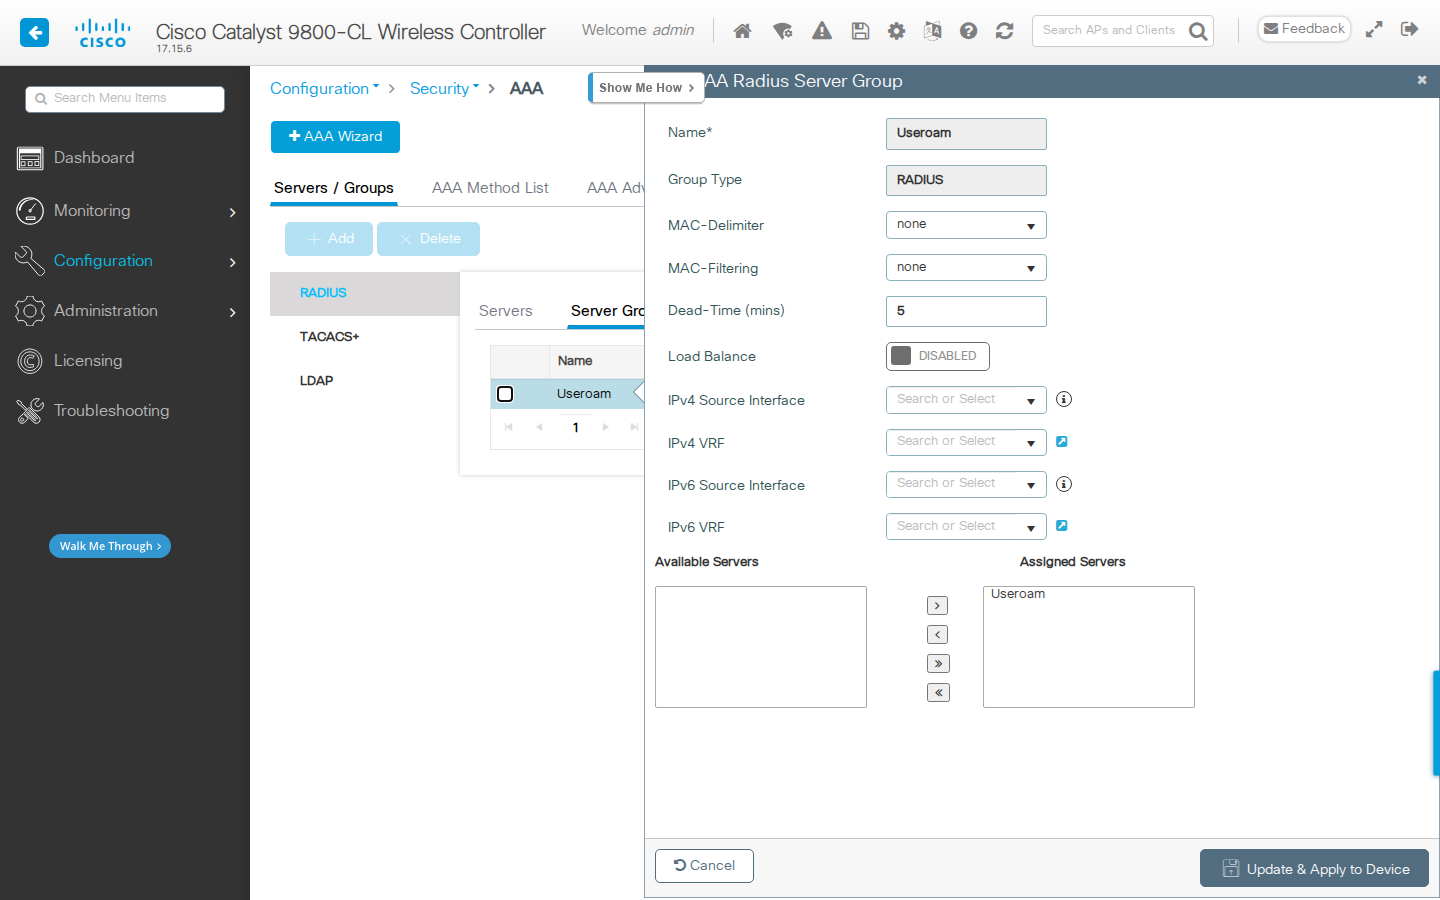](https://help.useroam.com/uploads/images/gallery/2026-11/13-aaa-grup.png) ### 5 - Authentication and Accounting Method Lists Switch to the **AAA Method List** tab. Under **Authentication**, click **+ Add**: - **Method List Name:** `Useroam_Auth` - **Type:** `login` - **Group Type:** `group` - **Assigned Server Groups:** move the `Useroam` group. (The lab device in the screenshot has no other RADIUS server, so the generic `radius` group is selected; if your WLC has other servers, always select the `Useroam` group.) [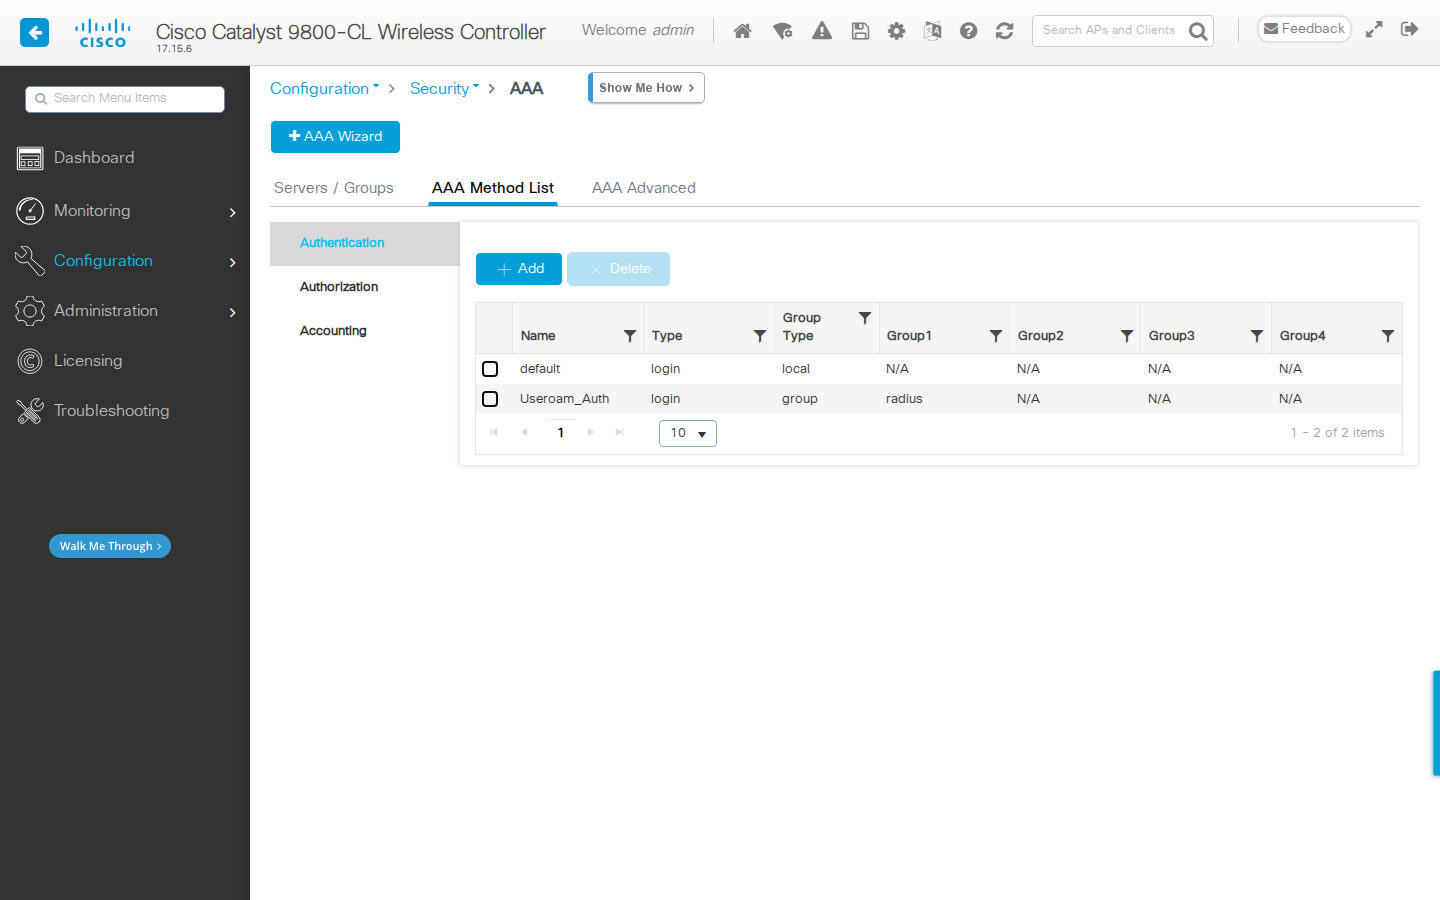](https://help.useroam.com/uploads/images/gallery/2026-11/14-aaa-auth.png) Under **Accounting**, click **+ Add**: - **Method List Name:** `Useroam_Aco` - **Type:** `identity` - **Group Type:** `group`, **Assigned Server Groups:** `Useroam` Accounting is required for **Guests > Active Guests** and the usage reports in the panel. [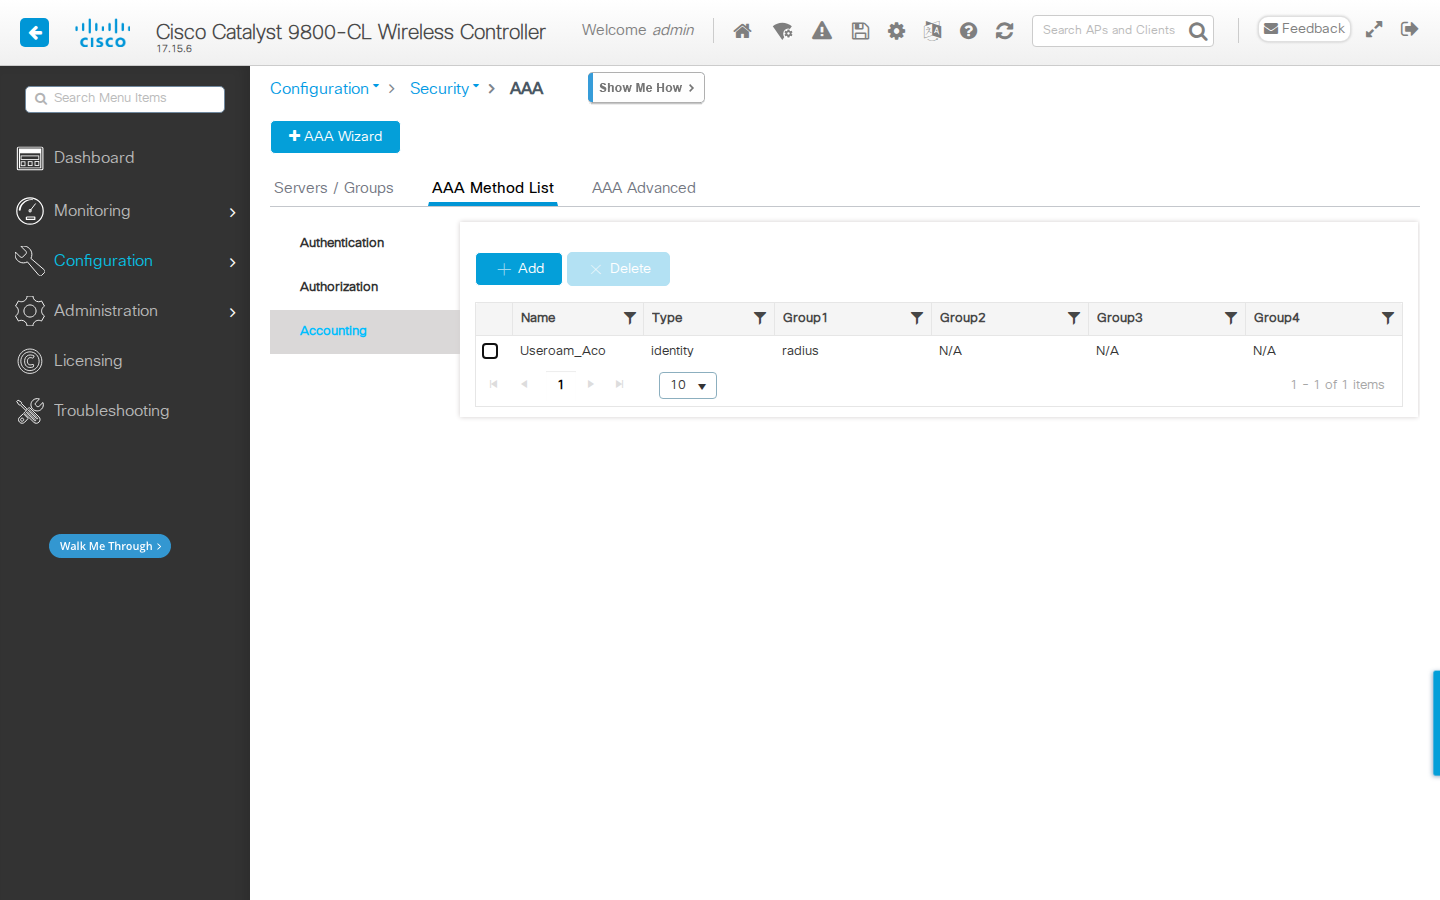](https://help.useroam.com/uploads/images/gallery/2026-11/15-aaa-acct.png) ### 6 - Interim Accounting and AP Information (CLI) The following two settings are made on the command line, not in the web interface. Enter them in `configure terminal` mode from **Administration > Command Line Interface** or over SSH: ``` aaa accounting update newinfo periodic 5 radius-server attribute wireless accounting call-station-id ap-macaddress-ssid ``` - **First line:** sends a usage update every 5 minutes for open sessions, so the active user count and data usage stay accurate. - **Second line:** adds the **MAC address of the AP and the SSID** the guest is connected to (which AP they connected from) to accounting records.Sessions opened before these settings keep the old format; the settings apply to newly connected guests.
### 7 - Pre-Authentication Allow List (Pre-Auth ACL) Before logging in, the guest must only be able to get an IP address, resolve names and reach the Useroam login page. Go to **Configuration > Security > ACL** and click **+ Add**. - **ACL Name:** `USEROAM-PREAUTH` - **ACL Type:** `IPv4 Extended` Add the rules in order with **Add**:| Seq | Action | Protocol | Source | Destination | Purpose |
|---|---|---|---|---|---|
| 10 | permit | udp | any | any, port eq bootps | DHCP (getting an IP) |
| 20 | permit | udp | any, port eq bootps | any | DHCP return |
| 30 | permit | udp | any | any, port eq bootpc | DHCP |
| 40 | permit | udp | any | any, port eq domain | DNS query |
| 50 | permit | udp | any, port eq domain | any | DNS answer |
| 60 | permit | ip | any | host 104.247.174.120 | Useroam login page |
| 70 | permit | ip | host 104.247.174.120 | any | Useroam return |
| 80 | permit | ip | any | 157.240.0.0 0.0.255.255 | WhatsApp login |
| 90 | permit | ip | 157.240.0.0 0.0.255.255 | any | WhatsApp return |
| 100 | permit | ip | any | 31.13.0.0 0.0.255.255 | WhatsApp login |
| 110 | permit | ip | 31.13.0.0 0.0.255.255 | any | WhatsApp return |
Rules 80 to 110 let the guest **log in with WhatsApp** (the verification message is sent from WhatsApp before login completes). If WhatsApp login is disabled on your portal, you can leave these four rules out.
[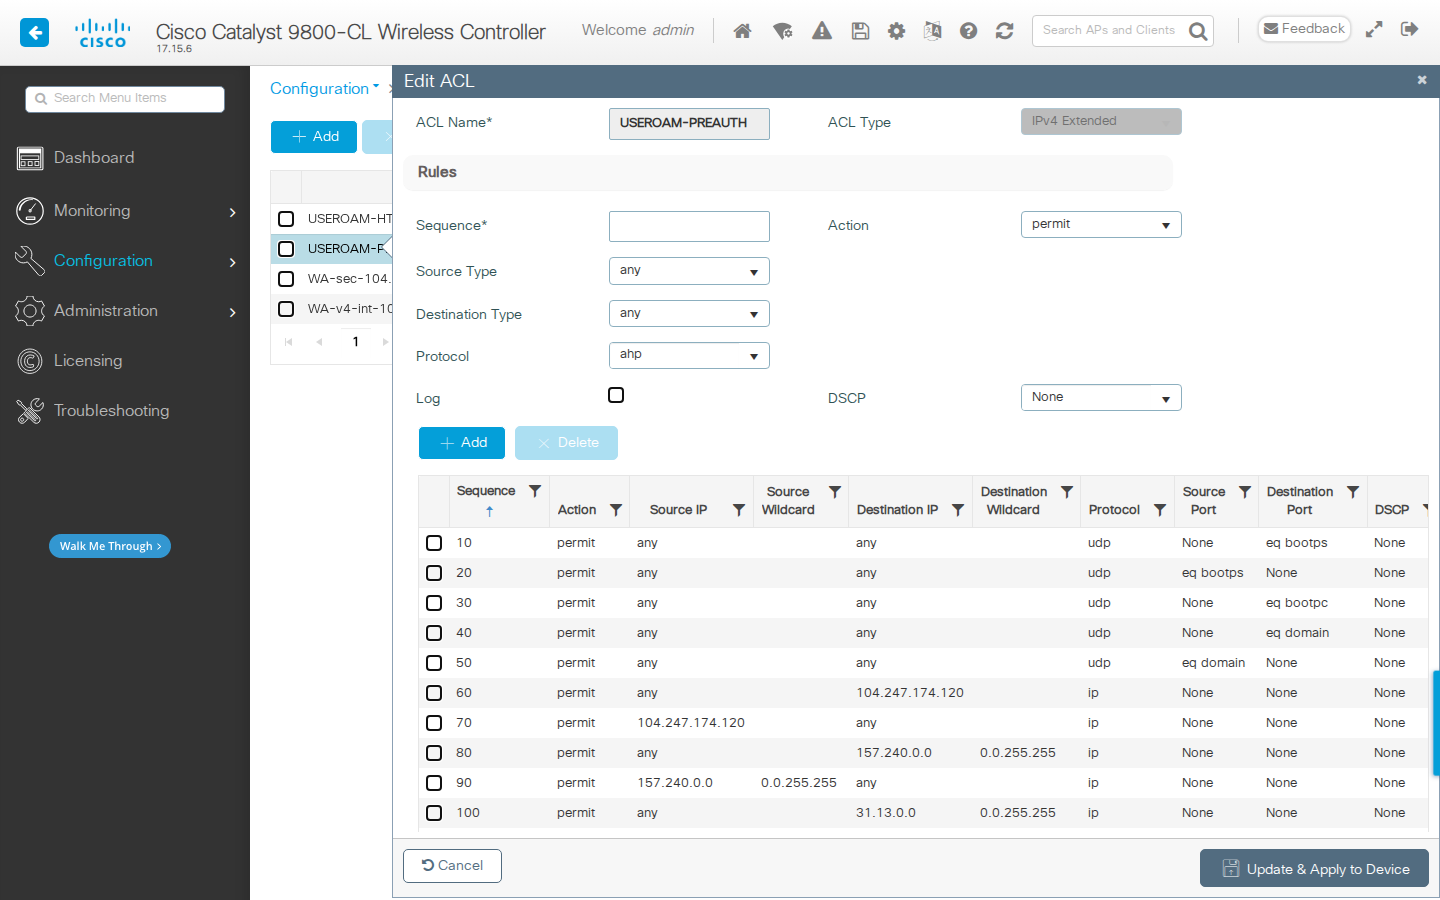](https://help.useroam.com/uploads/images/gallery/2026-11/21-acl-preauth.png) The same list on the command line: ``` ip access-list extended USEROAM-PREAUTH 10 permit udp any any eq bootps 20 permit udp any eq bootps any 30 permit udp any any eq bootpc 40 permit udp any any eq domain 50 permit udp any eq domain any 60 permit ip any host 104.247.174.120 70 permit ip host 104.247.174.120 any 80 permit ip any 157.240.0.0 0.0.255.255 90 permit ip 157.240.0.0 0.0.255.255 any 100 permit ip any 31.13.0.0 0.0.255.255 110 permit ip 31.13.0.0 0.0.255.255 any ``` ### 8 - Web Auth Global Setting In **Configuration > Security > Web Auth**, click the **global** row. - **Virtual IPv4 Address:** `192.0.2.1` (the virtual address the WLC uses for the login page; it must not be assigned to a real device on your network). - **Enable HTTP server for Web Auth:** checked. - **Disable HTTP secure server for Web Auth:** **checked**. - **Web Auth intercept HTTPs:** unchecked.**If this step is skipped, login will not work.** With secure (https) web auth enabled, the guest's browser does not accept the WLC's self-signed certificate and never sends the login to the WLC; the guest stays on the "logging in" screen and no RADIUS request reaches Useroam.
Save with **Update & Apply to Device**. [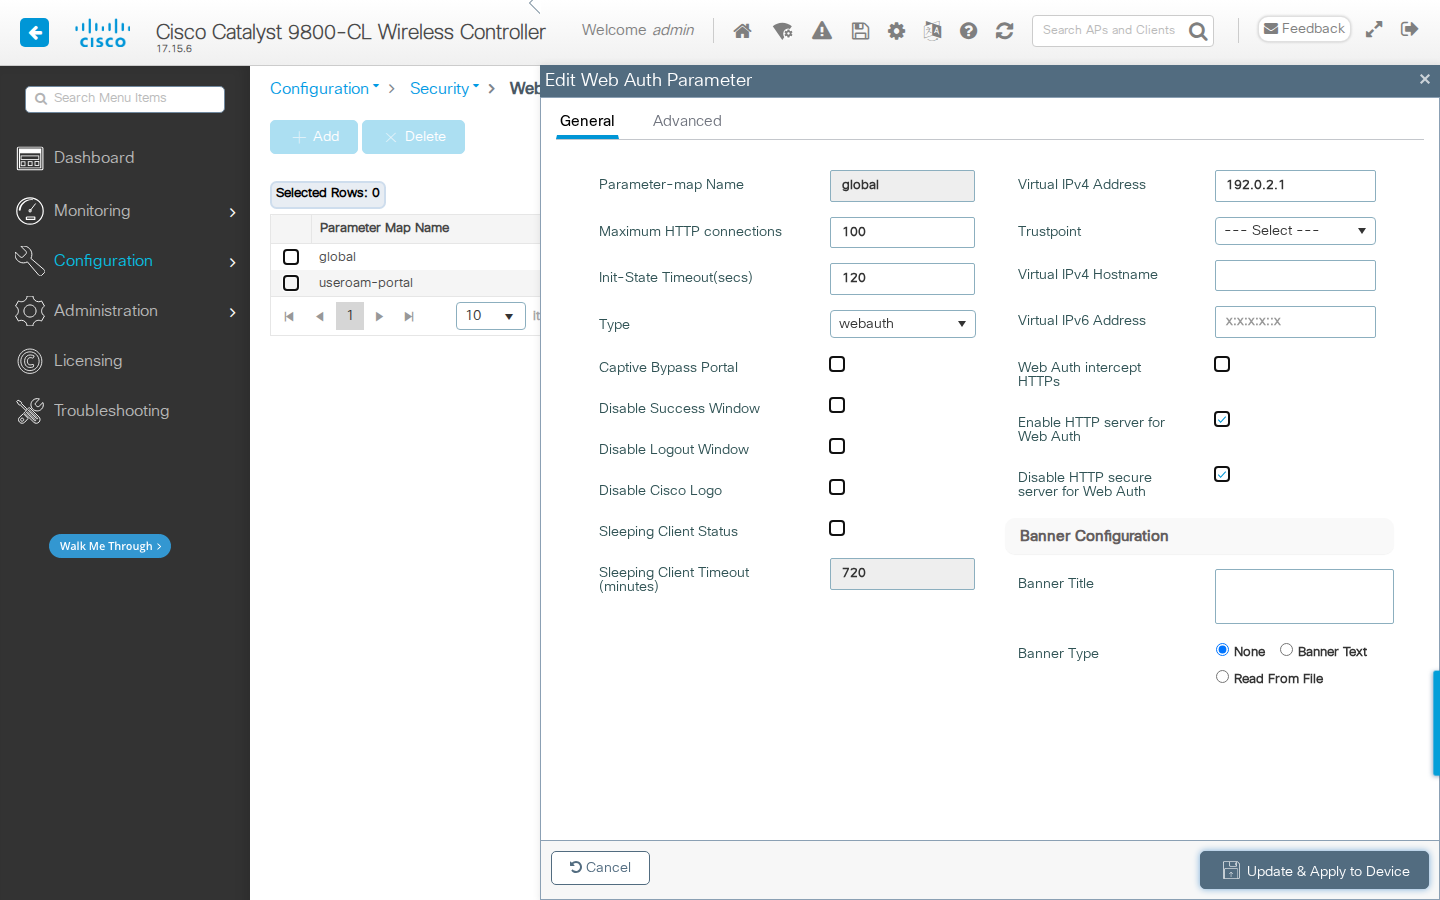](https://help.useroam.com/uploads/images/gallery/2026-11/30-webauth-global.png) The WLC web server must be on (`ip http server` on the command line); otherwise guests are not redirected to the login page. ### 9 - Useroam Login Page Parameter Map On the same **Web Auth** screen click **+ Add**. - **Parameter-map Name:** `useroam-portal` - **Type:** `webauth` - The other fields can stay at their defaults (Maximum HTTP connections 100, Init-State Timeout 120). [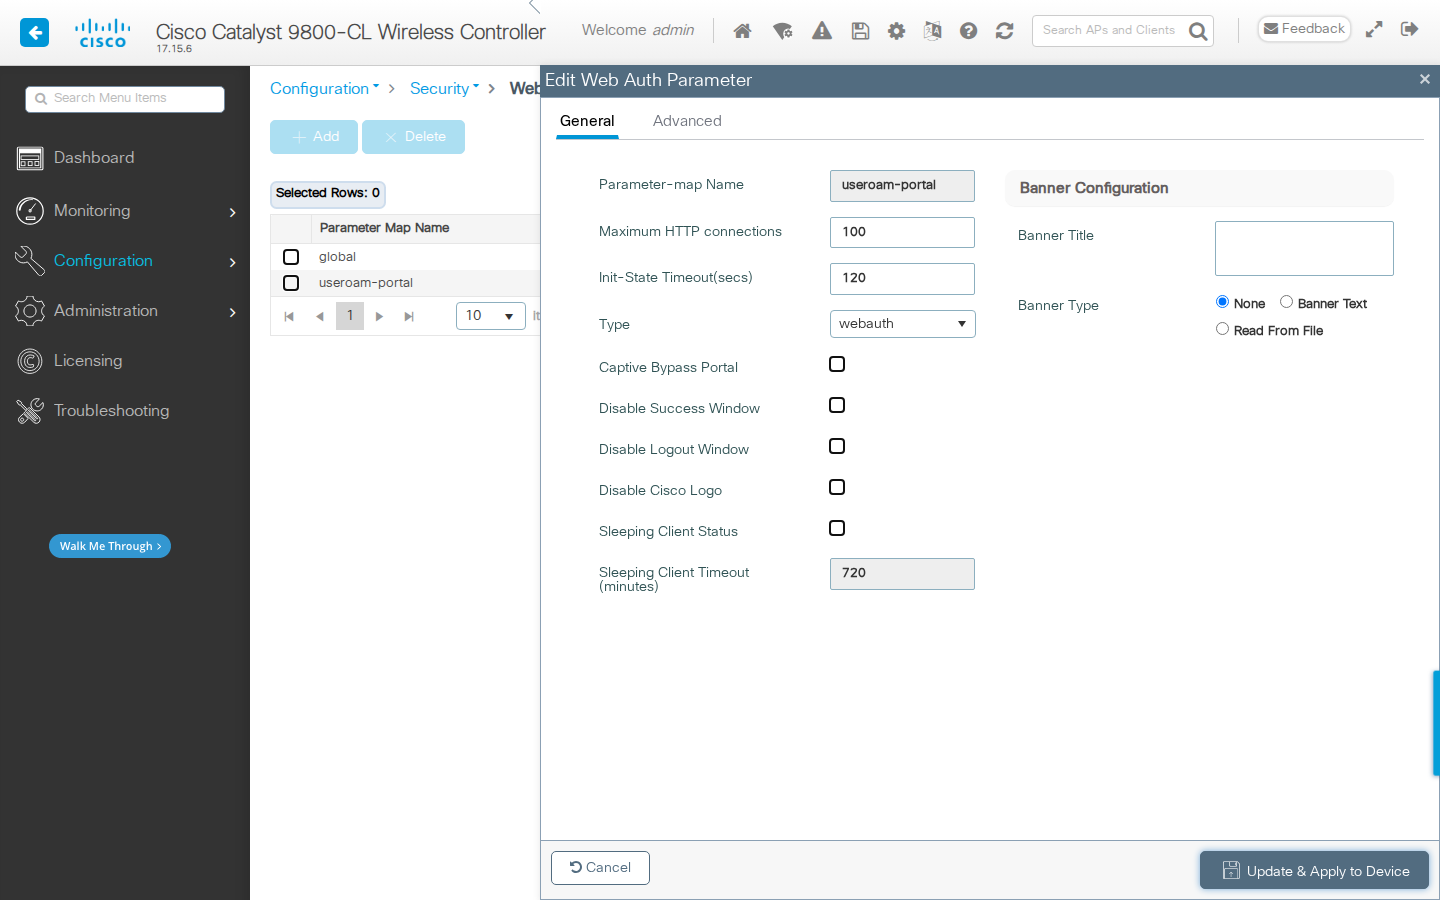](https://help.useroam.com/uploads/images/gallery/2026-11/31-webauth-general.png) After saving, click the `useroam-portal` row and open the **Advanced** tab: - **Redirect URL for login:** the full **Web Auth (External) URL** from the panel (`http://104.247.174.120/cisco/?u=...`). - **Redirect On-Success / On-Failure:** leave empty (Useroam handles the page after login). - **Redirect Append for AP MAC Address:** `ap_mac` - **Redirect Append for Client MAC Address:** `client_mac` - **Redirect Append for WLAN SSID:** `wlan` - **Portal IPV4 Address:** `104.247.174.120` The **Preview of the Redirect URL** box at the top shows where the WLC will send the guest. Check that it starts with `http://104.247.174.120/cisco/?u=`. The WLC appends its own parameters with a second `?`; this is expected and Useroam reads it correctly. [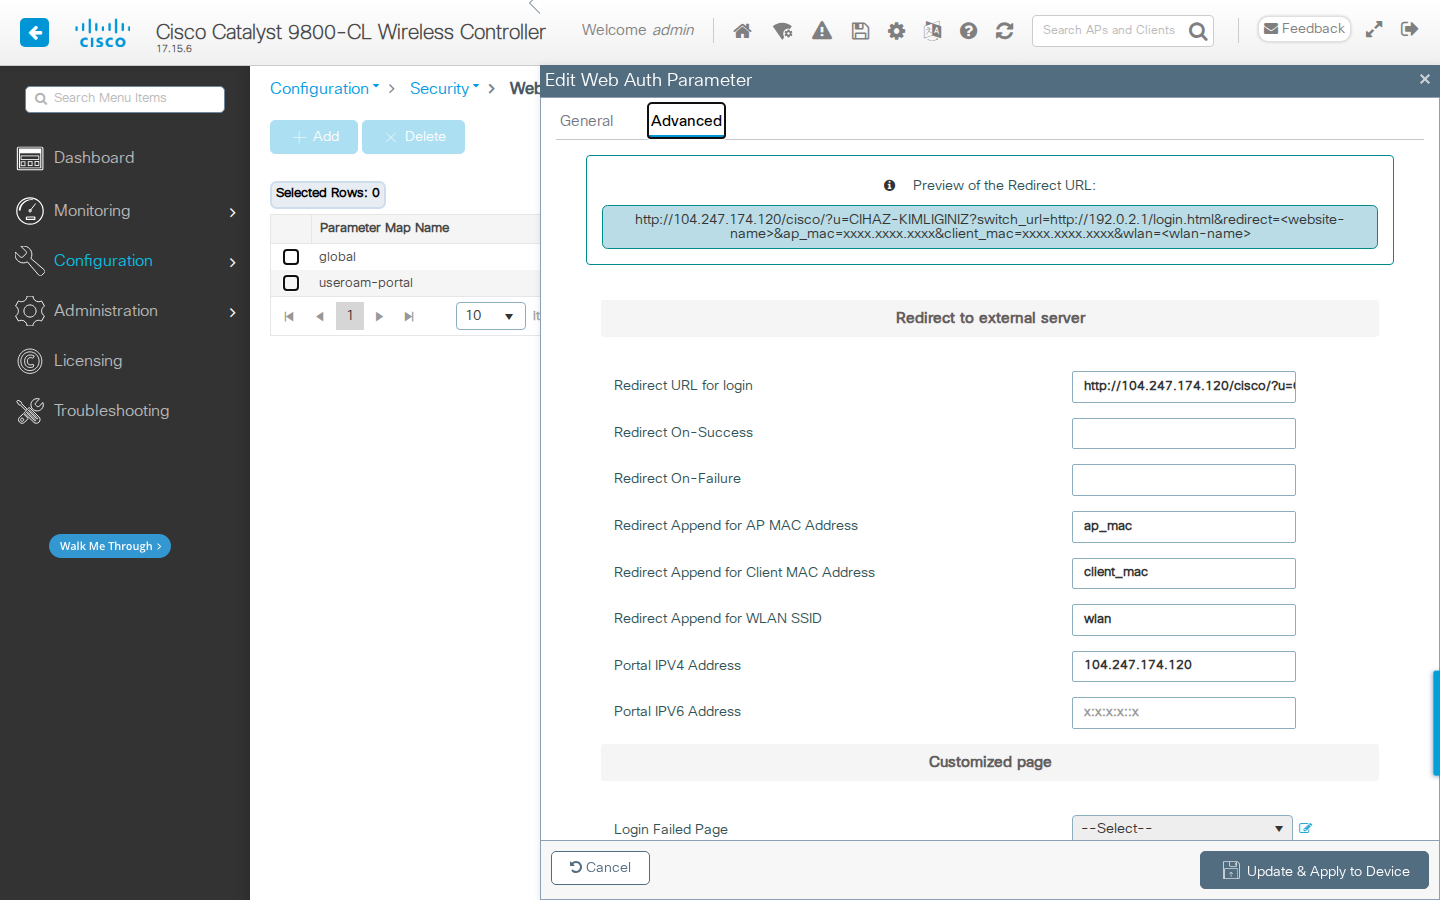](https://help.useroam.com/uploads/images/gallery/2026-11/32-webauth-advanced.png) ### 10 - Guest WLAN (SSID) Go to **Configuration > Tags & Profiles > WLANs** and click **+ Add**. **General** tab: - **Profile Name** and **SSID:** the network name guests will see (e.g. `Hotel-Guest`). - **Status:** ENABLED, **Broadcast SSID:** ENABLED. [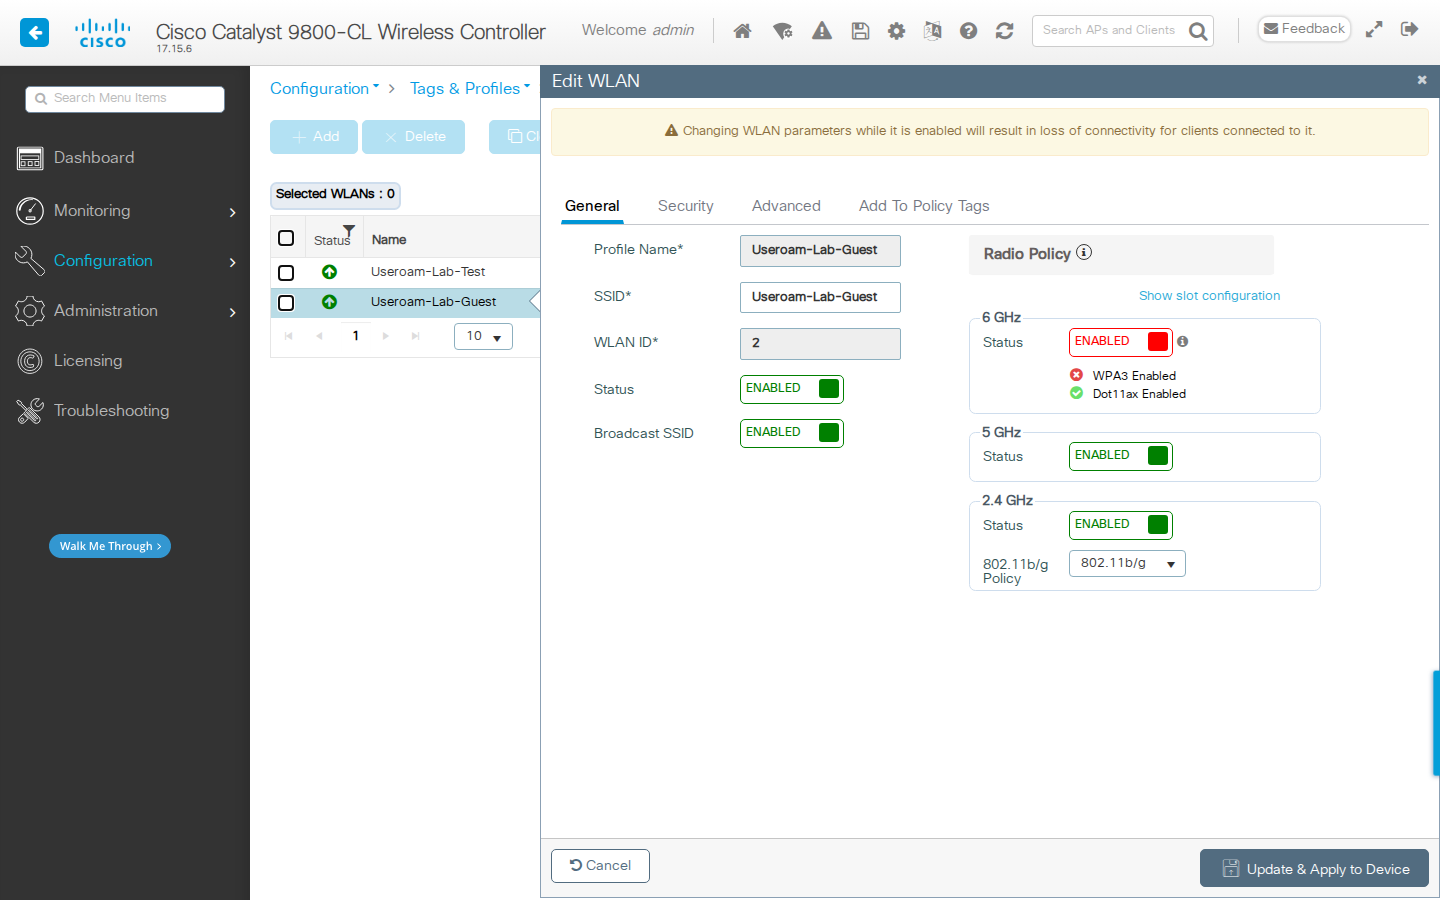](https://help.useroam.com/uploads/images/gallery/2026-11/41-wlan-general.png) **Security > Layer2** tab: security type **None** (open network; login happens on the Useroam page). **MAC Filtering** unchecked. [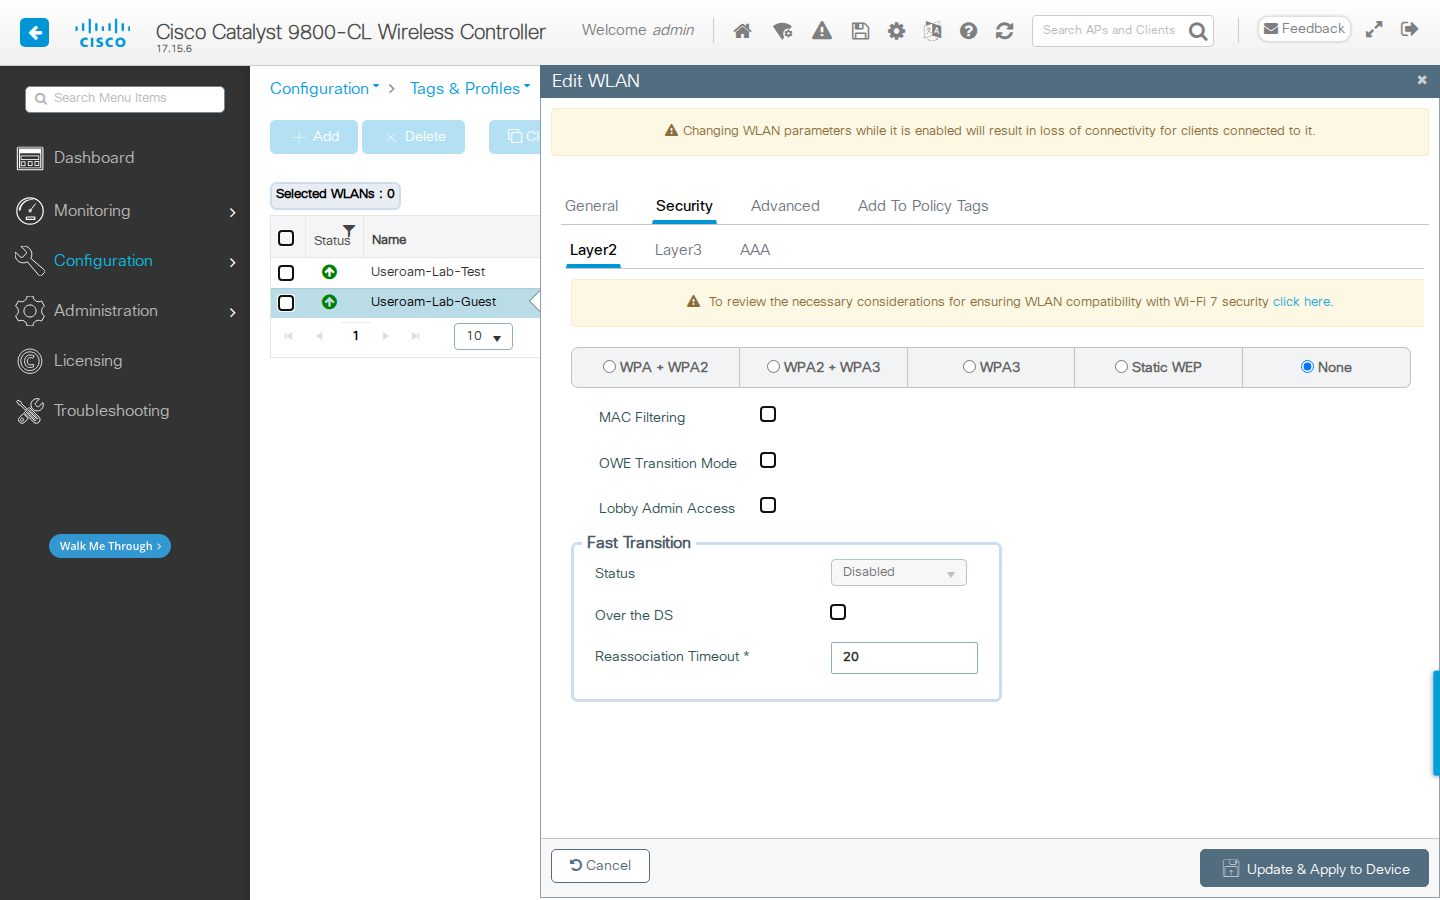](https://help.useroam.com/uploads/images/gallery/2026-11/42-wlan-l2.png) **Security > Layer3** tab: - **Web Policy:** checked. - **Web Auth Parameter Map:** `useroam-portal` - **Authentication List:** `Useroam_Auth` - Click **Show Advanced Settings >>>** and select `USEROAM-PREAUTH` in **Preauthentication ACL IPv4**. Save with **Apply to Device**. [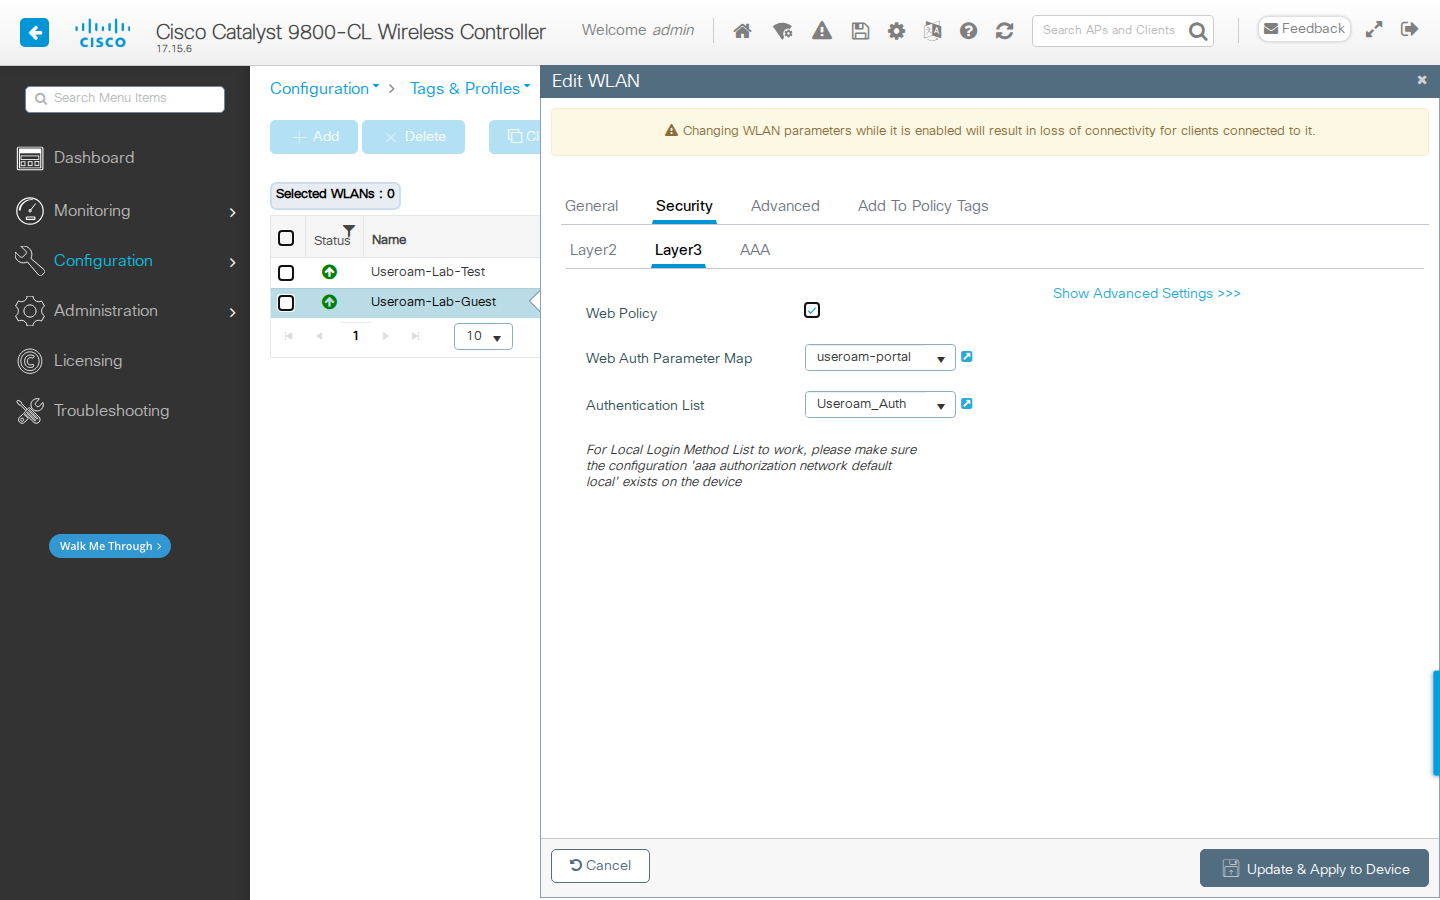](https://help.useroam.com/uploads/images/gallery/2026-11/43-wlan-l3.png) ### 11 - Policy Profile Go to **Configuration > Tags & Profiles > Policy** and click **+ Add** (you can also use an existing profile). **General** tab: - **Name:** e.g. `useroam-policy`, **Status:** ENABLED. - **WLAN Switching Policy:** if your APs are at a remote site in **FlexConnect** mode (like the lab in the screenshot), **Central Switching** and **Central DHCP** are off and **Central Authentication** is on. If the APs are in **Local** mode at the same site as the WLC, Central Switching stays on. - The guest VLAN is selected on the **Access Policies** tab. [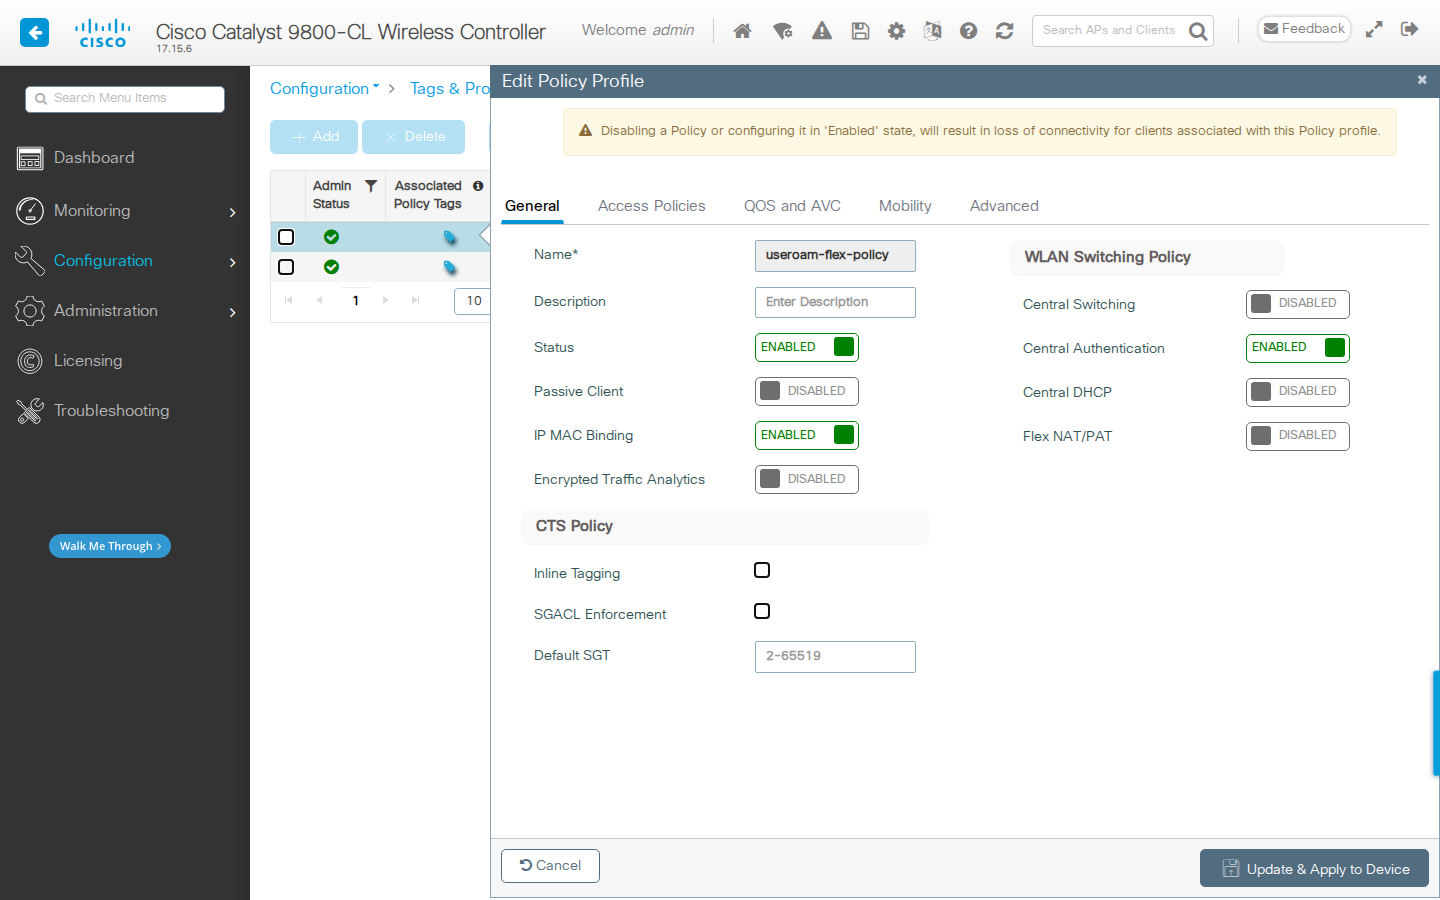](https://help.useroam.com/uploads/images/gallery/2026-11/51-policy-general.png) **Advanced** tab: - **Session Timeout (sec):** the maximum guest session length (e.g. `86400` = 24 hours). - **Idle Timeout (sec):** how long an idle guest stays connected (e.g. `3600`). - **AAA Policy > Accounting List:** `Useroam_Aco` - **Interim Accounting:** ENABLED Save with **Apply to Device**. [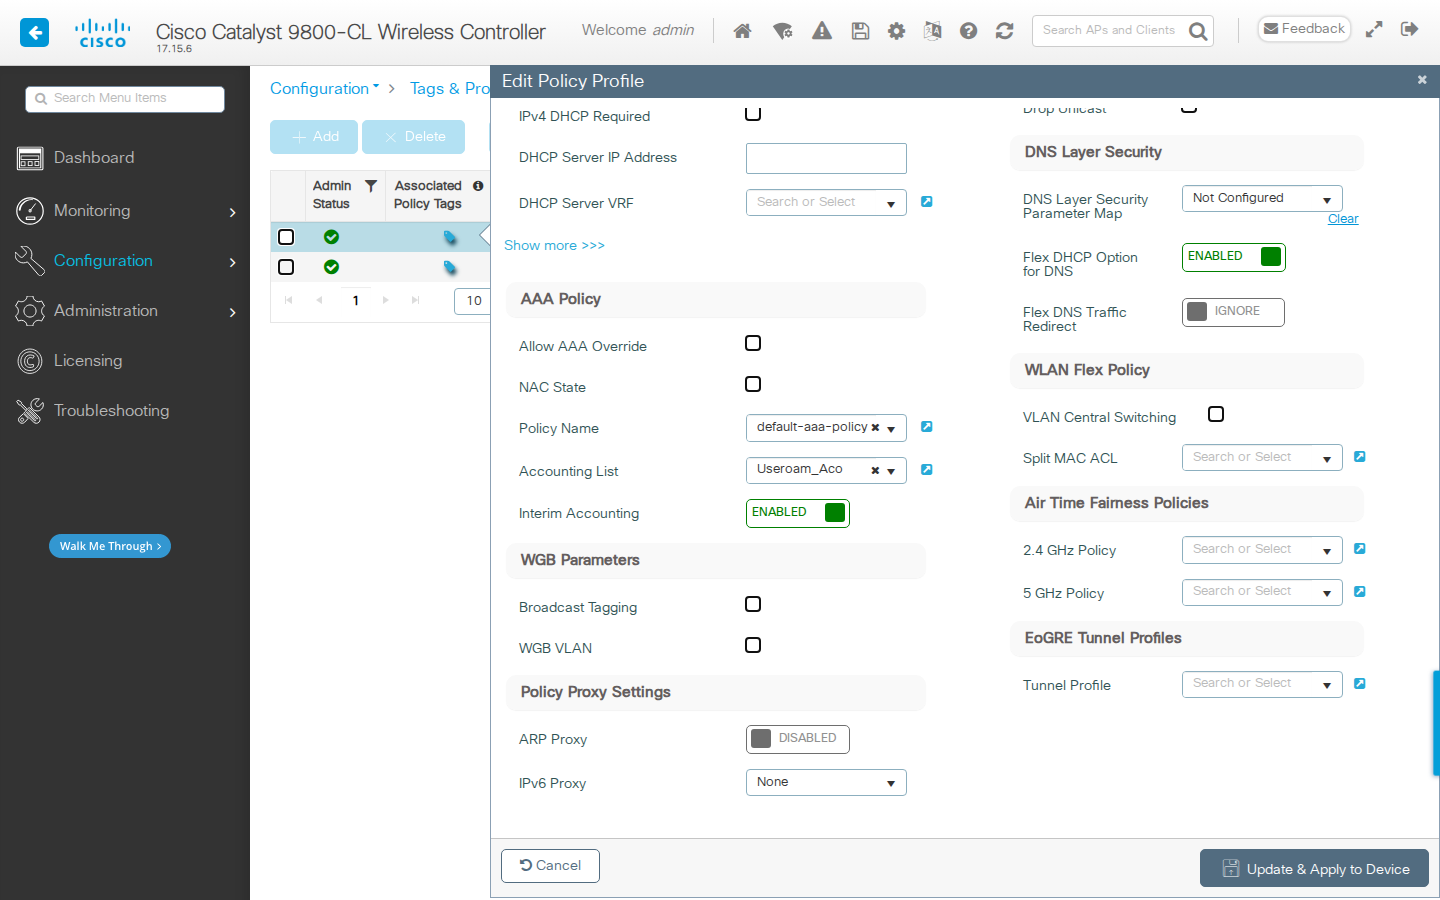](https://help.useroam.com/uploads/images/gallery/2026-11/52-policy-advanced.png) ### 12 - Policy Tag and AP Assignment In **Configuration > Tags & Profiles > Tags**, on the **Policy** tab, add a new tag or open the tag your APs use. Under **WLAN-POLICY Maps**, click **+ Add** and map your guest WLAN (step 10) to your policy profile (step 11). [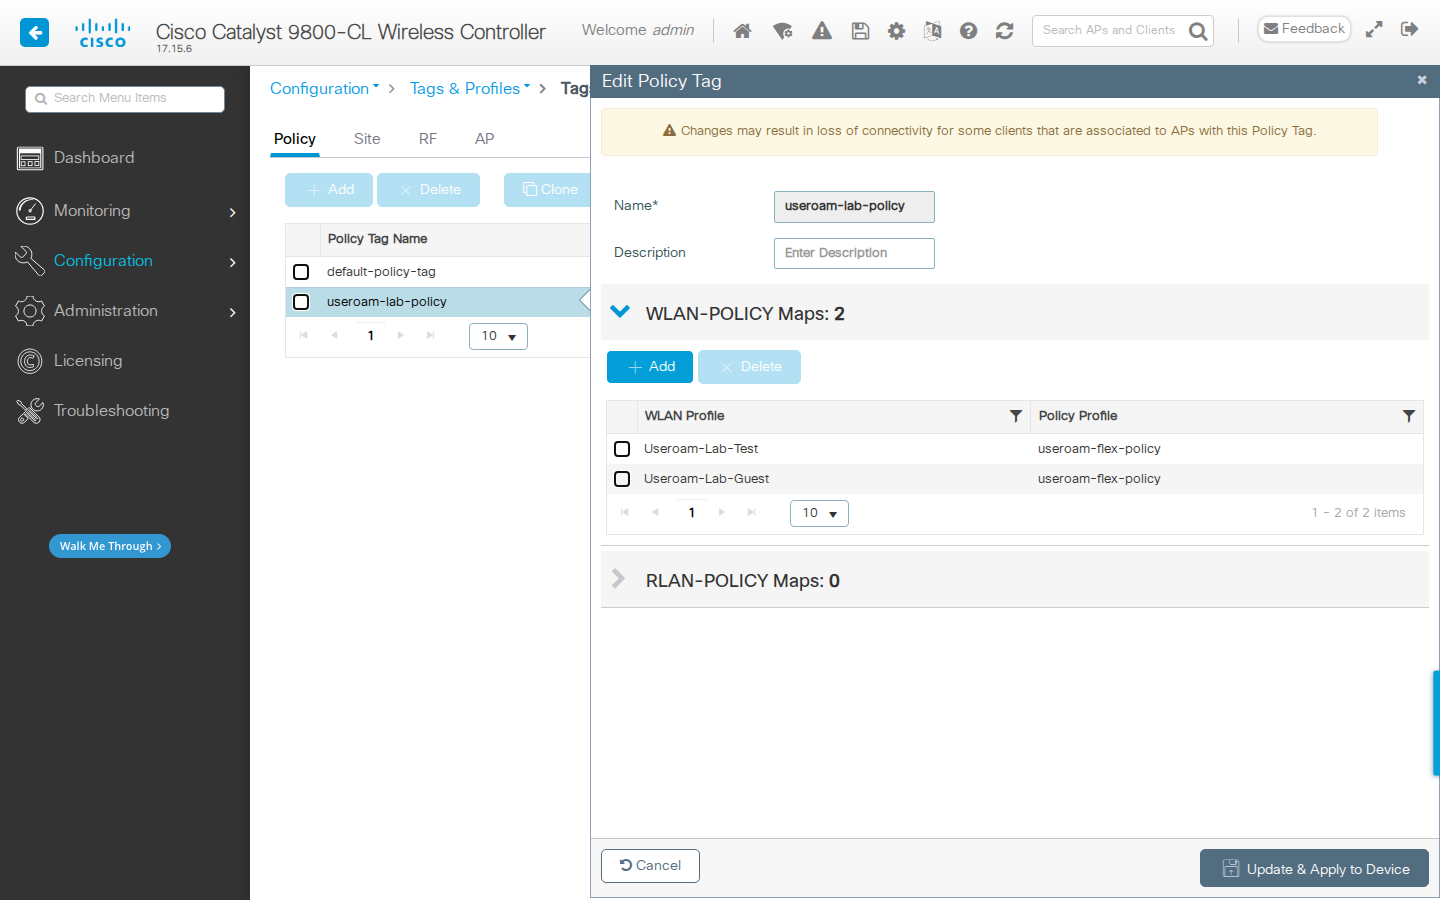](https://help.useroam.com/uploads/images/gallery/2026-11/61-tag.png) This tag must be assigned to the APs that will broadcast the guest network: in **Configuration > Wireless > Access Points**, click the AP and select the tag in **General > Tags > Policy**. Check the **Policy Tag** column in the list to confirm each AP has the right tag. [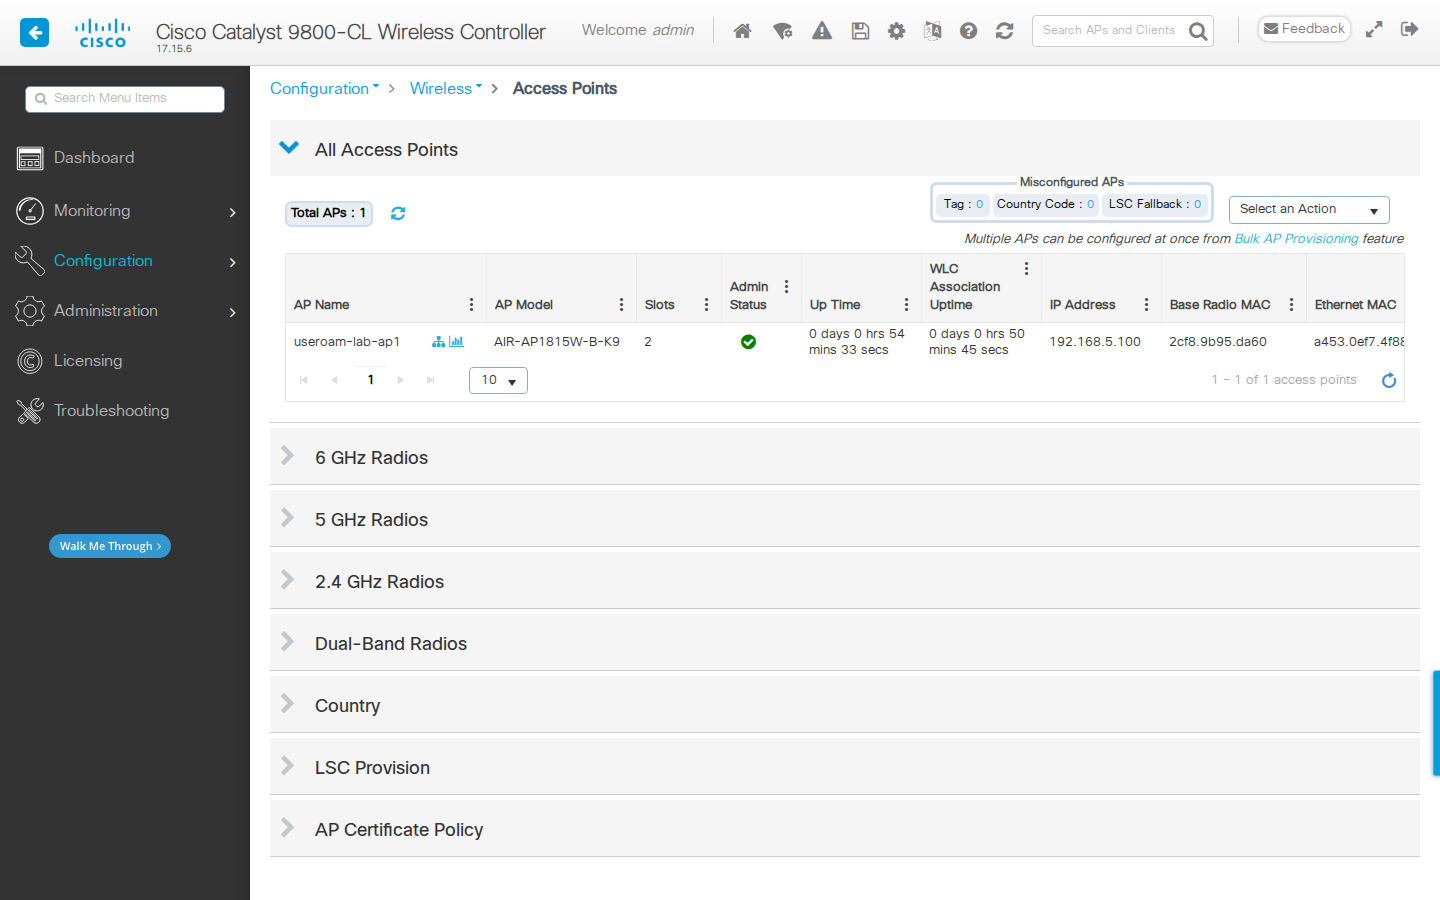](https://help.useroam.com/uploads/images/gallery/2026-11/70-ap-liste.png)**Make the settings permanent:** when all steps are done, click the **save (disk)** icon in the top menu or run `write memory` on the command line. Otherwise the settings are lost when the WLC restarts.
### 13 - Test and Troubleshooting 1. Connect a phone to the guest SSID. The Useroam login page should open by itself. If it does not, open `http://neverssl.com` in the browser. 2. Log in with SMS, WhatsApp or another method enabled on your portal. 3. Check that the guest appears in **Guests > Active Guests** in the panel; on the WLC, the guest's state in **Monitoring > Wireless > Clients** should be **Run**.| Symptom | What to check |
|---|---|
| The login page never opens | Are Web Policy and `useroam-portal` selected on the WLAN Layer3 tab; does the ACL have the 104.247.174.120 and DNS rules; is `ip http server` on. |
| Stuck on the "logging in" screen | Step 8: is Disable HTTP secure server for Web Auth checked, is the Virtual IPv4 Address 192.0.2.1. |
| The browser warns about an "insecure form" | Redirect URL for login must start with `http://104.247.174.120/cisco/?u=...`; do not use the https panel address. |
| "Wrong username or password" | Does the RADIUS Key match the Shared Secret in the panel; is the Device Address in the panel the public IP the WLC uses to reach the internet (if RADIUS requests leave from a different IP, Useroam does not recognize the device). |
| The WLC shows the RADIUS server as "dead" | Does the firewall in front allow UDP 1812 and 1813 from the WLC to 104.247.174.120. Test from the command line: `test aaa group Useroam test 1234 legacy` (a "reject" answer means the connection works). |
| Active users do not appear in the panel | Are Accounting List `Useroam_Aco` and Interim Accounting enabled in the policy profile; were the commands in step 6 entered. |