**Before you start:** you need pfSense CE 2.7.0 / pfSense Plus 23.05 or later, administrator access to the pfSense web interface and the **public (external) IP address** pfSense uses to reach the internet. Menu names may differ slightly between versions.
**The Useroam server address is 104.247.174.120 everywhere.** Use this IP for the RADIUS server, the pre-login allow list and the 5651 log target. Do not use any other address.
**How it works:** a small portal page prepared by Useroam is uploaded to pfSense. It forwards the guest to the Useroam welcome page. After the guest logs in, the username and password are posted back to pfSense, which checks them with Useroam over RADIUS. pfSense has no separate "external portal" setting; this is the method.
### 1 - Add the Device in the Useroam Panel Log in at [panel.useroam.com](https://panel.useroam.com) and open **New Device**. - **Device Type:** select `pfSense`. - **5651 Logging:** turn on if pfSense will send its logs to Useroam (step 12). - **Device Address:** **\[CRITICAL STEP\]** enter the public (external) IP pfSense uses to reach the internet. If pfSense is behind a modem/NAT, enter the NAT's outgoing IP. Useroam identifies the device by this IP and RADIUS requests must come from it. Do not enter an internal IP (192.168.x.x, 10.x.x.x). - **Device Name:** the name you will see in the panel (e.g. "Hotel pfSense"). Click **Save**. [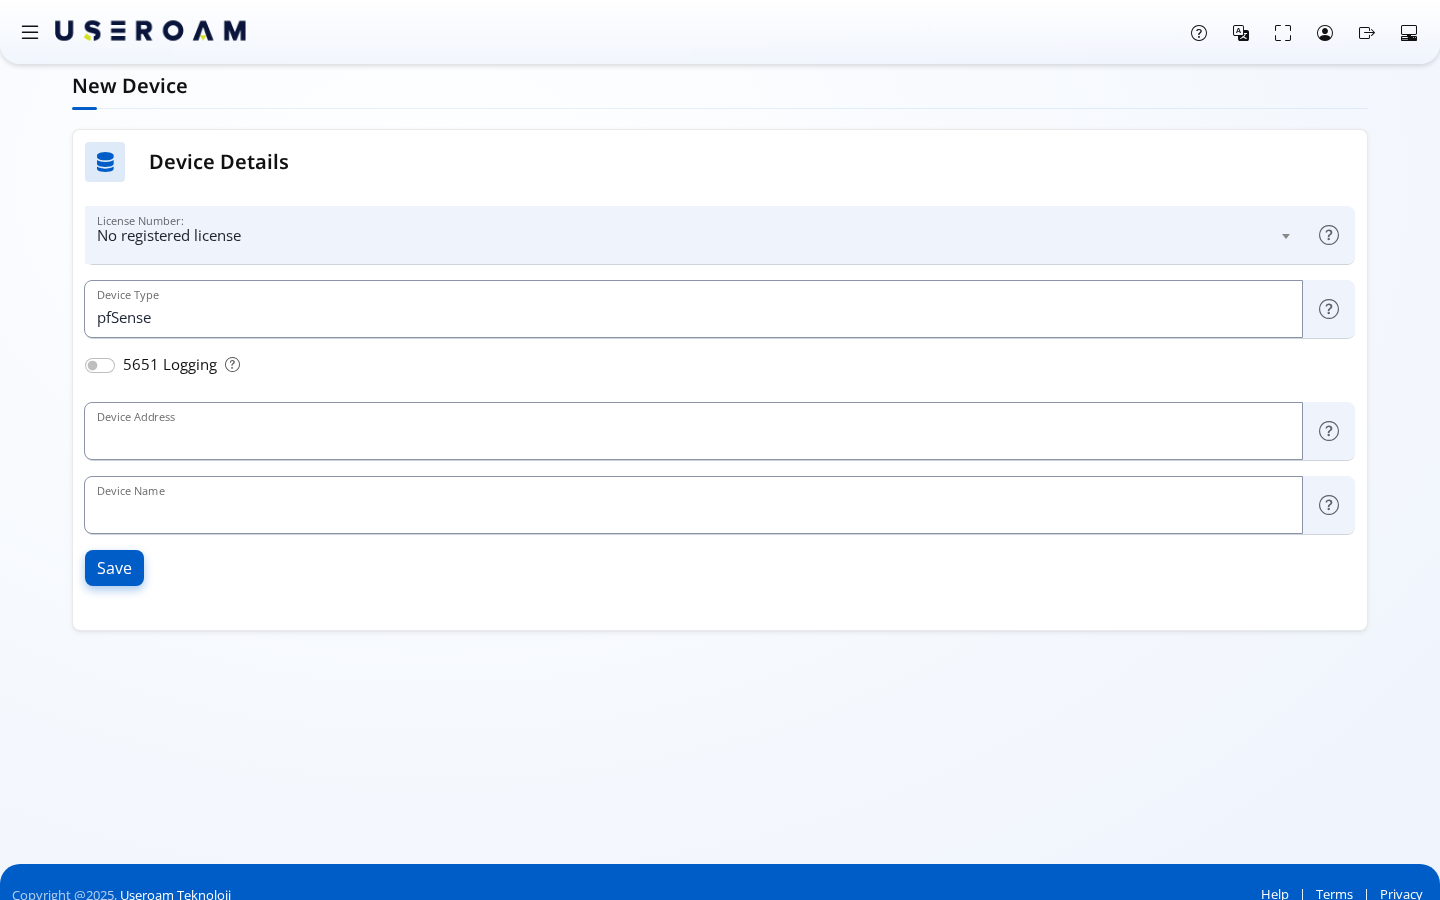](https://help.useroam.com/uploads/images/gallery/2026-11/20en-panel-yeni-cihaz.png) ### 2 - Get the Setup Details from the Panel After saving, open the **Setup** tab on **Settings > Device Settings**. Two things are taken from here: - **Shared Secret:** the password used when defining the RADIUS server. Copy the value shown on the card. - **Download portal page:** downloads the portal file (`portal.html`) with your device ID written into it. Do not edit the file; it is uploaded to pfSense in step 6. [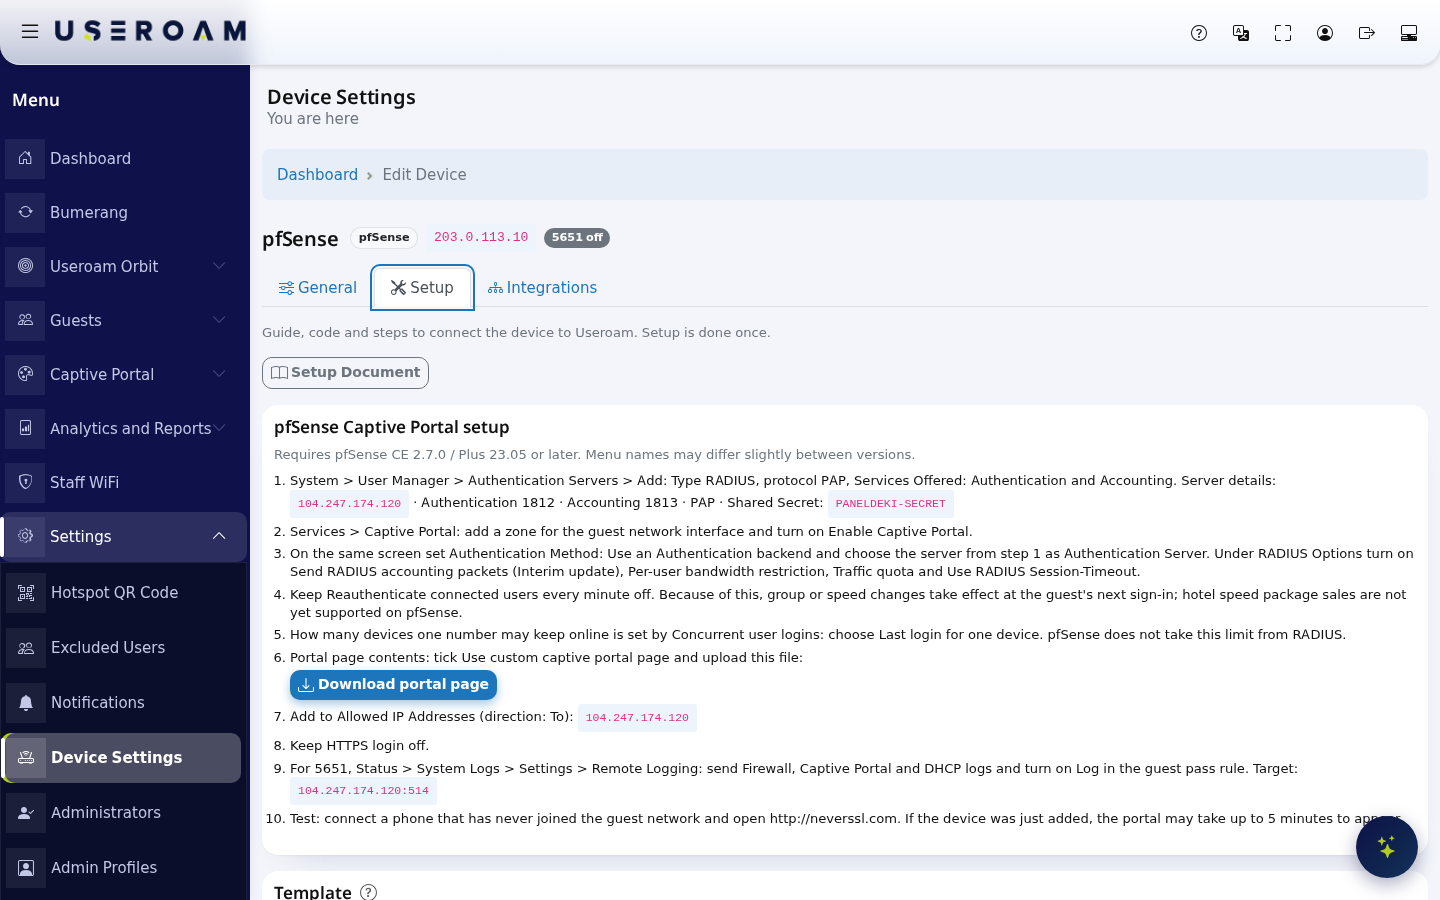](https://help.useroam.com/uploads/images/gallery/2026-11/21en-panel-kurulum-karti.png) ### 3 - Define the RADIUS Server In pfSense go to **System > User Manager > Authentication Servers** and click **Add**. [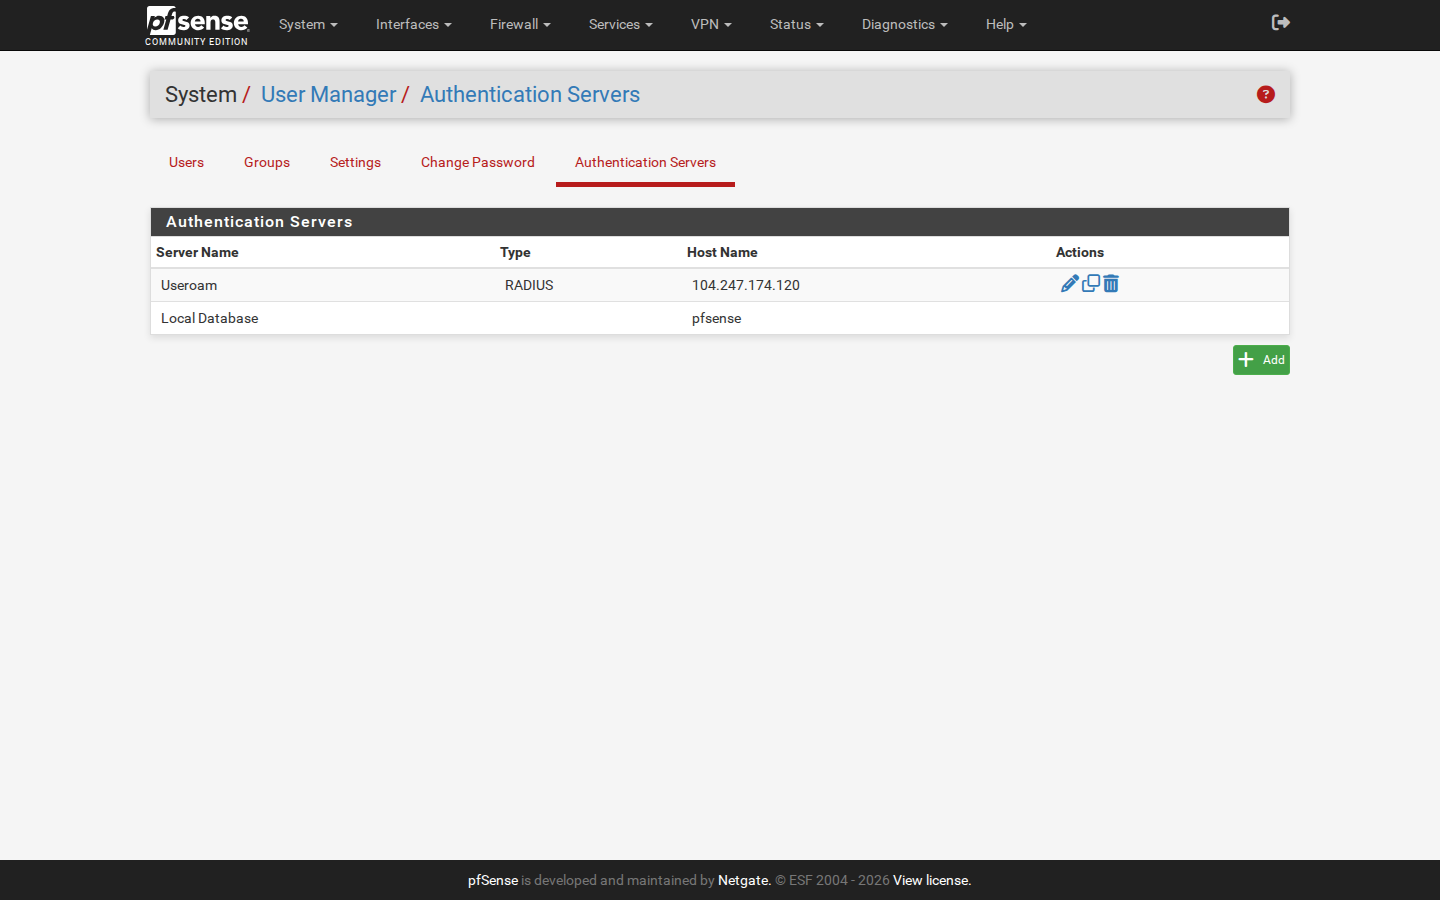](https://help.useroam.com/uploads/images/gallery/2026-11/01-authservers.png) - **Descriptive name:** `Useroam` - **Type:** `RADIUS` [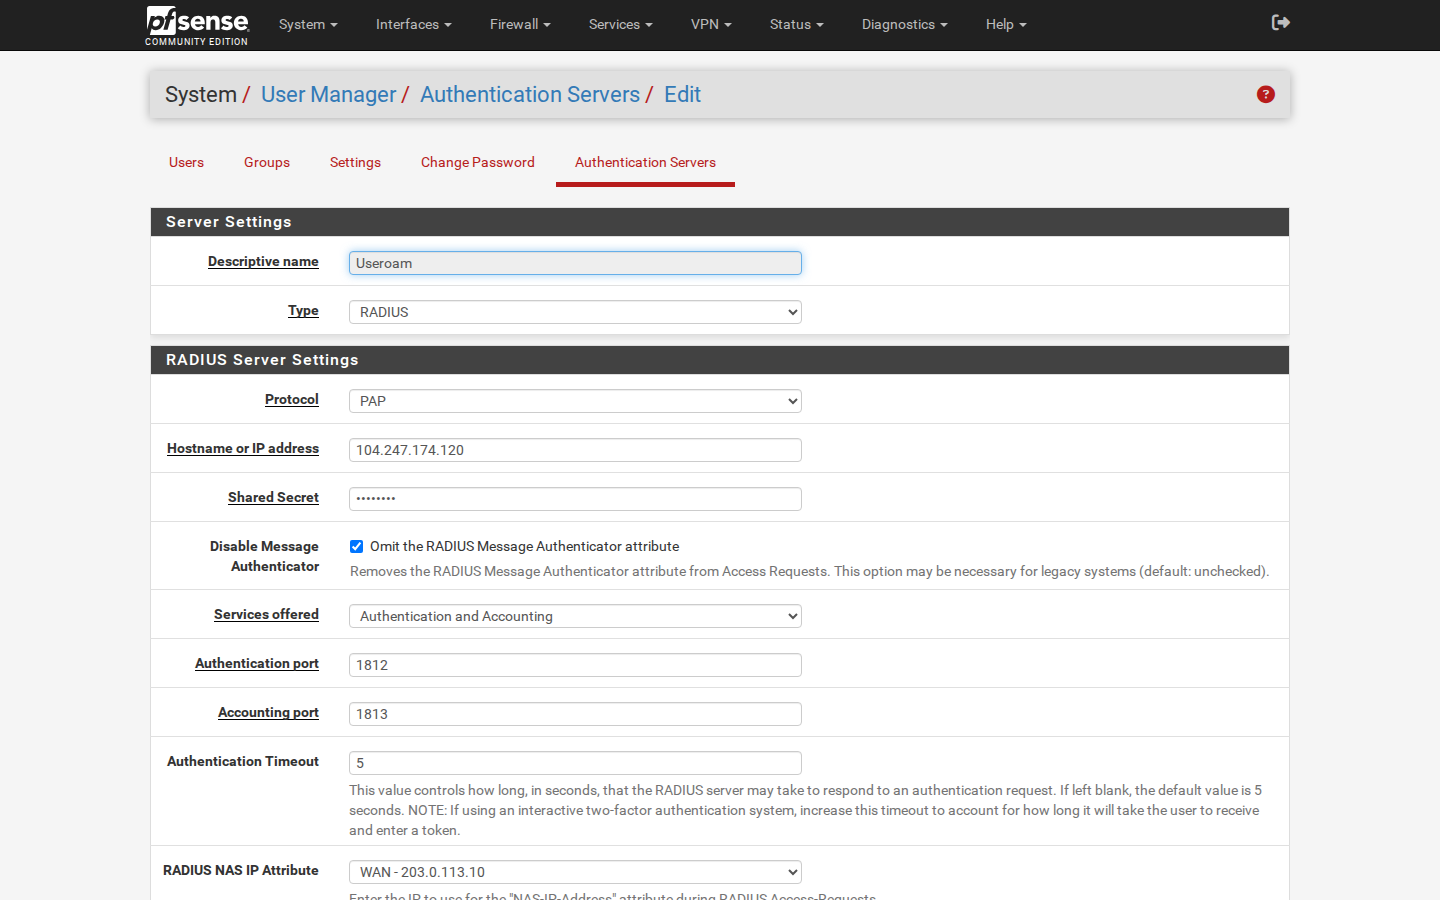](https://help.useroam.com/uploads/images/gallery/2026-11/02-authserver-ust.png) Fill in **RADIUS Server Settings**: - **Protocol:** `PAP` - **Hostname or IP address:** `104.247.174.120` - **Shared Secret:** the value from the panel card in step 2. - **Disable Message Authenticator:** leave unchecked. - **Services offered:** `Authentication and Accounting` - **Authentication port:** `1812`, **Accounting port:** `1813` - **Authentication Timeout:** `5` - **RADIUS NAS IP Attribute:** the internet-facing interface (usually `WAN`). Click **Save**. [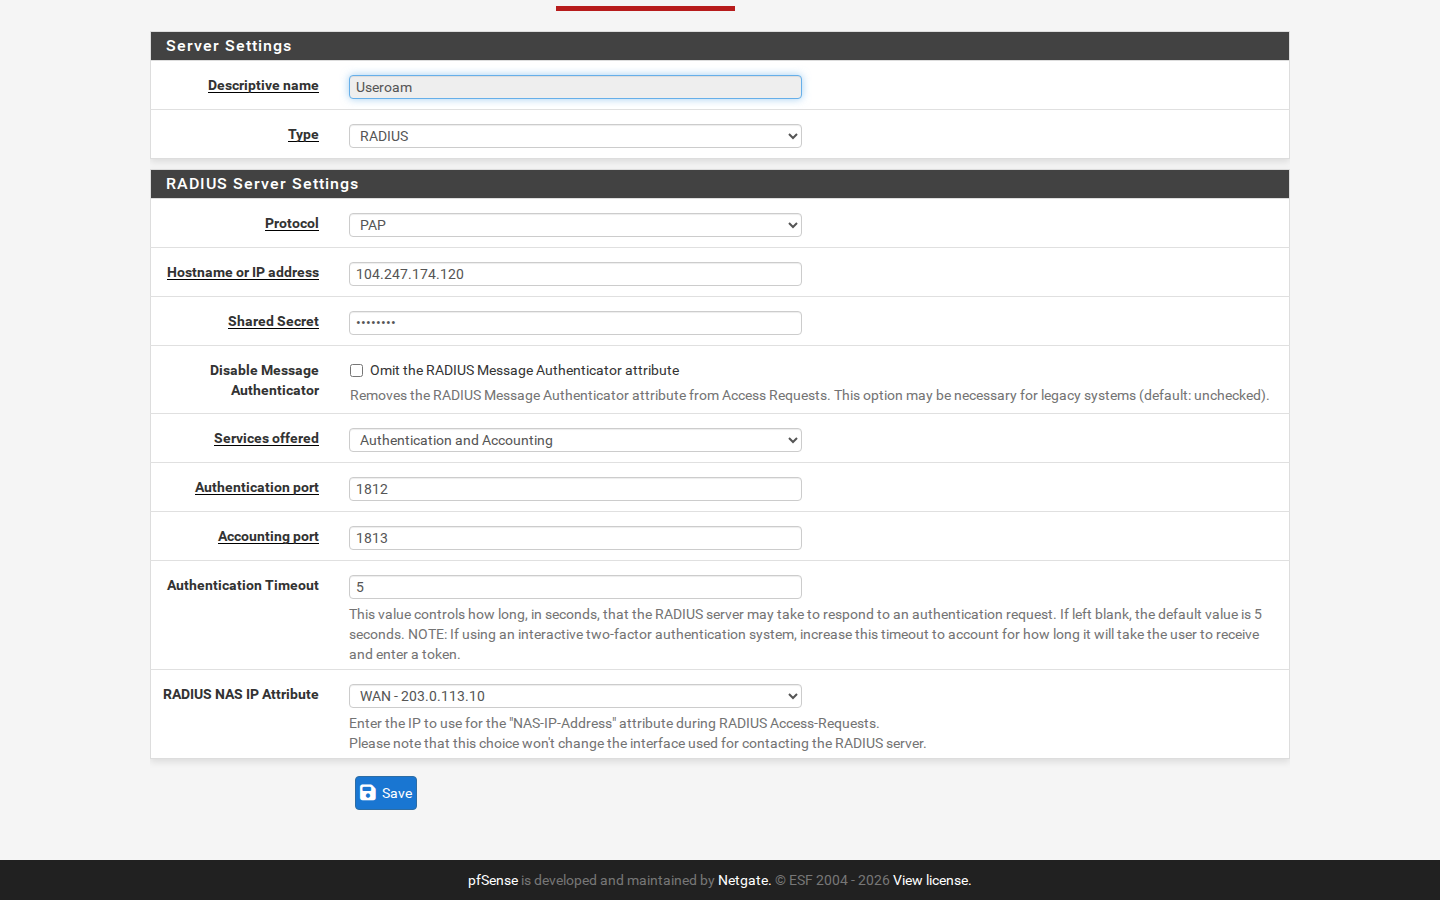](https://help.useroam.com/uploads/images/gallery/2026-11/03-authserver-radius.png) ### 4 - Create a Captive Portal Zone On **Services > Captive Portal** click **Add** to create a zone (e.g. `guest`), then click the zone's edit icon. [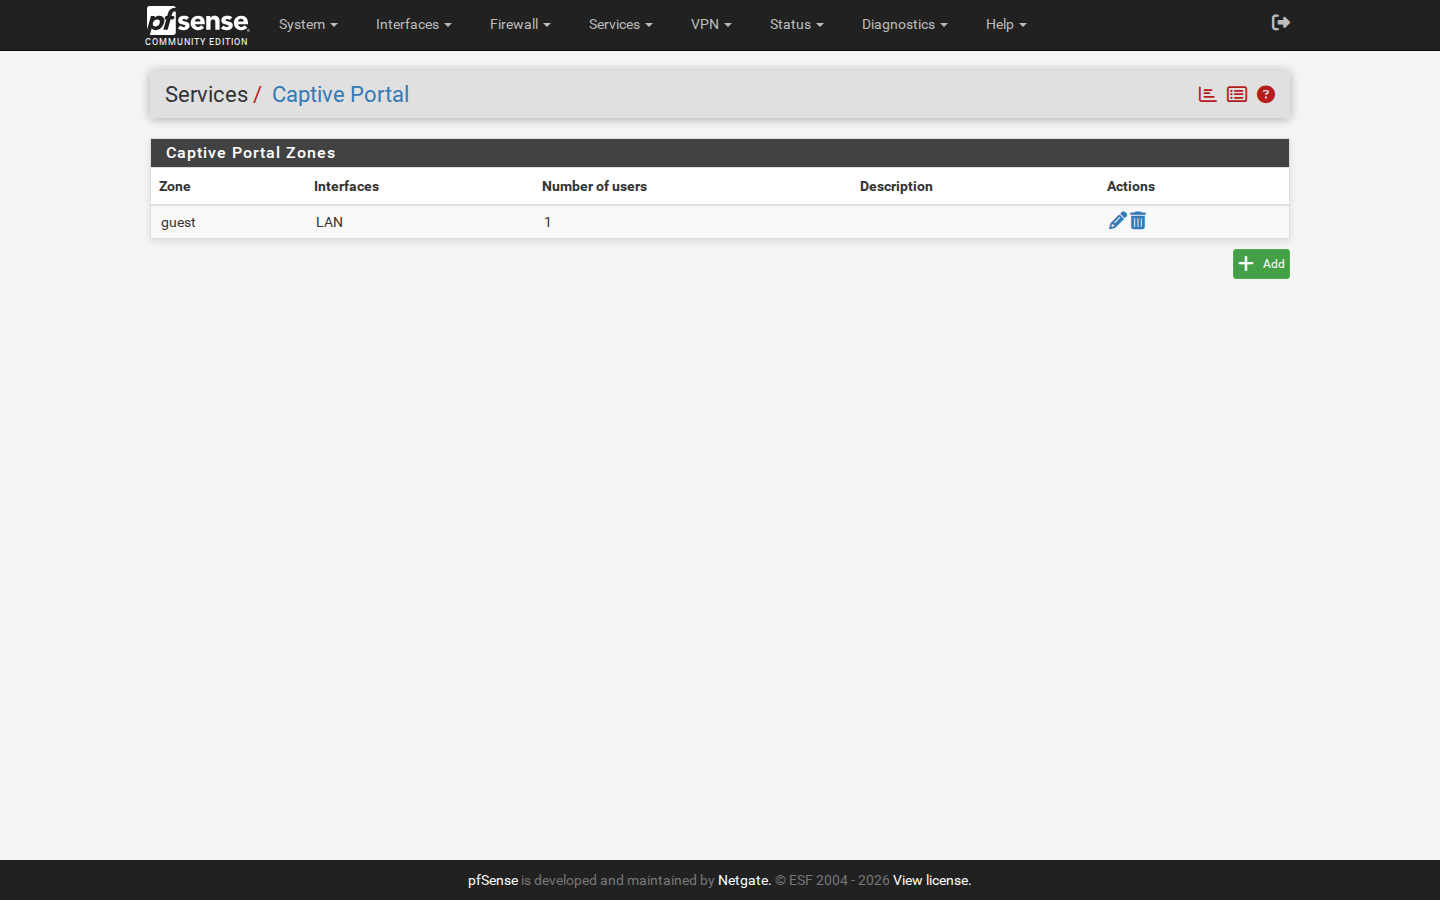](https://help.useroam.com/uploads/images/gallery/2026-11/04-zones.png) - **Enable:** `Enable Captive Portal` checked. - **Interfaces:** the interface of the guest network (e.g. `LAN` or the guest VLAN). - **Idle timeout, Hard timeout, Traffic quota:** leave empty. These limits come from the group in the Useroam panel (step 13). [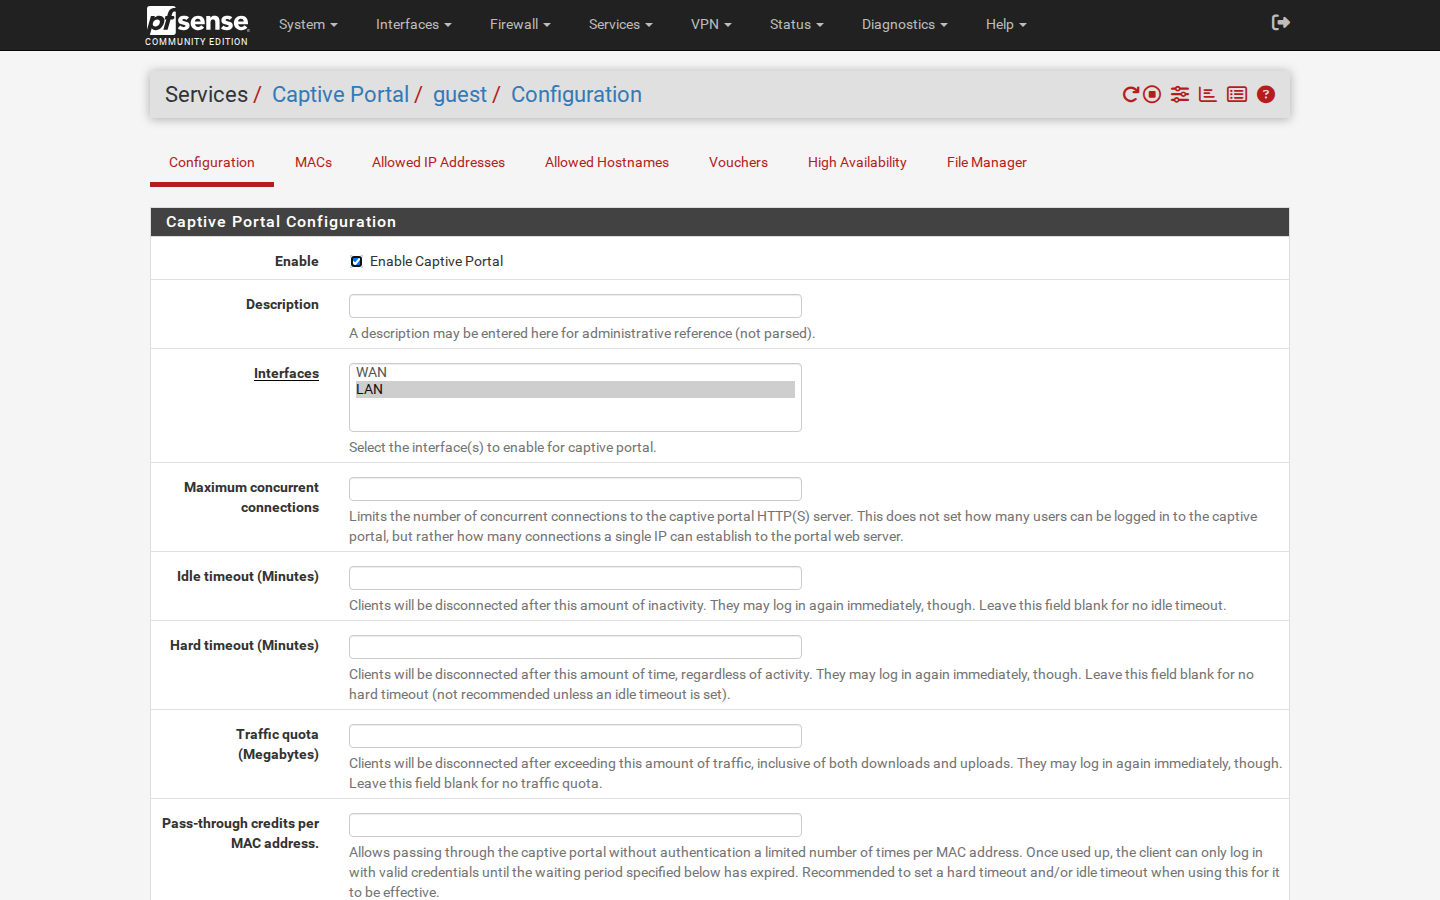](https://help.useroam.com/uploads/images/gallery/2026-11/05-zone-ust.png)The guest interface must have the **DHCP server enabled** and the **DNS Resolver/Forwarder** running, otherwise guests cannot see the portal.
### 5 - Devices per Number On the same zone page, **Concurrent user logins** sets how many devices one number may keep online at the same time. pfSense does not take this limit from RADIUS; it is set here. - **Multiple:** no limit; one number can stay online on several devices. - **Last login (recommended):** when the number logs in on another device, the previous device is disconnected (one device). - **First login:** the first device stays online and other devices cannot log in. Leave **MAC filtering** and **Pass-through MAC Auto Entry** unchecked. **Check** **Use custom captive portal page**. [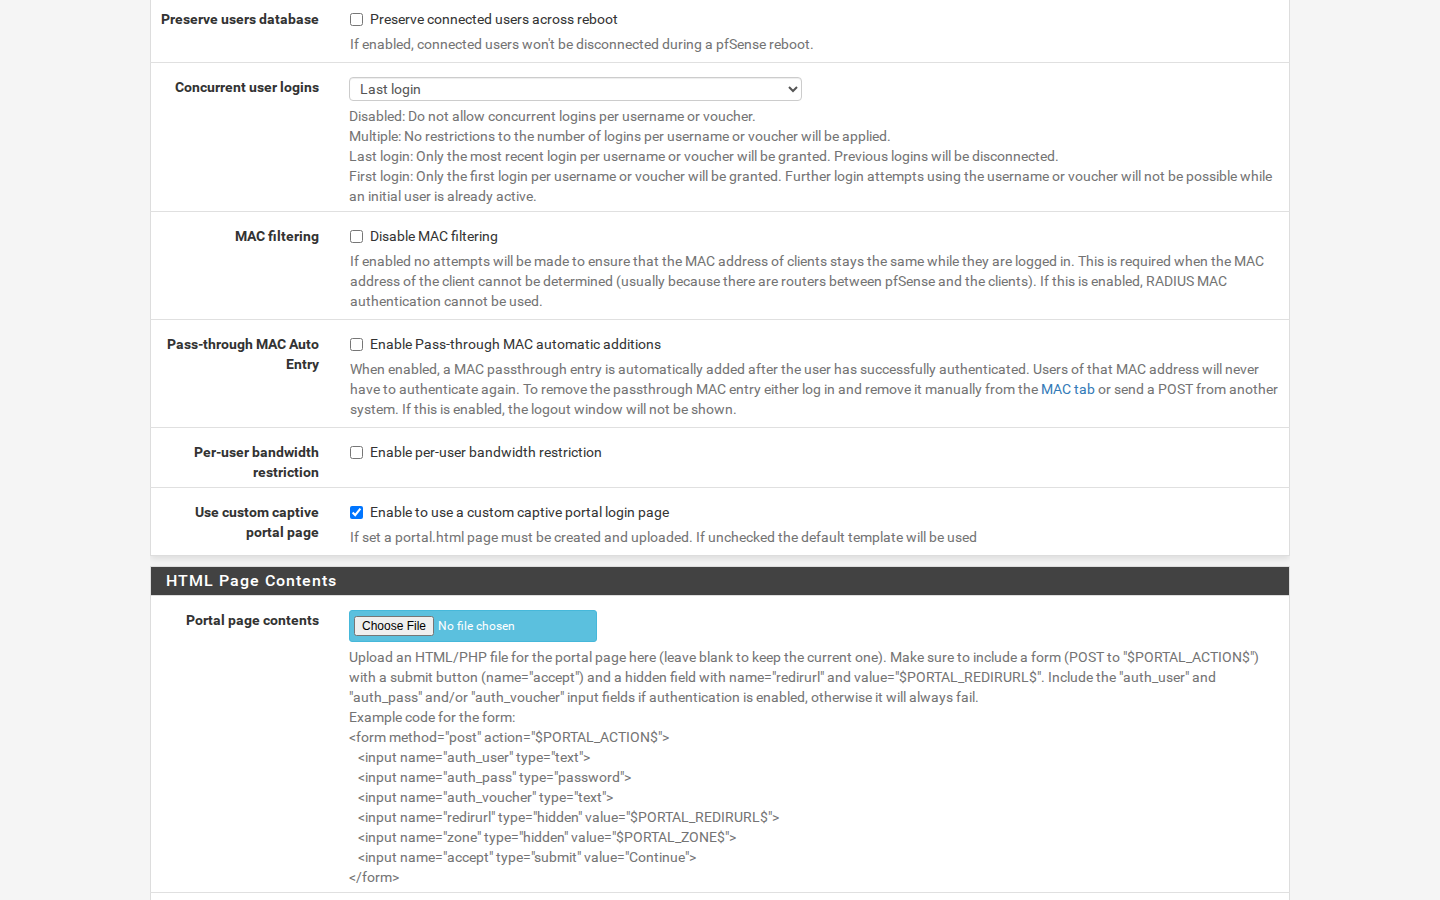](https://help.useroam.com/uploads/images/gallery/2026-11/06-zone-concurrent.png) ### 6 - Upload the Useroam Portal Page Under **HTML Page Contents**, use **Choose File** in **Portal page contents** to select the `portal.html` file downloaded in step 2. Leave the Auth error and Logout pages empty. [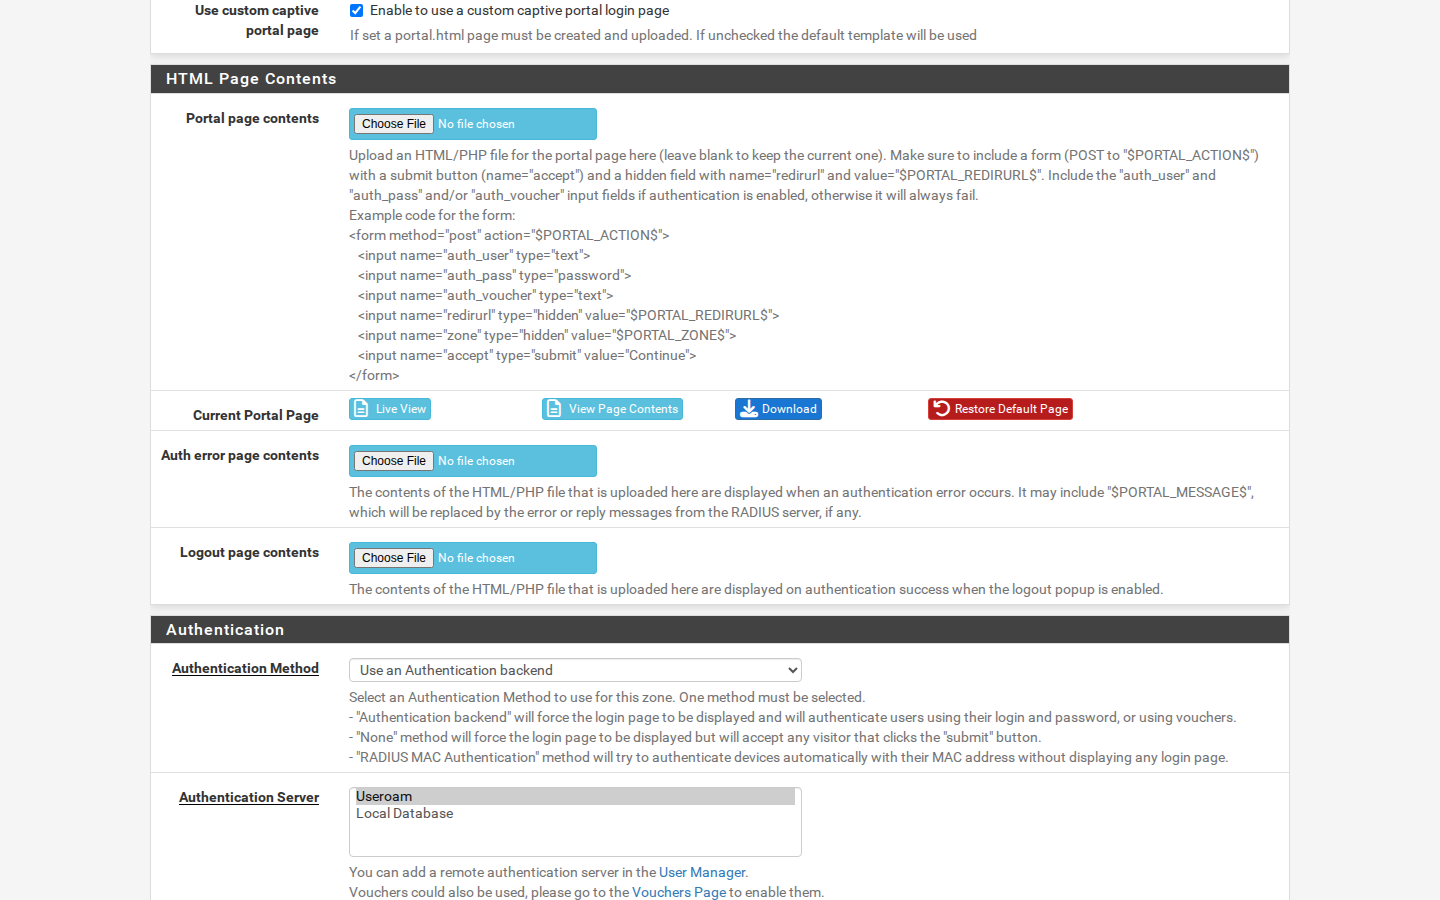](https://help.useroam.com/uploads/images/gallery/2026-11/07-zone-html.png) ### 7 - Authentication Settings In the **Authentication** section: - **Authentication Method:** `Use an Authentication backend` - **Authentication Server:** `Useroam`, added in step 3 - **Secondary authentication Server:** leave empty (nothing selected). - **NAS Identifier:** leave empty. [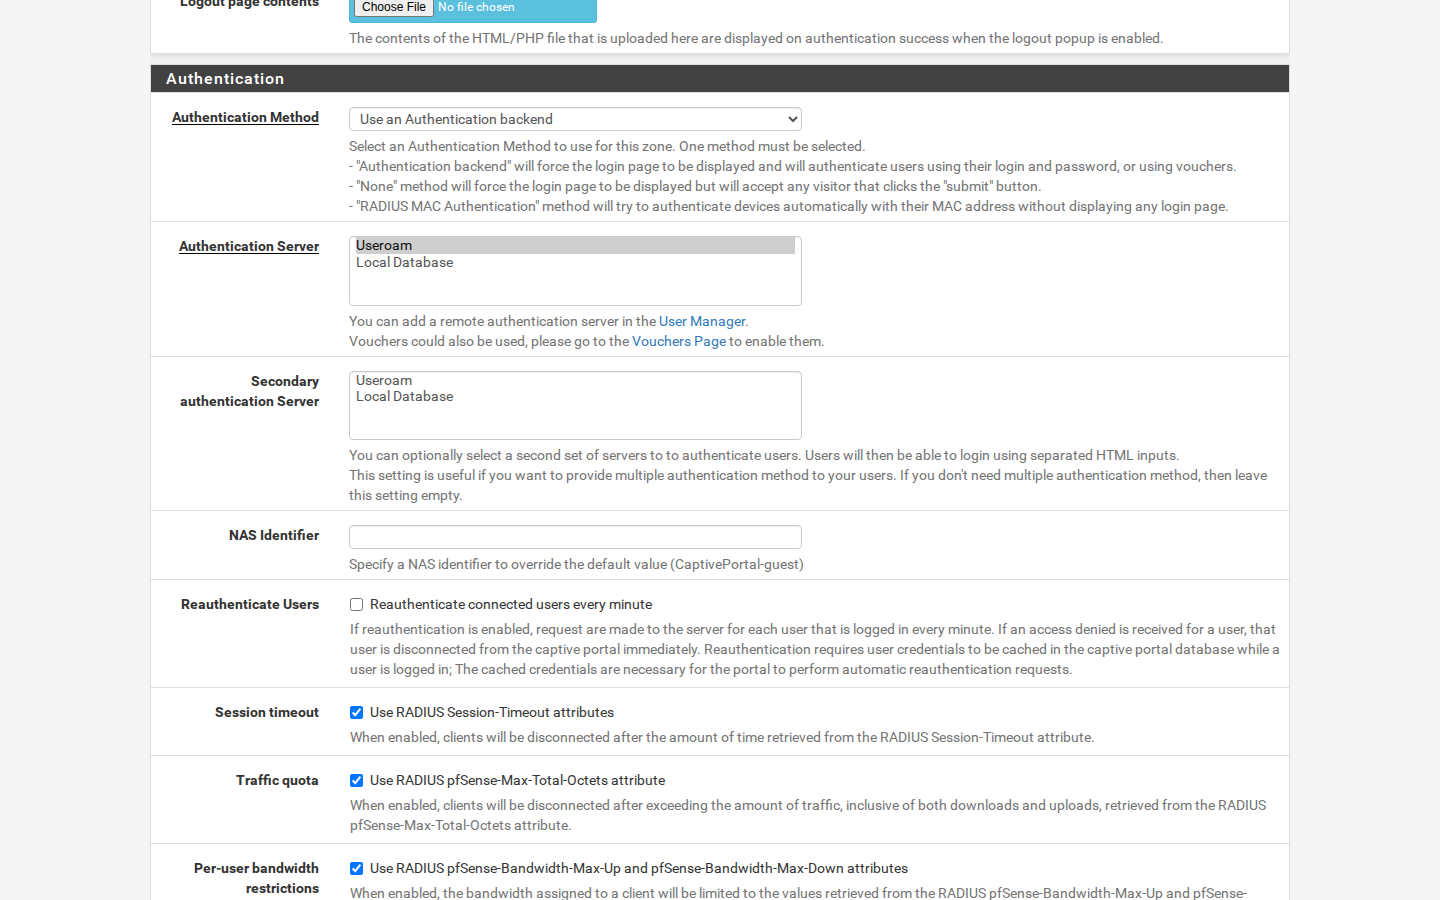](https://help.useroam.com/uploads/images/gallery/2026-11/08-zone-auth.png) ### 8 - RADIUS Options (Speed, Quota, Time)**\[CRITICAL STEP\]** If the three boxes below are not checked, pfSense **ignores** the speed, quota and time values sent by Useroam and guests stay unlimited.
- **Reauthenticate Users:** leave unchecked. - **Session timeout:** `Use RADIUS Session-Timeout attributes` checked. The group's validity and daily end time are applied with it. - **Traffic quota:** `Use RADIUS pfSense-Max-Total-Octets attribute` checked. - **Per-user bandwidth restrictions:** `Use RADIUS pfSense-Bandwidth-Max-Up and pfSense-Bandwidth-Max-Down attributes` checked. - **MAC address format:** `Default` [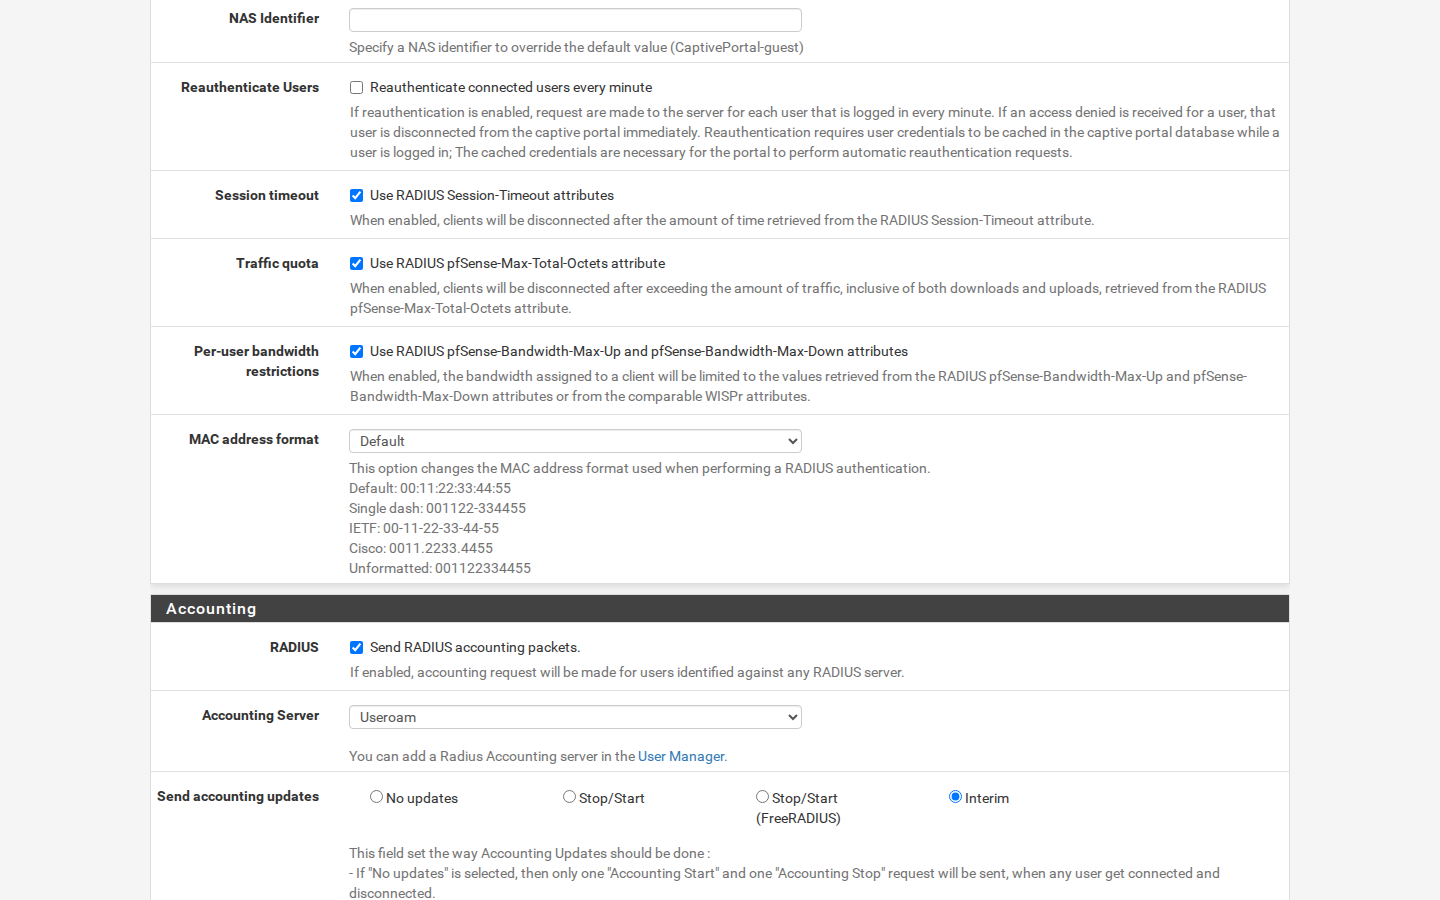](https://help.useroam.com/uploads/images/gallery/2026-11/09-zone-radius-opsiyon.png) ### 9 - Accounting In the **Accounting** section: - **RADIUS:** `Send RADIUS accounting packets` checked. - **Accounting Server:** `Useroam` - **Send accounting updates:** `Interim`. Useroam sets the interim interval to 5 minutes. - **Accounting style:** leave unchecked (default). [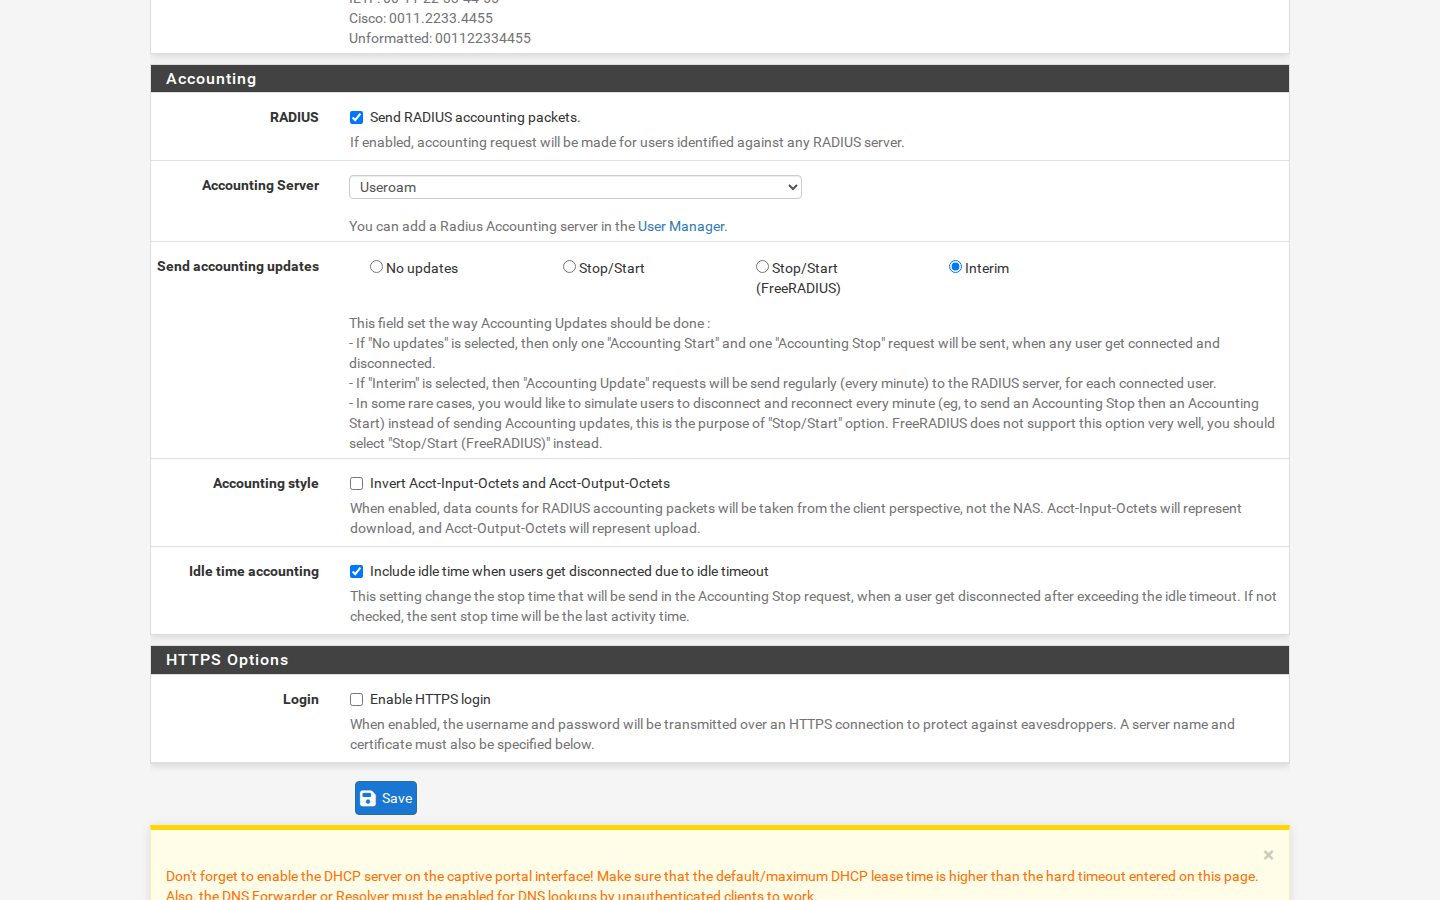](https://help.useroam.com/uploads/images/gallery/2026-11/10-zone-accounting.png) ### 10 - HTTPS Options and Save Under **HTTPS Options** leave **Enable HTTPS login** unchecked. Click **Save** at the bottom of the page. [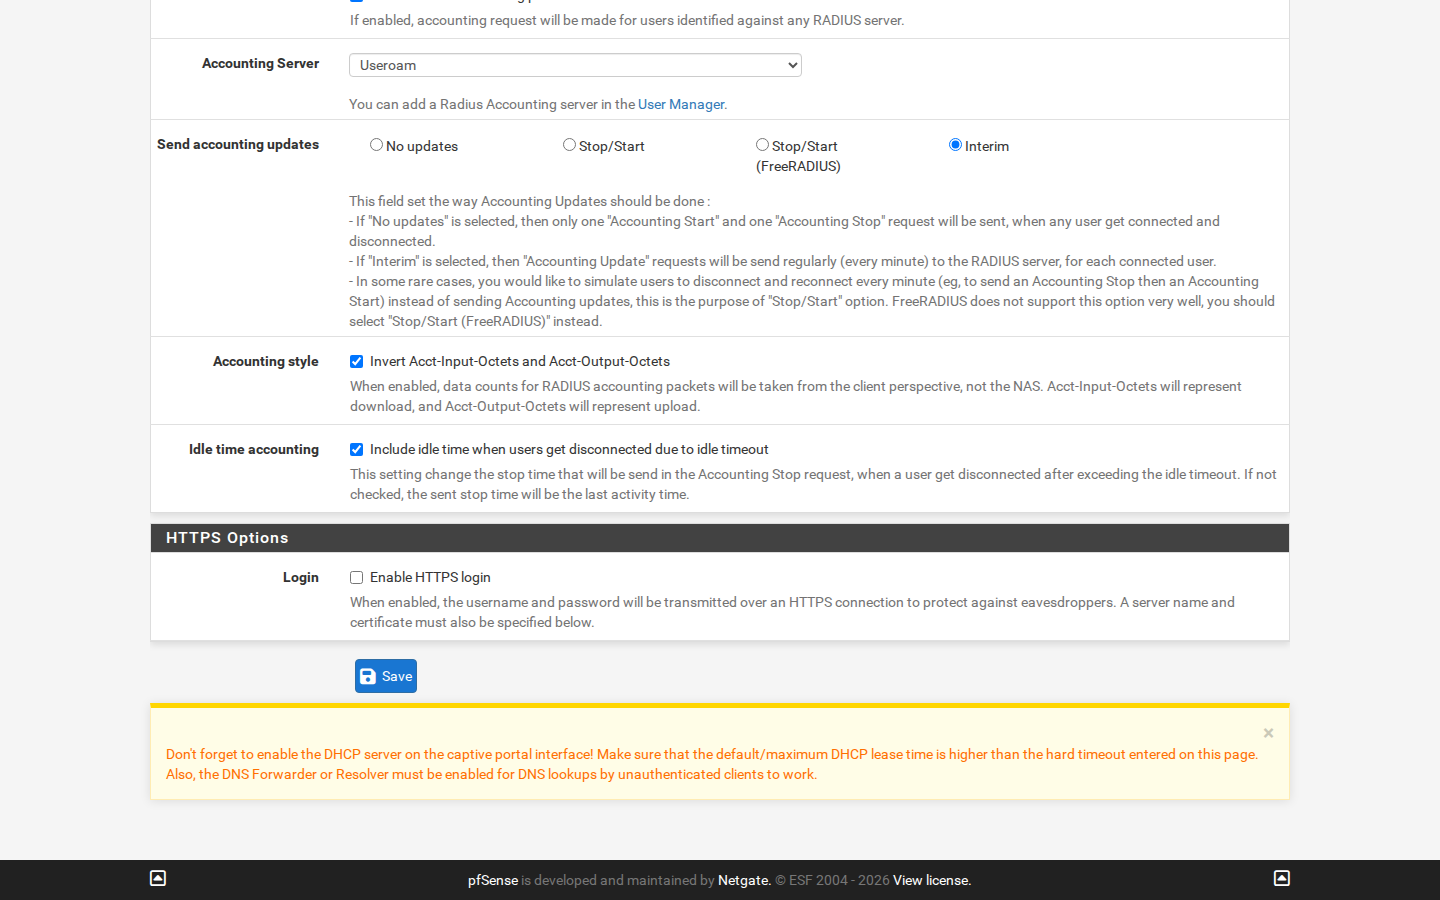](https://help.useroam.com/uploads/images/gallery/2026-11/11-zone-https.png) ### 11 - Pre-Login Access (Allowed IP Addresses) Guests must reach the Useroam welcome page before they log in. On the zone's **Allowed IP Addresses** tab click **Add** and enter: - `104.247.174.120` (Useroam). **Direction:** `Both` or `To`. - If WhatsApp login is used: `157.240.0.0/16` and `31.13.0.0/16` (Direction: `To`). [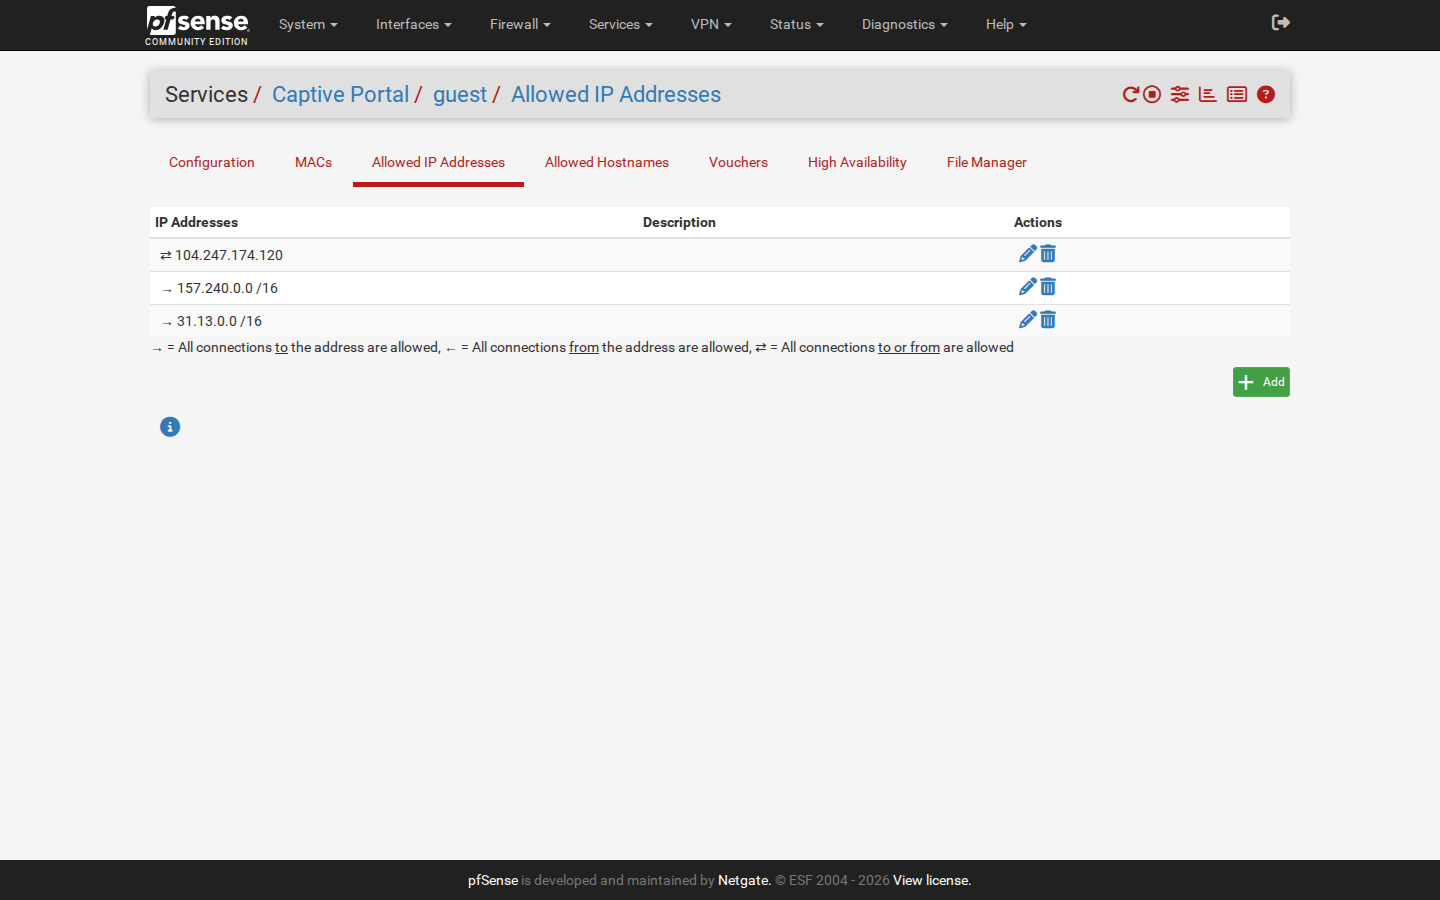](https://help.useroam.com/uploads/images/gallery/2026-11/12-allowed-ip.png) ### 12 - 5651 Log Forwarding On **Status > System Logs > Settings** scroll to **Remote Logging Options**: - **Enable Remote Logging:** checked. - **Remote log servers:** `104.247.174.120:514` - **Remote Syslog Contents:** `Firewall Events`, `DHCP Events` and `Captive Portal Events` checked. Also open the allow rule on the guest interface under **Firewall > Rules** and check **Log packets that are handled by this rule**. Click **Save** and **Apply Changes**. [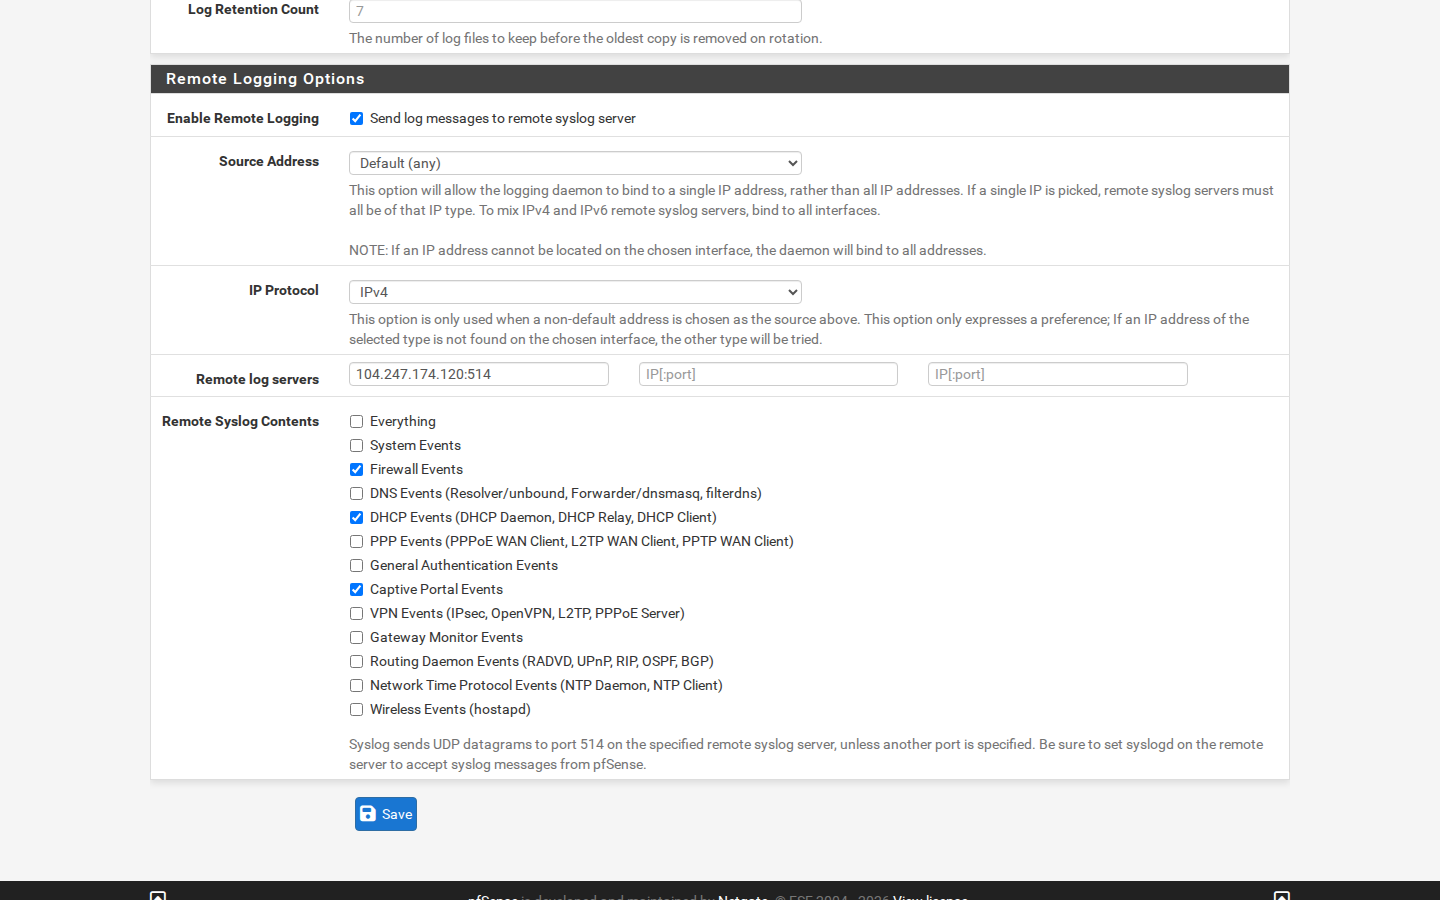](https://help.useroam.com/uploads/images/gallery/2026-11/13-remote-log.png) ### 13 - Speed, Quota and End Time in Groups When you open a group for a pfSense device in the Useroam panel under **Groups**, the **pfSense Speed and Quota Settings** card appears. Fields left empty apply no limit. - **Download / Upload speed:** write values such as `10M` or `512k`. - **Total quota (MB):** download plus upload. pfSense allows at most 4096 MB. - **Idle (min):** the session ends after this long without traffic. - **Daily end time:** every guest session in the group ends at this time (e.g. `12:00`). For hotel guests an earlier checkout time takes precedence. - **Validity:** the duration field at the top of the group is the maximum session length. [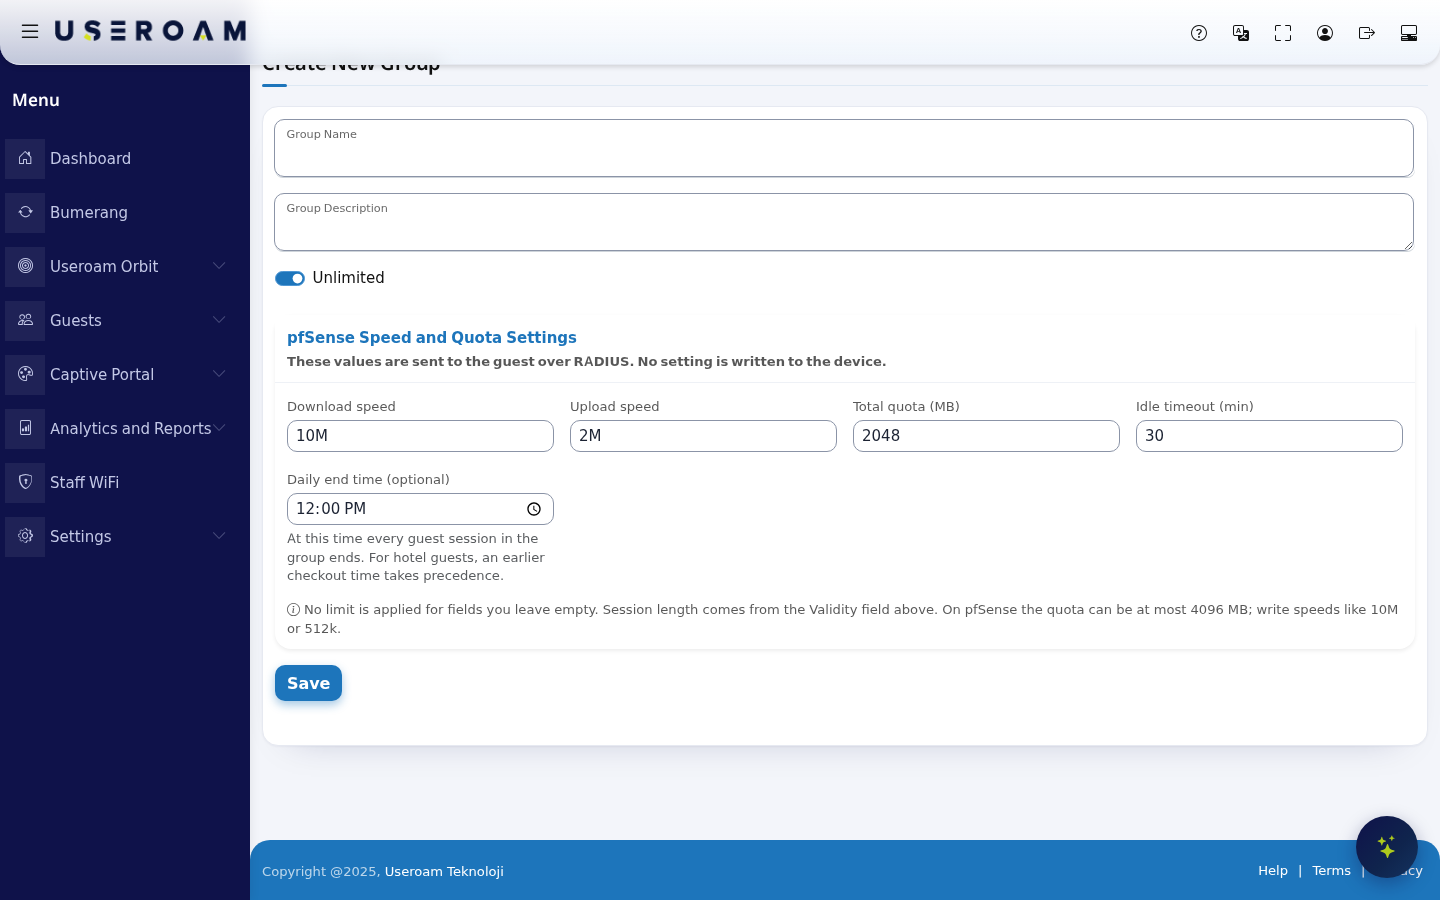](https://help.useroam.com/uploads/images/gallery/2026-11/22en-panel-grup.png)Group changes apply at the guest's **next login**. Because pfSense cannot receive an instant disconnect command from outside, hotel speed package sales are not yet supported on pfSense.
### 14 - Test Connect to the guest network with a phone that has not joined before and open `http://neverssl.com`. The Useroam welcome page should open; after logging in with SMS or WhatsApp you should be online. If the device was just added to the panel, the portal may take up to 5 minutes to open. Connected guests are listed on **Status > Captive Portal**. [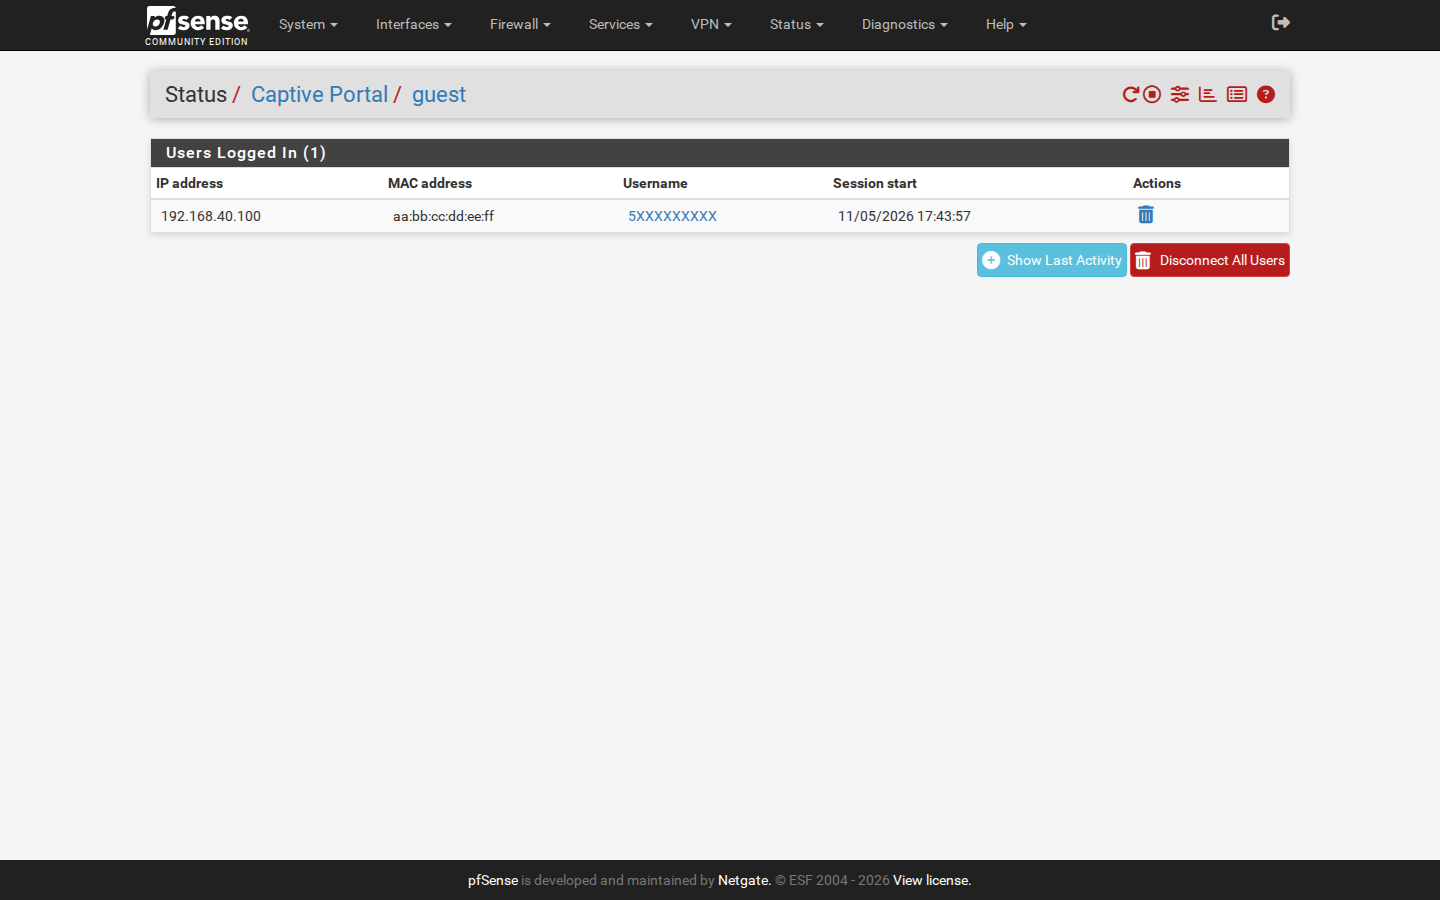](https://help.useroam.com/uploads/images/gallery/2026-11/14-status.png) ### Troubleshooting| Symptom | Check |
|---|---|
| Portal does not open, blank page or timeout | The 104.247.174.120 entry in step 11; DHCP and DNS on the guest interface; wait 5 minutes if the device was just added. |
| Portal opens but login says "wrong password" | Shared Secret matches the panel; the Device Address in the panel is the IP pfSense really uses to reach the internet. |
| Speed or quota not applied | The three boxes in step 8 are checked; the group has values; the guest logged in again after the change. |
| Session does not end at the end time | Session timeout box checked; pfSense time and time zone are correct (System > General Setup). |
| One number stays online on several devices | Step 5: Concurrent user logins set to Last login. |
| No 5651 logs in the panel | Remote Logging in step 12 and the Log option on the guest rule. |