
Portal Settings
What is it for?
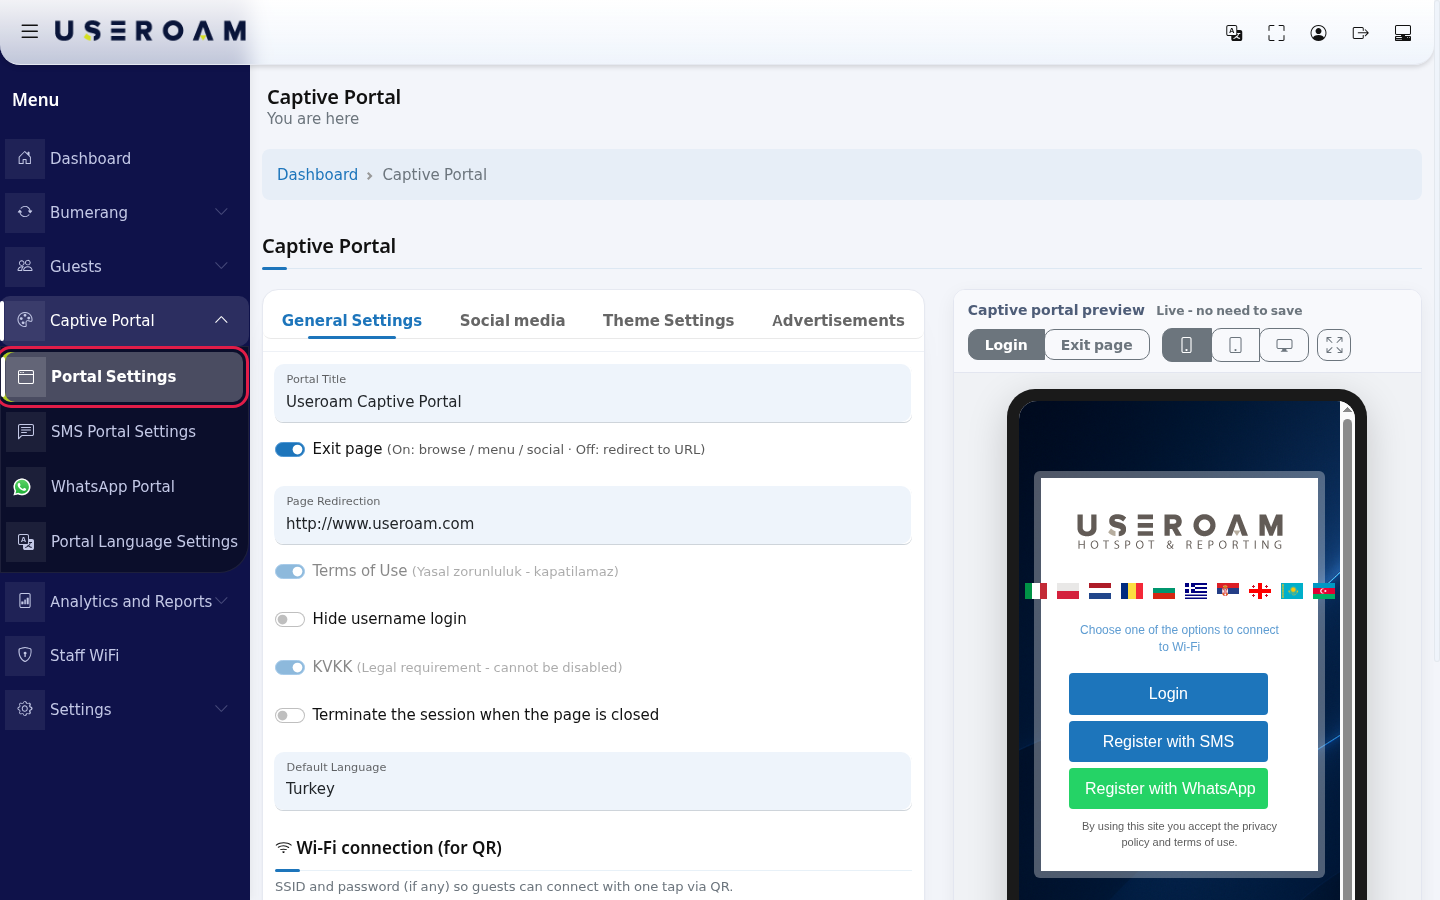
The Portal Settings screen manages the login screen (captive portal) that opens on a guest's phone when they join your Wi-Fi: title, logo, background, colours, the exit page after login, social media links, the Instagram card, Wi-Fi QR details and a login screen advertisement. The preview on the right shows each change right away, the way the guest will see it.
How do I open this screen? In the left menu, click Captive Portal → Portal Settings. The screen title reads Captive Portal with You are here below it; Dashboard in the path line takes you back to the home screen.
When do I use it?
- You added a new device and want to tailor the login screen your guests will see.
- Your logo, colours or background image changed.
- You are deciding whether guests go to your website after login or see an exit page with your social media links.
- You want to promote your Instagram account or show an announcement (advertisement) on the login screen.
Before you start
- Settings apply to the selected device. If you have several devices, select the right one first (Device Selection).
- The login methods (SMS, WhatsApp) are switched on in SMS Portal Settings and WhatsApp Portal Settings, not here. The texts on the portal (including the KVKK privacy text) are changed on the screen described in Editing Portal Texts.
- Prepare the logo and background as PNG, JPG, GIF or WEBP. Keep special characters and spaces out of the file name (e.g. cafe-logo.png).
Step by step
In the left menu, click Captive Portal → Portal Settings. A settings card with four tabs opens on the left and the Captive portal preview on the right.
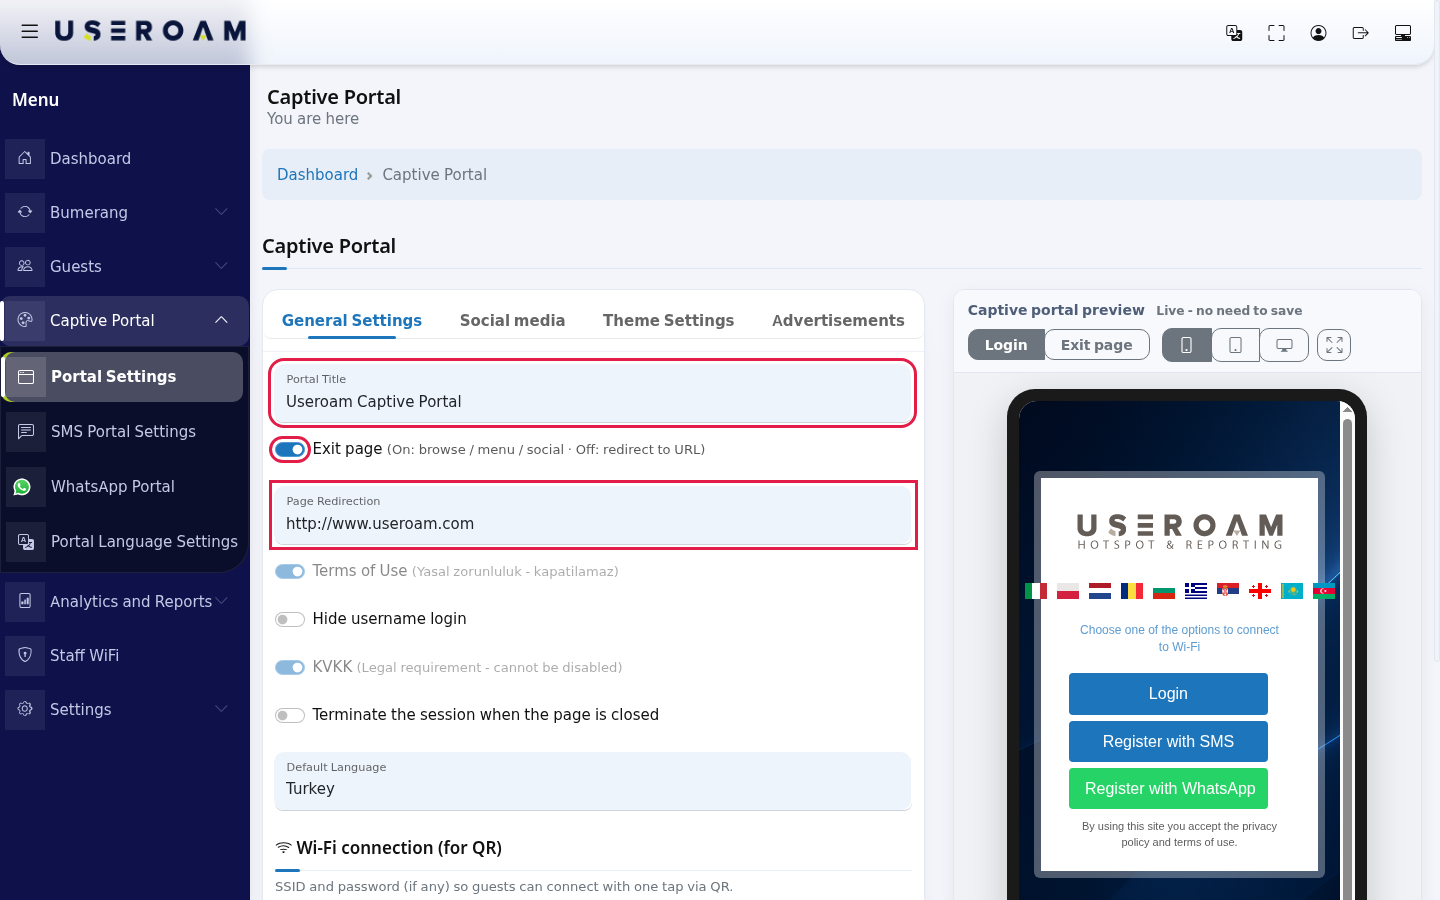
On the General Settings tab, type your business name into Portal Title (e.g. Sea Cafe Guest Wi-Fi). Then set the Exit page switch and the Page Redirection address:
- The note next to the switch reads (On: browse / menu / social · Off: redirect to URL).
- Exit page on: after login the guest sees an exit page with a Start Surfing button, your social media icons and (if enabled) the Instagram card. Start Surfing goes to the Page Redirection address.
- Exit page off: the guest is sent straight to the Page Redirection address after login.
- Page Redirection: type a full web address (e.g. https://www.seacafe.com). It is used in both cases, so do not leave it empty.
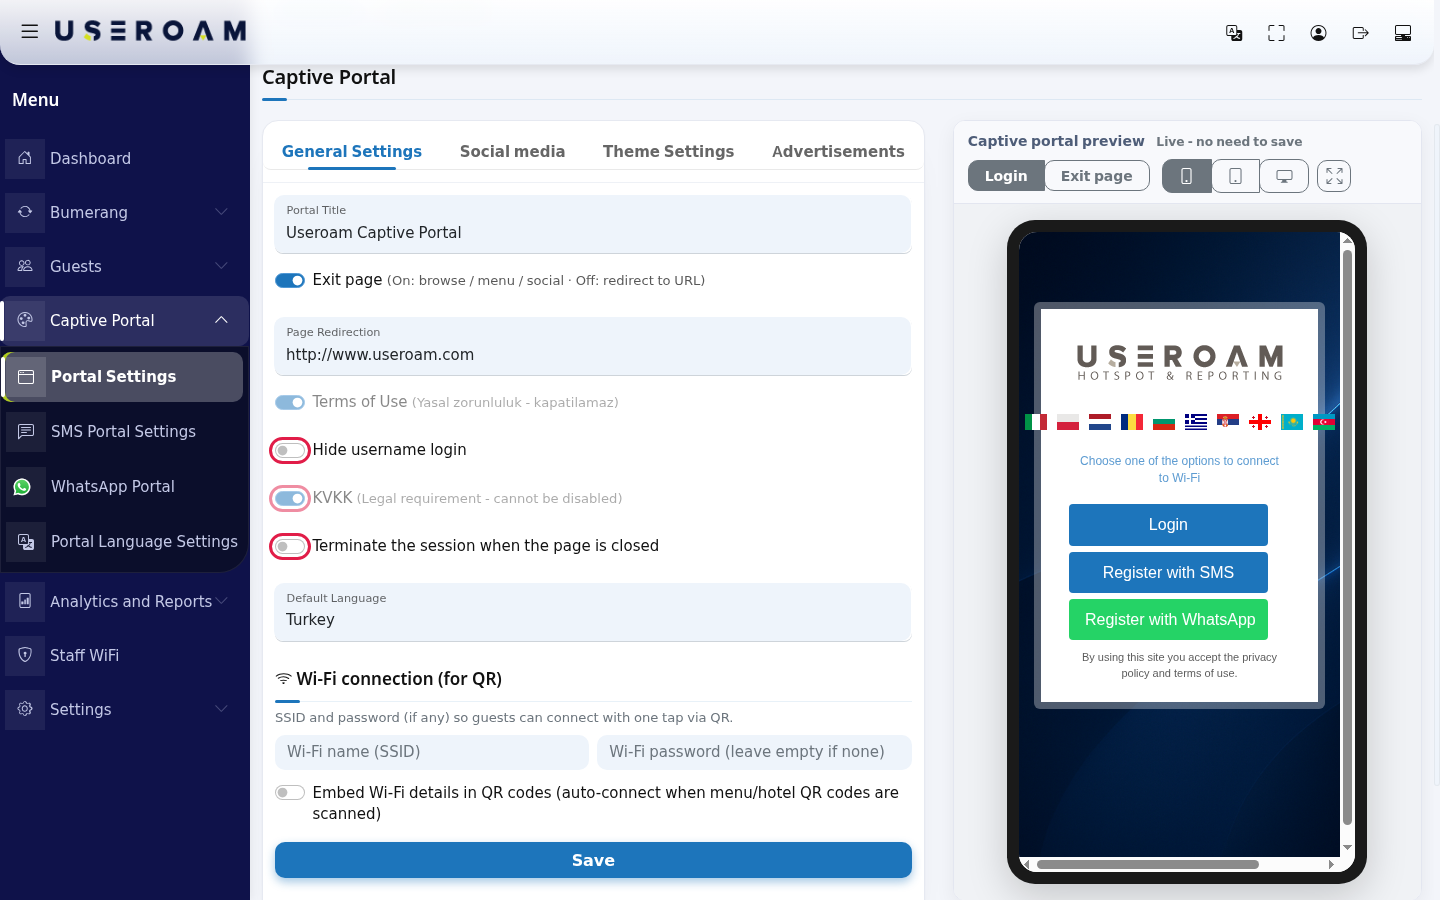
Check the switches:
- Terms of Use and KVKK: grey and always on. The panel shows (Legal requirement - cannot be disabled) next to KVKK and the Turkish (Yasal zorunluluk - kapatilamaz) next to Terms of Use. Guests cannot log in without accepting these texts. You change their content on the language screen.
- Hide username login: when on, the Login button (username and password boxes) disappears from the login screen and guests can only register with SMS or WhatsApp. If your hotel guests log in with their room number or a username you gave them, leave it off.
- Terminate the session when the page is closed: when on, the guest's session ends when they close the portal page; they see a warning before closing. It only appears on device types that support it (e.g. Sophos).
- Automatic Redirection: only appears on MikroTik, Fortinet, WatchGuard and EnGenius devices and redirects the guest automatically after login. When the switch is on, redirection is on. The demo device is a Sophos, so it is not in the image. Before 26 September 2026 this switch was displayed inverted and every Save on this tab flipped the setting; if you saved before that date, check that the switch is in the state you want and save once.
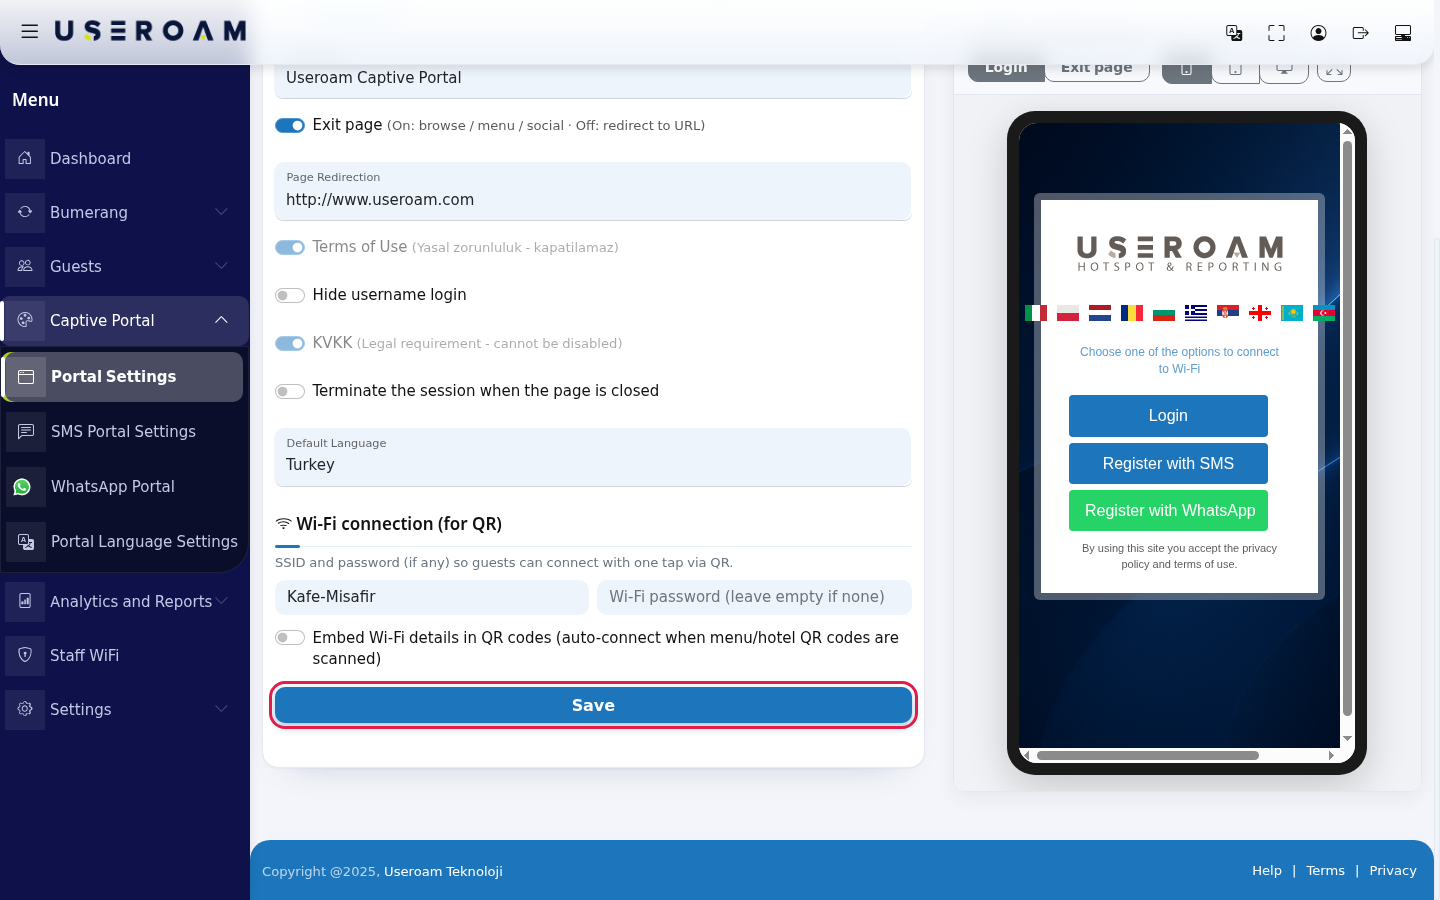
Choose the language the portal opens in from Default Language (e.g. Turkey). The list contains the languages on the Portal Language Settings screen. Then fill in Wi-Fi connection (for QR):
- Wi-Fi name (SSID): your guest network name (e.g. Cafe-Guest).
- Wi-Fi password (leave empty if none).
- Embed Wi-Fi details in QR codes: when on, scanning your menu and hotel QR codes offers to join the network automatically.
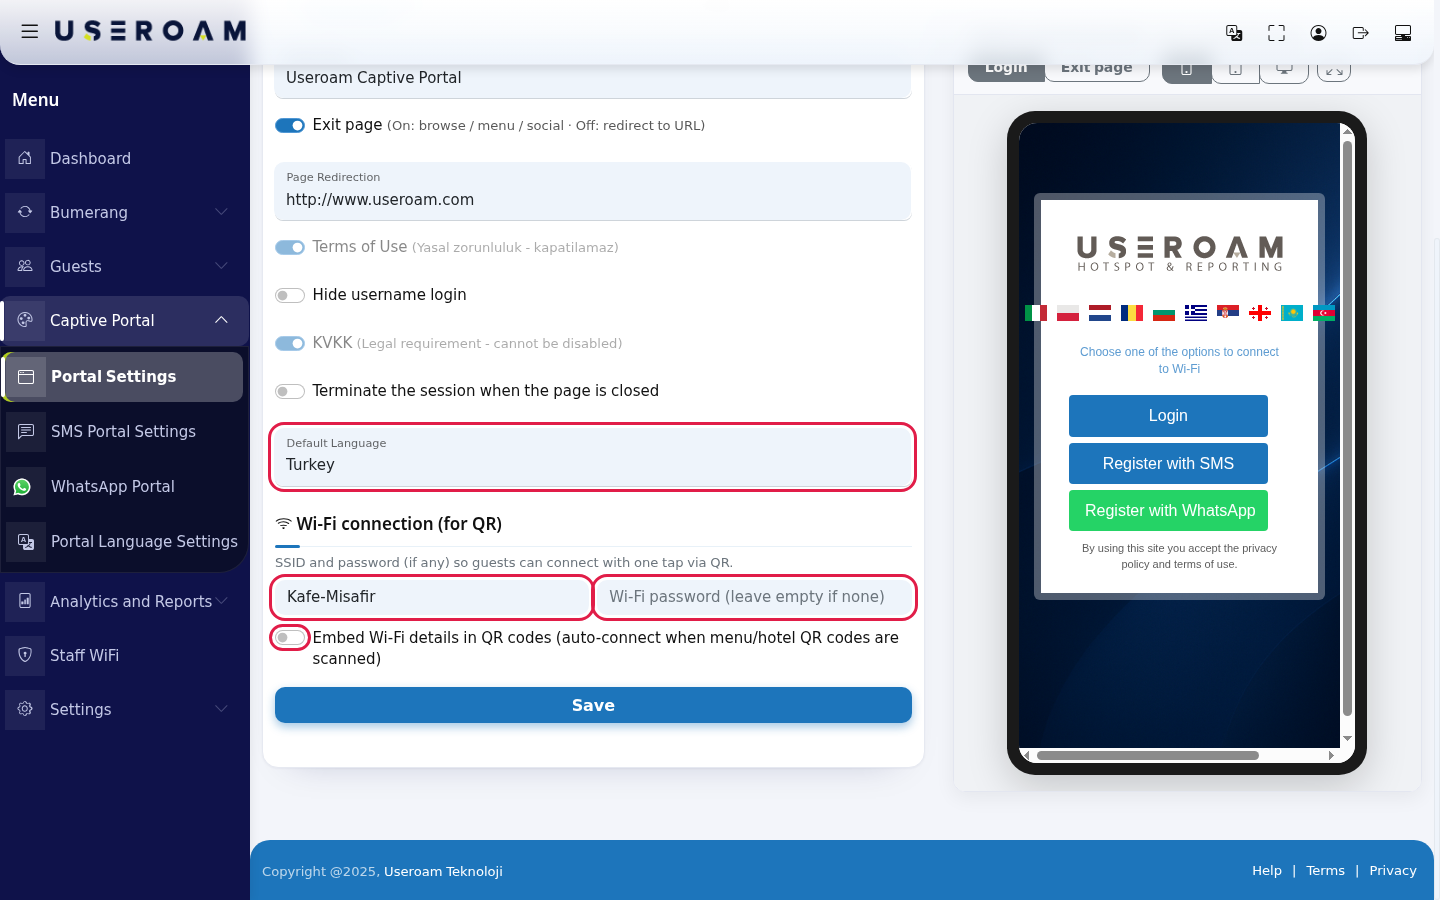
Press Save at the bottom of the tab. If it works the page reloads, your values stay in place and a green Successful- Successfully updated message appears above the card. The same message appears when you save on the Social media and Theme Settings tabs; the page opens on the tab you saved.
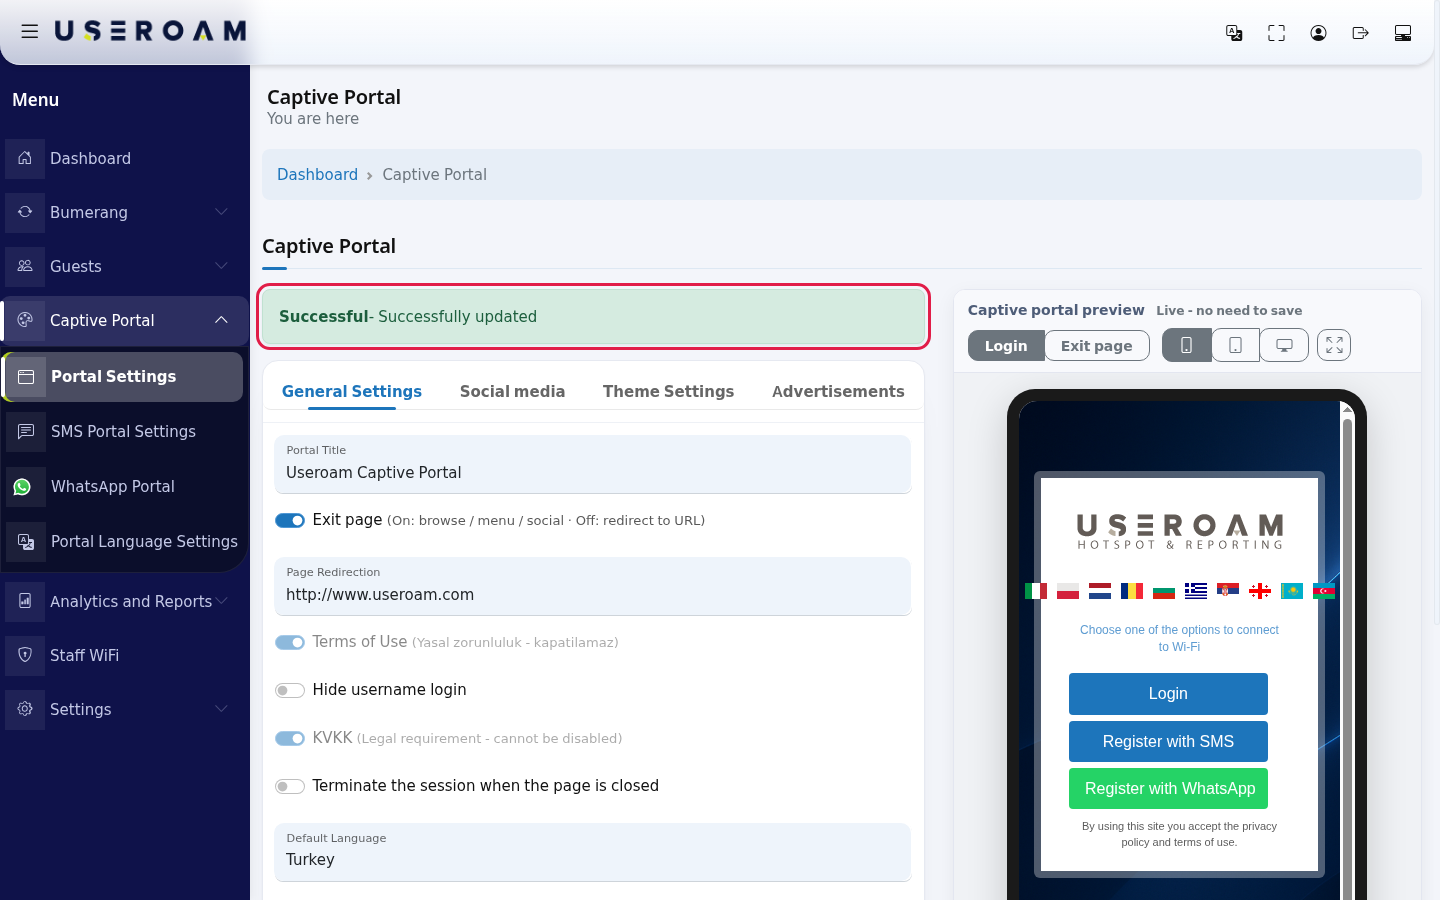
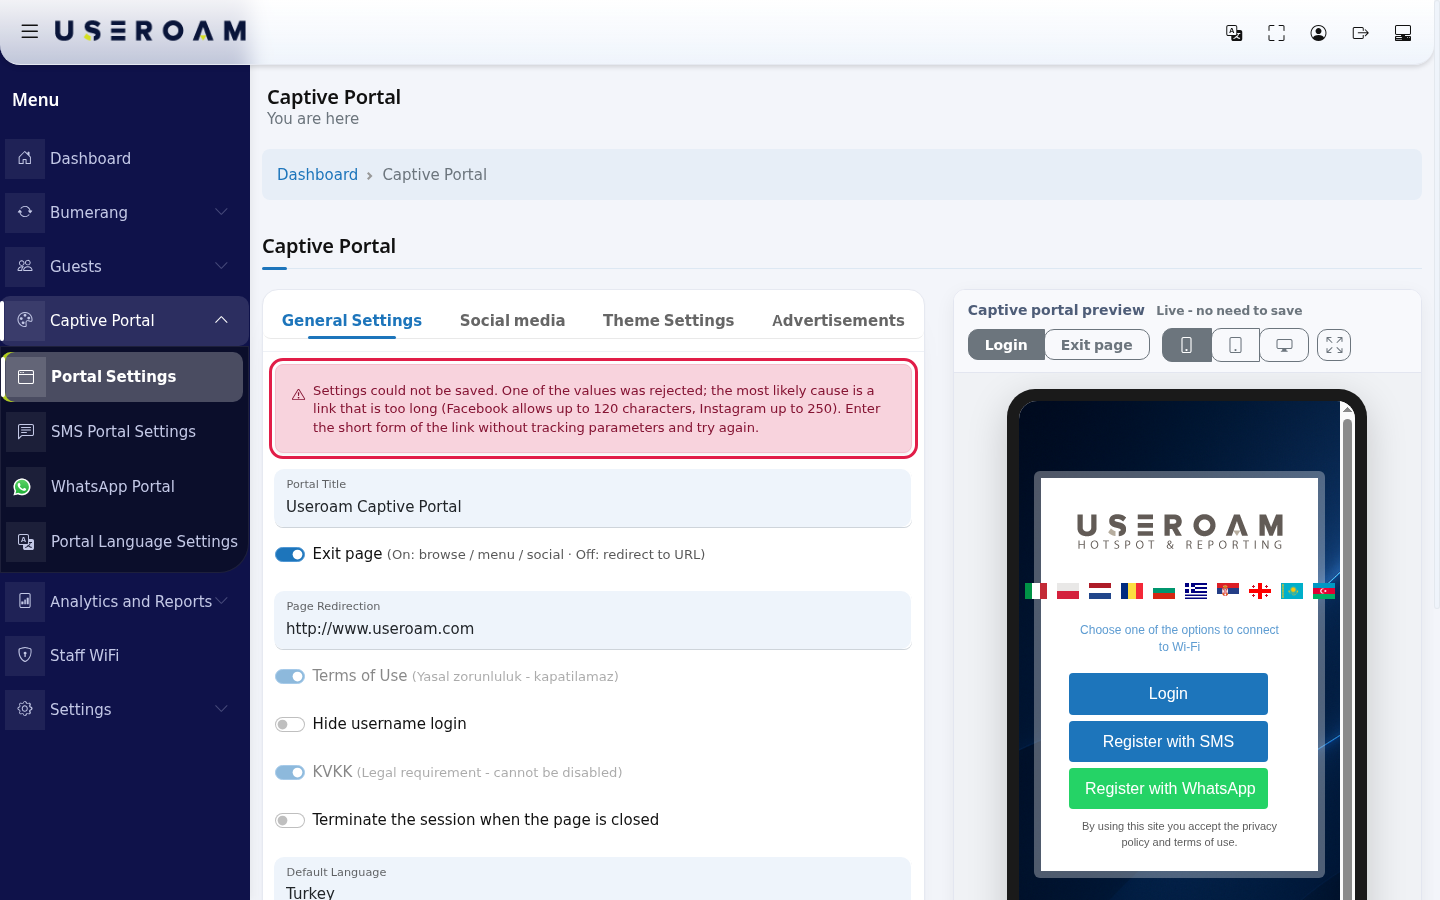
If saving fails, a red warning appears above the tab: Settings could not be saved. One of the values was rejected; the most likely cause is a link that is too long... Shorten the long address (usually Page Redirection or a social media link) and save again.
Go to the Social media tab. Type the full addresses of your accounts into Facebook Page, X (Twitter) page, Youtube Page and Pinterest Page (e.g. https://facebook.com/seacafe). The icon of each filled-in account turns coloured; empty accounts are not shown on the exit page.
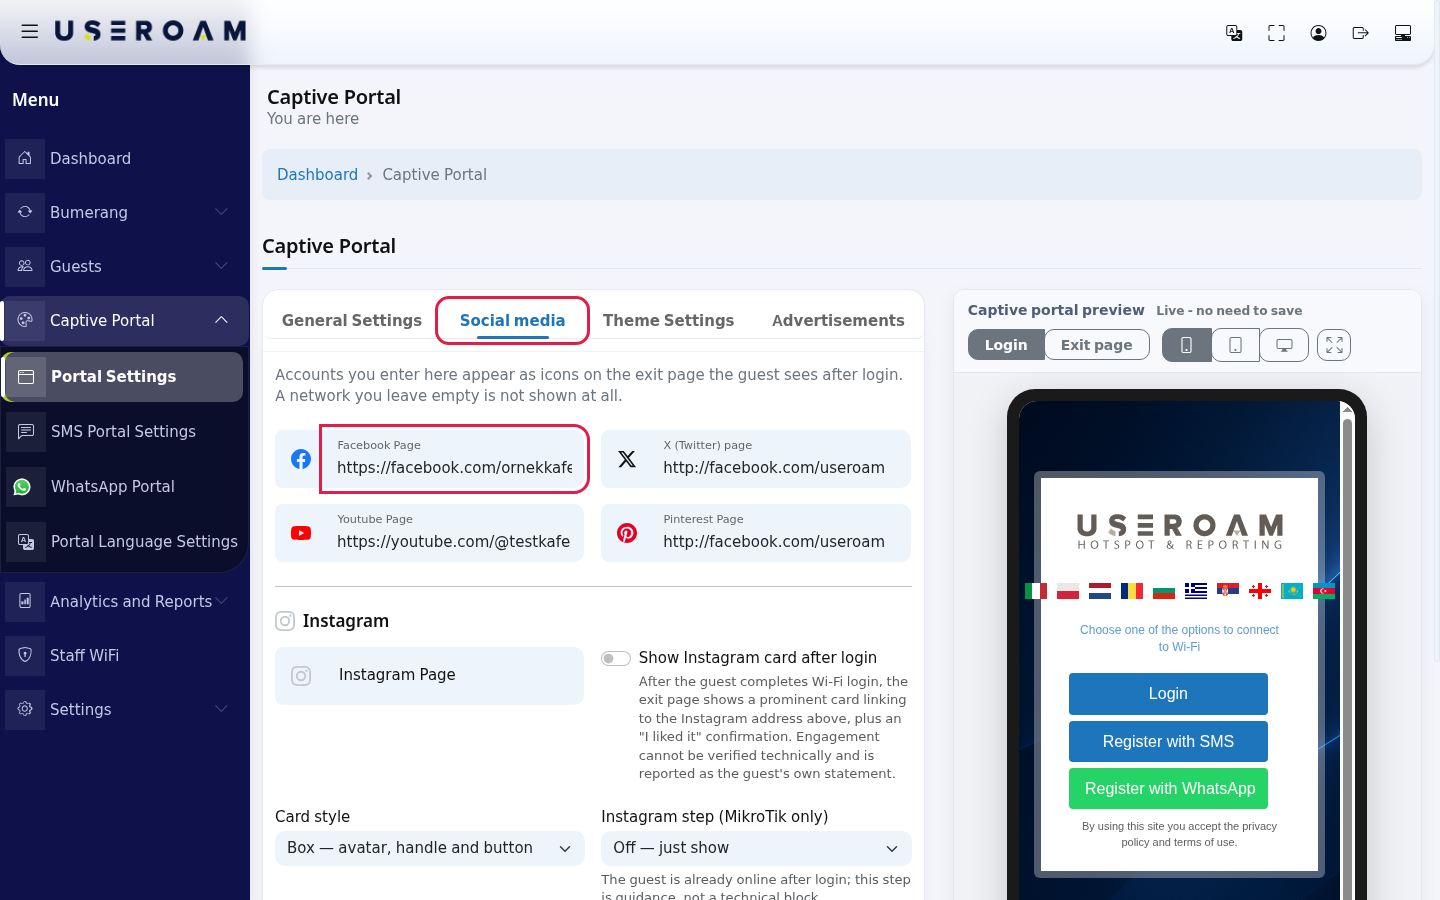
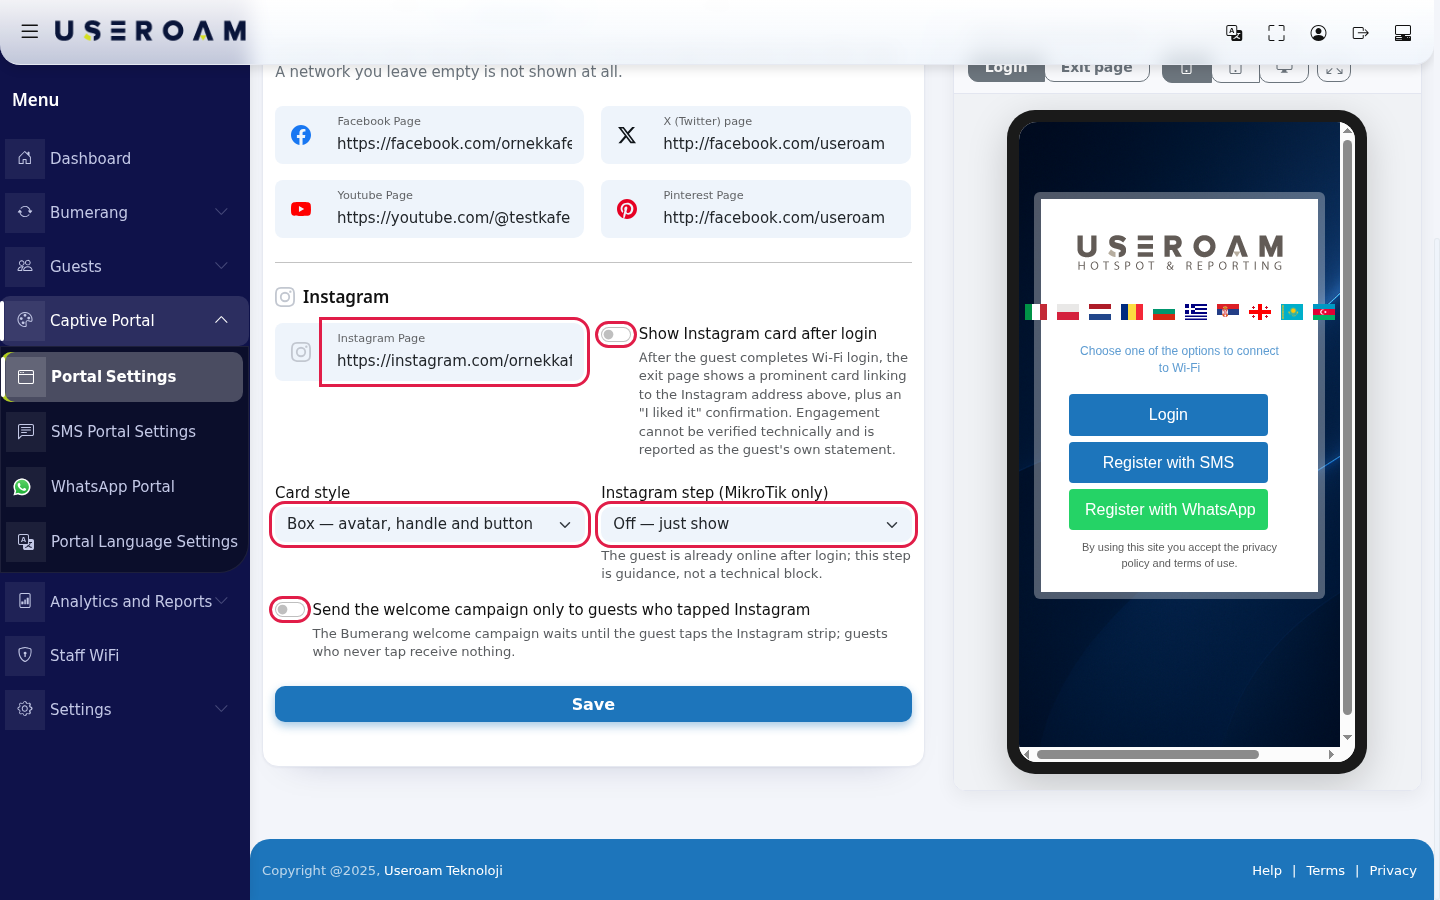
Fill in the Instagram section of the same tab, then press Save at the bottom of the tab:
- Instagram Page: your Instagram address.
- Show Instagram card after login: shows a prominent card linking to your Instagram on the exit page, plus an I liked it confirmation. The like cannot be verified technically; it is reported as the guest's own statement.
- Card style: Box (avatar, handle and button) or Button only.
- Instagram step (MikroTik only): Off (just show), Visual priority (highlight the strip), Time lock (unlocks after 8 s), Hard gate (tap required to continue). Note under it: the guest is already online after login; this step is guidance, not a technical block.
- Send the welcome campaign only to guests who tapped Instagram: the Bumerang welcome campaign waits until the guest taps the Instagram strip; guests who never tap receive nothing.
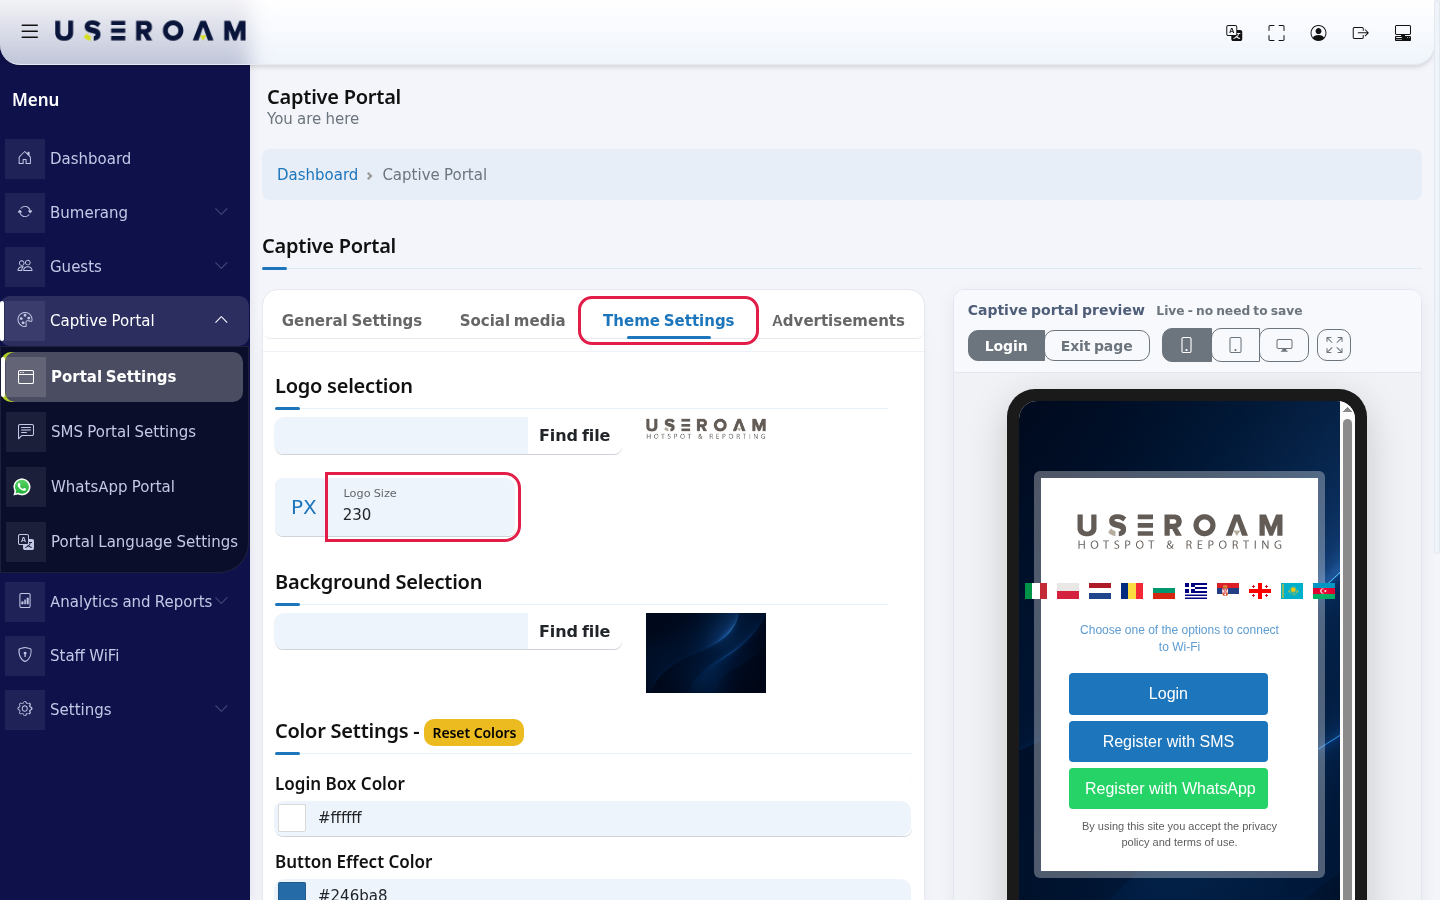
Go to the Theme Settings tab. Under Logo selection, pick your logo with Find file and type its width in pixels into Logo Size (e.g. 230). Pick the background image under Background Selection. The small pictures on the right are the logo and background currently in use.
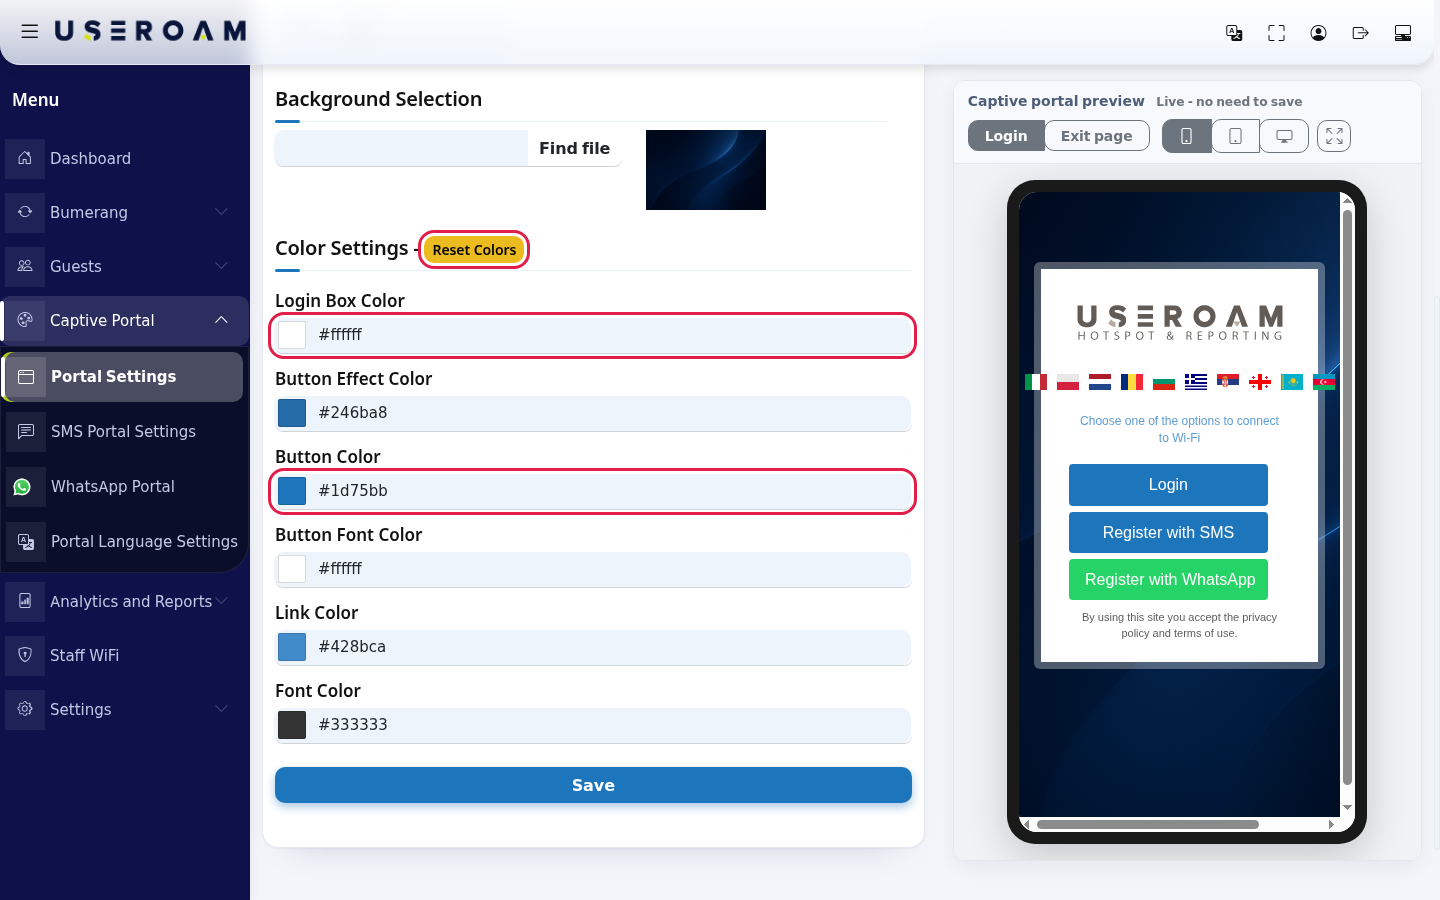
Choose the colours under Color Settings, then press Save at the bottom of the tab. Clicking a box opens a colour picker:
- Login Box Color: background of the login box.
- Button Color and Button Effect Color: normal and hover colour of the buttons.
- Button Font Color, Link Color, Font Color: button text, links and text.
- Reset Colors: returns to Useroam's default colours.
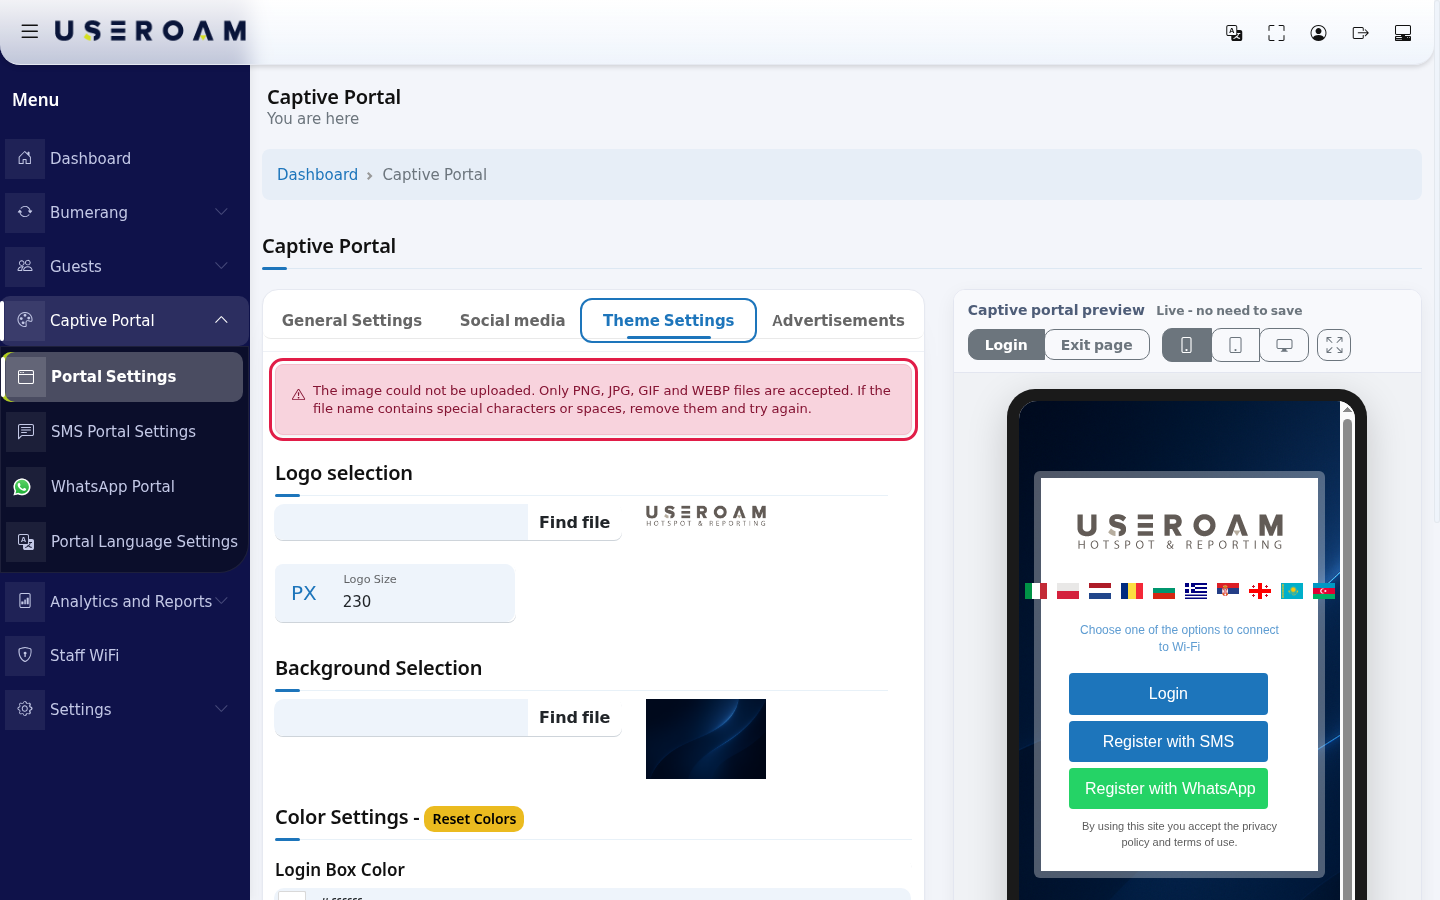
If an image cannot be uploaded, this warning appears above the tab: The image could not be uploaded. Only PNG, JPG, GIF and WEBP files are accepted. If the file name contains special characters or spaces, remove them and try again. Rename the file (e.g. cafe-logo.png) and upload it again.
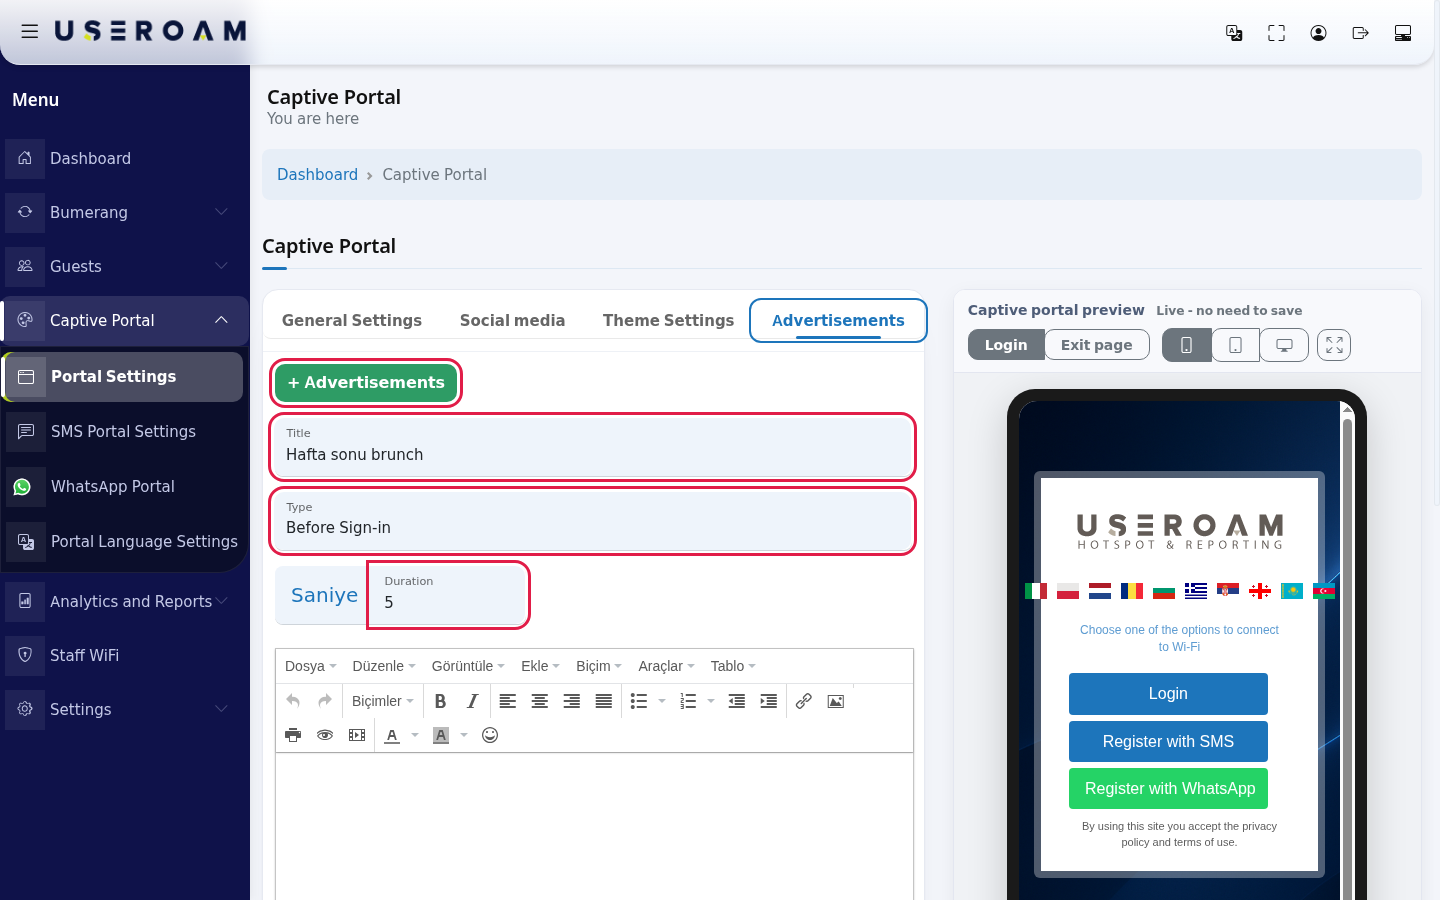
To show an announcement on the login screen, go to the Advertisements tab and press + Advertisements. Fill in the form:
- Title: name of the advertisement in the list (e.g. Weekend brunch).
- Type: Before Sign-in or After Logging In.
- Duration (the unit label reads Saniye, seconds): after how many seconds the window closes by itself (e.g. 5). With 0 it does not close by itself; the guest closes it.
- Write the content in the editor below; you can add an image too. The editor menus are in Turkish.
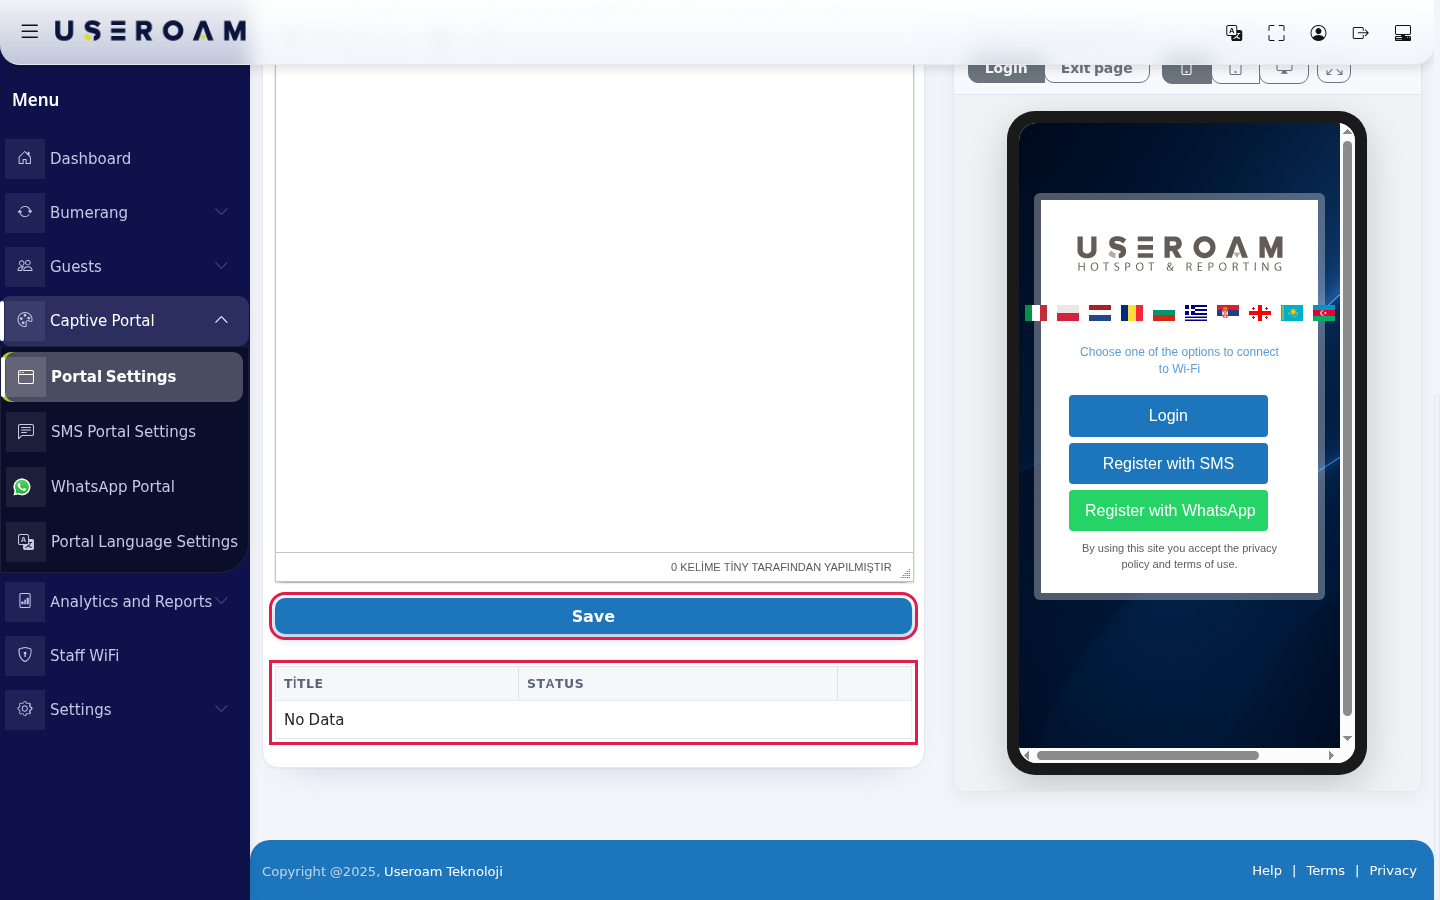
Press Save under the form. The advertisement is listed in the table below with Title and Status columns. With the row buttons you publish (Publish) or unpublish it, open the form again with Edit or remove it with Delete. With no advertisements the table shows No Data.
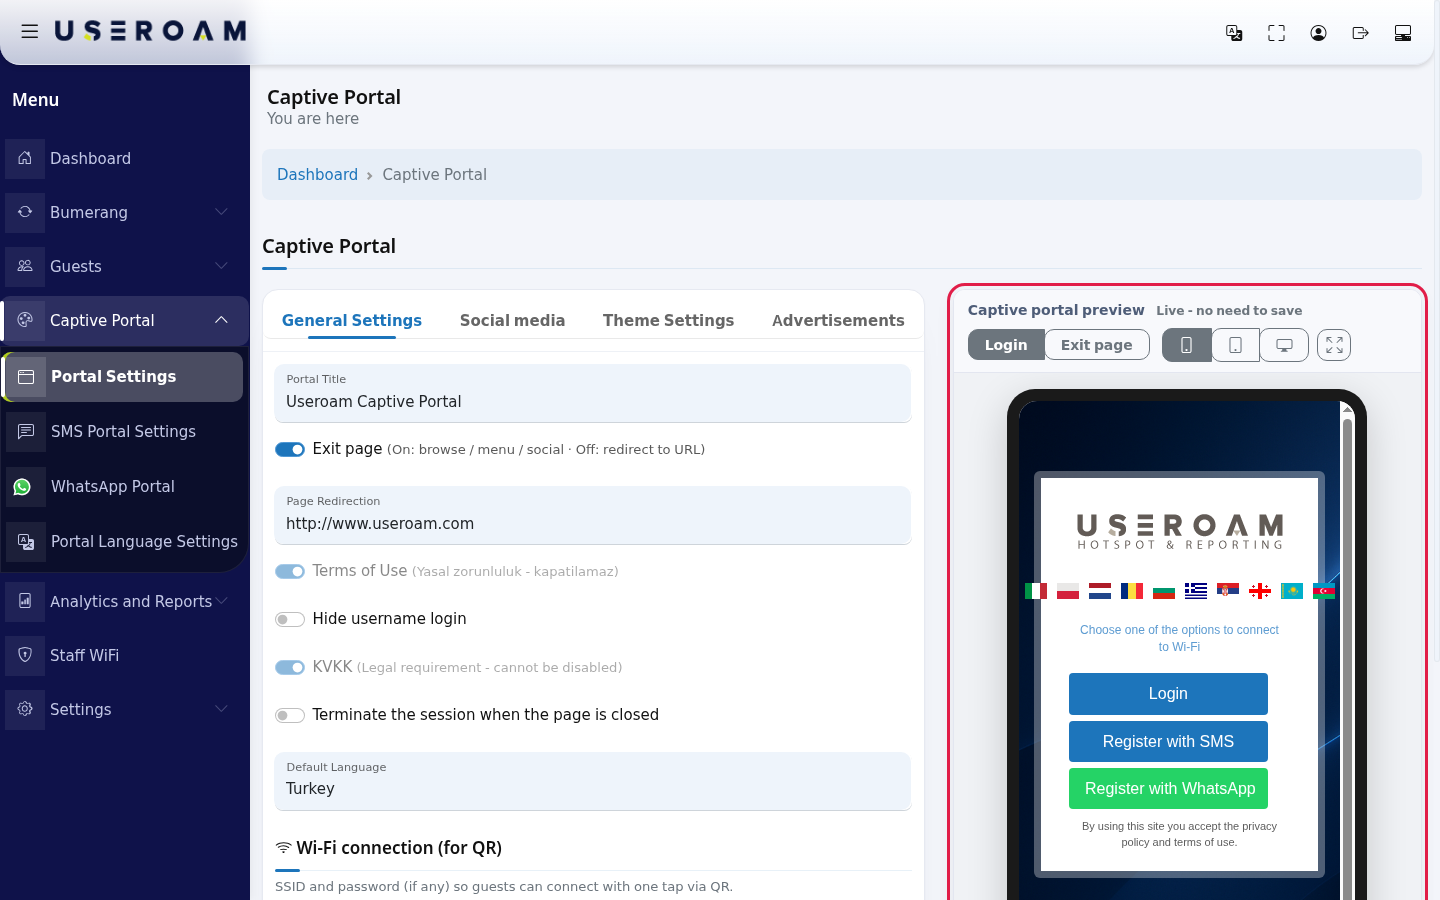
Check the result in the Captive portal preview on the right. The top line reads Live - no need to save: titles, colours and switches show up in the preview right away.
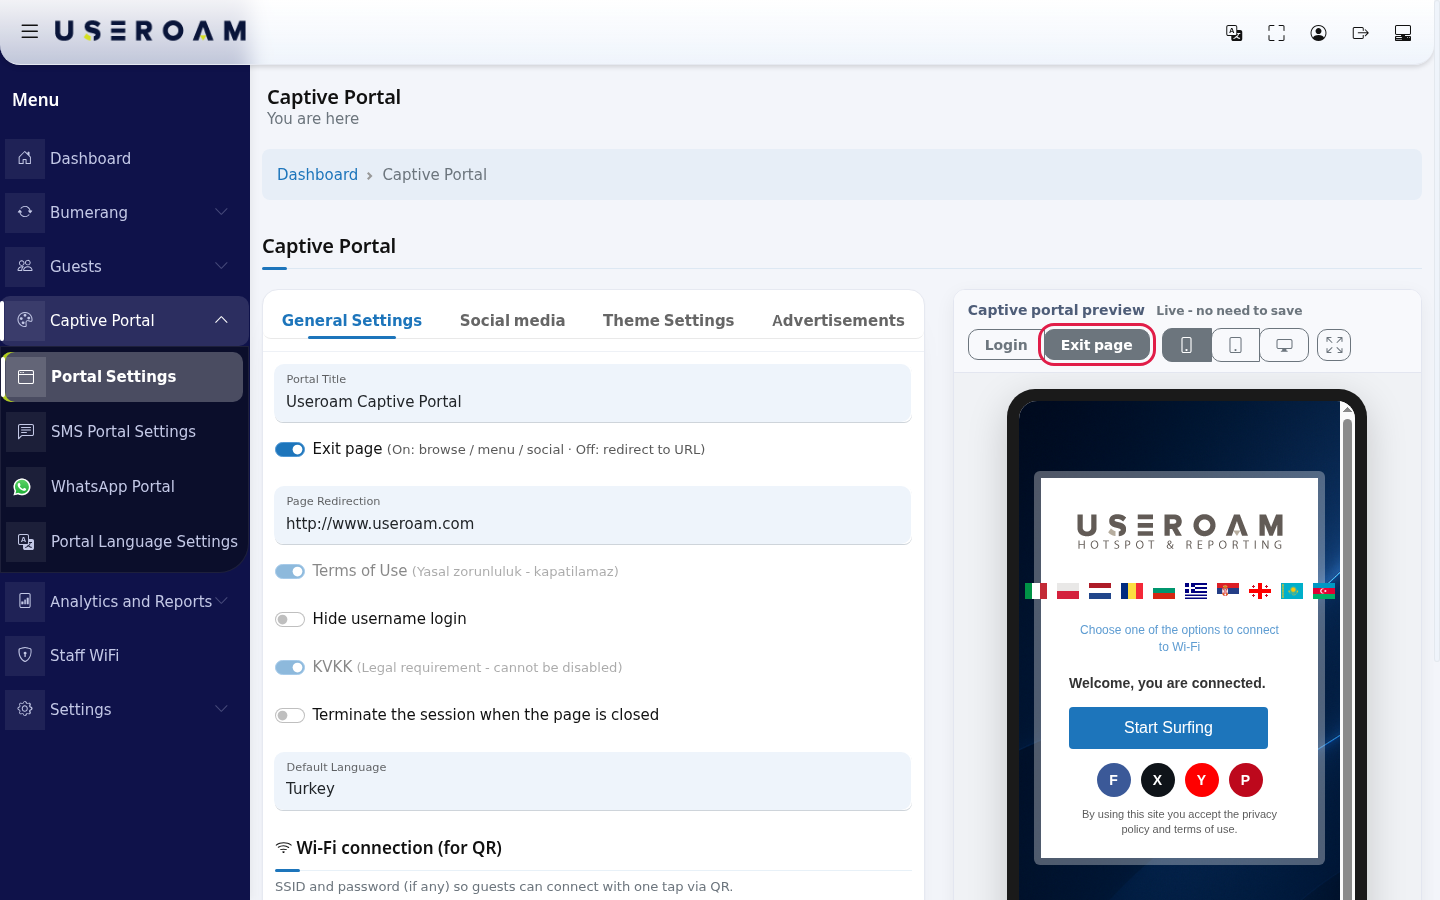
Press Exit page above the preview. The screen the guest sees after login opens: Welcome, you are connected., the Start Surfing button and the social media icons. Login takes you back to the login view. If the exit page is off it reads Exit page is off: after login the guest goes straight to the redirect URL.
Use the phone, tablet and desktop buttons to see other screen sizes. The last button opens the preview full screen. When you are happy, make sure you pressed Save on the tab you changed: the preview does not save.
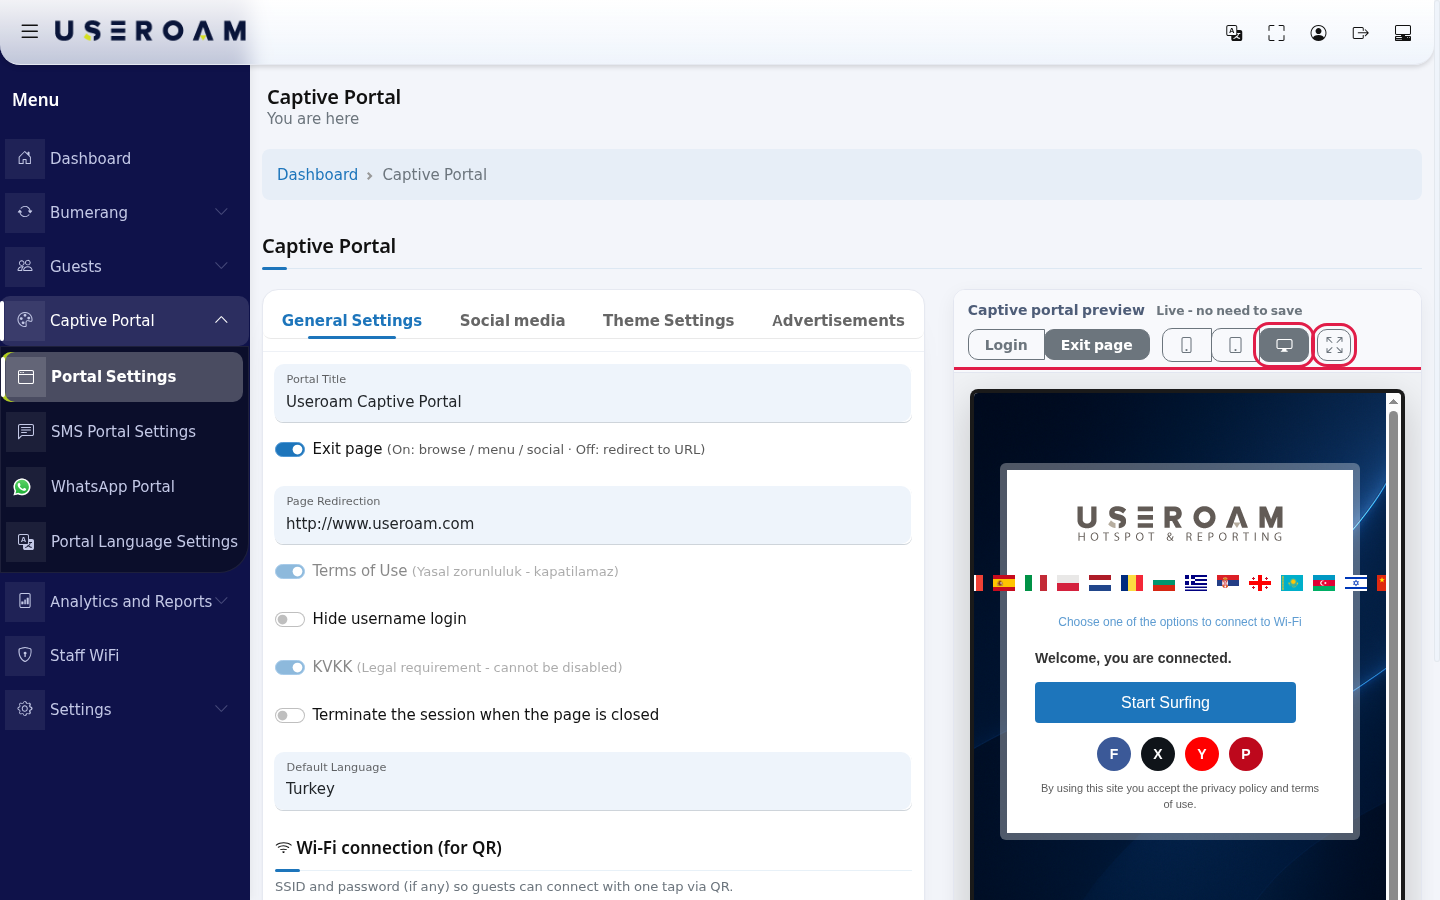
Every field and button on the screen
| Field / Button | What it does | Example |
|---|---|---|
| General Settings, Social media, Theme Settings, Advertisements | Four tabs. Each has its own Save; saving one tab does not save the others. | - |
| Portal Title | Portal name shown in the guest's browser tab and on some window titles. | Sea Cafe Guest Wi-Fi |
| Exit page | On: browse / menu / social page. Off: redirect to URL. | On |
| Page Redirection | Address for Start Surfing or the direct redirect. | https://www.seacafe.com |
| Terms of Use, KVKK | Always on, cannot be disabled (legal requirement). | - |
| Hide username login | Removes the username and password login button. | Off |
| Terminate the session when the page is closed | Ends the session when the portal window closes. Only on supporting devices. | Off |
| Automatic Redirection | Only on MikroTik, Fortinet, WatchGuard, EnGenius. On: the guest is redirected automatically after login. | On |
| Default Language | Opening language of the portal. | Turkey |
| Wi-Fi name (SSID), Wi-Fi password (leave empty if none) | SSID and password (if any) so guests can connect with one tap via QR. | Cafe-Guest |
| Embed Wi-Fi details in QR codes | Auto-connect when menu/hotel QR codes are scanned. | On |
| Facebook Page, X (Twitter) page, Youtube Page, Pinterest Page | Accounts you enter here appear as icons on the exit page the guest sees after login. A network you leave empty is not shown at all. | https://facebook.com/seacafe |
| Instagram Page | Address of the Instagram icon and card. | https://instagram.com/seacafe |
| Show Instagram card after login | Instagram card and I liked it confirmation on the exit page. | On |
| Card style | Box (avatar, handle and button) or Button only. | Box |
| Instagram step (MikroTik only) | Off, Visual priority, Time lock (8 s), Hard gate. | Off |
| Send the welcome campaign only to guests who tapped Instagram | Limits the Bumerang welcome message to guests who tapped Instagram. | Off |
| Logo selection, Find file | Logo file (PNG, JPG, GIF, WEBP). | cafe-logo.png |
| Logo Size (PX) | Maximum logo width in pixels. | 230 |
| Background Selection | Background image. | background.jpg |
| Color Settings | Login Box Color, Button Color, Button Effect Color, Button Font Color, Link Color, Font Color. | #1d75bb |
| Reset Colors | Back to the default colours. | - |
| + Advertisements | Opens the new advertisement form. Pressing it again while the form is open clears the form. | - |
| Title, Type, Duration | Name, when it is shown and how many seconds it stays open. | Weekend brunch, Before Sign-in, 5 |
| Advertisement table: Title, Status | Whether the advertisement is published. Row buttons: publish / unpublish, Edit, Delete. | - |
| Captive portal preview | Live - no need to save. Login and Exit page views; phone, tablet, desktop; full screen. | - |
Texts you see in the preview
The login view shows the language flags, Choose one of the options to connect to Wi-Fi, the Login button (opens Username and Password), Register with SMS, Register with WhatsApp, Register with National ID if that method is on, and at the bottom By using this site you accept the privacy policy and terms of use. The exit page view shows Welcome, you are connected., Start Surfing and, if the Instagram card is on, Follow us on Instagram with Follow. You can change all texts guests see on the language screen.
Warnings and errors
| Message | When it appears | What to do |
|---|---|---|
| Settings could not be saved. One of the values was rejected; the most likely cause is a link that is too long... | General Settings or Social media could not be saved. | Shorten the long address (remove tracking parameters at the end) and save again. |
| The image could not be uploaded. Only PNG, JPG, GIF and WEBP files are accepted... | A logo or background could not be uploaded on Theme Settings. | Check the file type and remove special characters and spaces from the name. |
| Exit page is off: after login the guest goes straight to the redirect URL. | Exit page view in the preview while the switch is off. | Information only. Turn the switch on and save if you want an exit page. |
Frequently asked questions
I see the change in the preview, but guests still see the old screen.
The preview does not save. Press Save at the bottom of the tab you changed. Each tab's Save only saves that tab.
Can I turn off KVKK or the terms of use?
No. They are locked because they are a legal requirement. You can change their content as described in Editing Portal Texts.
There are no SMS and WhatsApp buttons on the login screen.
They are switched on by the module switches in SMS Portal Settings and WhatsApp Portal Settings.
My After Logging In advertisement does not appear.
On Sophos devices the login screen only shows the Before Sign-in type and opens a single published advertisement at a time. To show advertisements after login and with more targeting, use Bumerang Advertisements.
I turned on the Instagram step but guests can still skip it.
That is expected. The guest is online as soon as they log in; the Instagram step is only guidance and only works on MikroTik devices.