
Setting up MikroTik without exposing it to the internet (offline)
There are two setup paths. In the automatic setup (MikroTik Integration Guide) the Useroam panel connects to your router over the internet and does the setup for you. In the offline setup (this page) your router is never exposed; you upload the setup file to the router and run it yourself. Both paths set up guest login, Useroam login (RADIUS) and 5651 logging.
What is it for?
This page explains how to connect your MikroTik router to Useroam without exposing it to the internet, that is, without letting the Useroam panel connect to the router. The router only talks outwards: it asks Useroam about guest logins and sends 5651 records to Useroam. No port, user or rule that lets anyone in from outside is added.
When to use it
- Your security policy does not allow the router's management service (HTTPS) to be reachable from the internet.
- The router sits behind another modem or a carrier-grade shared IP (CGNAT) and cannot be reached from outside.
- The automatic setup showed USEROAM: device registered, but the panel could NOT connect back. and you cannot set up port forwarding (see "If Useroam cannot reach the router" below).
What works with the offline setup?
| Feature | Offline setup | Notes |
|---|---|---|
| Guest login (SMS, WhatsApp, voucher, hotel and other login methods) | Works | The router asks Useroam over RADIUS. The welcome page is served by Useroam. |
| Session records (duration, data used) | Works | The router sends session updates every 5 minutes. |
| Active Guests list | Works | The list is built from the session records the router sends. There is no disconnect button in the list. |
| 5651 logging | Works | The router sends its logs to Useroam over UDP 514. 5651 Logging (5651 Loglama) must be on in the panel. |
| Blocked Users | Works | A blocked guest is rejected at their next login. A session that is already open is not closed. |
| Group settings (speed, quota, duration, idle time, device count) | Works, applied at login | The settings are sent to the router when the guest logs in. If you change a guest's group later, it takes effect when they log in again. If the group names a router profile or address list, it must exist on the router with the same name (created by hand). |
| MikroTik Management console | Does not work | The console connects to the router over the internet. On an offline router you see the Cannot reach the device... warning. |
| Disconnecting a guest or blocking them on the router instantly from the panel | Does not work | These actions need a connection to the router. |
| Speed package sales | Not available on MikroTik | Not available with the automatic setup either. |
Before you start
- RouterOS 7.1 or newer. Run
/system resource printin the terminal and look at the version line. - Winbox and an administrator account on the router. You can download Winbox from the link on the Setup tab of Device Settings.
- The public IPv4 address the router uses to reach the internet. If the router is behind a modem, this is the modem's public address. Useroam recognises both logins and 5651 records by this address; if it is wrong, guest login and logging do not work.
- Which port will carry the guest network. The port your guest access point (AP) is plugged into, or the bridge that port belongs to.
- A text editor on your computer (Notepad is enough).
Step by step
(RouterOS 7.23.3 and newer only) Turn on device mode. In Winbox open New Terminal, paste the line below, press Enter, then unplug the router's power and plug it back in. On these versions the hotspot cannot be set up until device mode is on. Skip this step on older versions.
/system device-mode update mode=advancedAdd the router to the panel. In Device Selection > New Device, choose MikroTik as the device type. Enter the router's public IPv4 address (for example 203.0.113.10) as the device address, turn on 5651 Logging and press Save. The SSL port is not used in the offline setup; it can stay at 443. Skip this step if the router is already added.
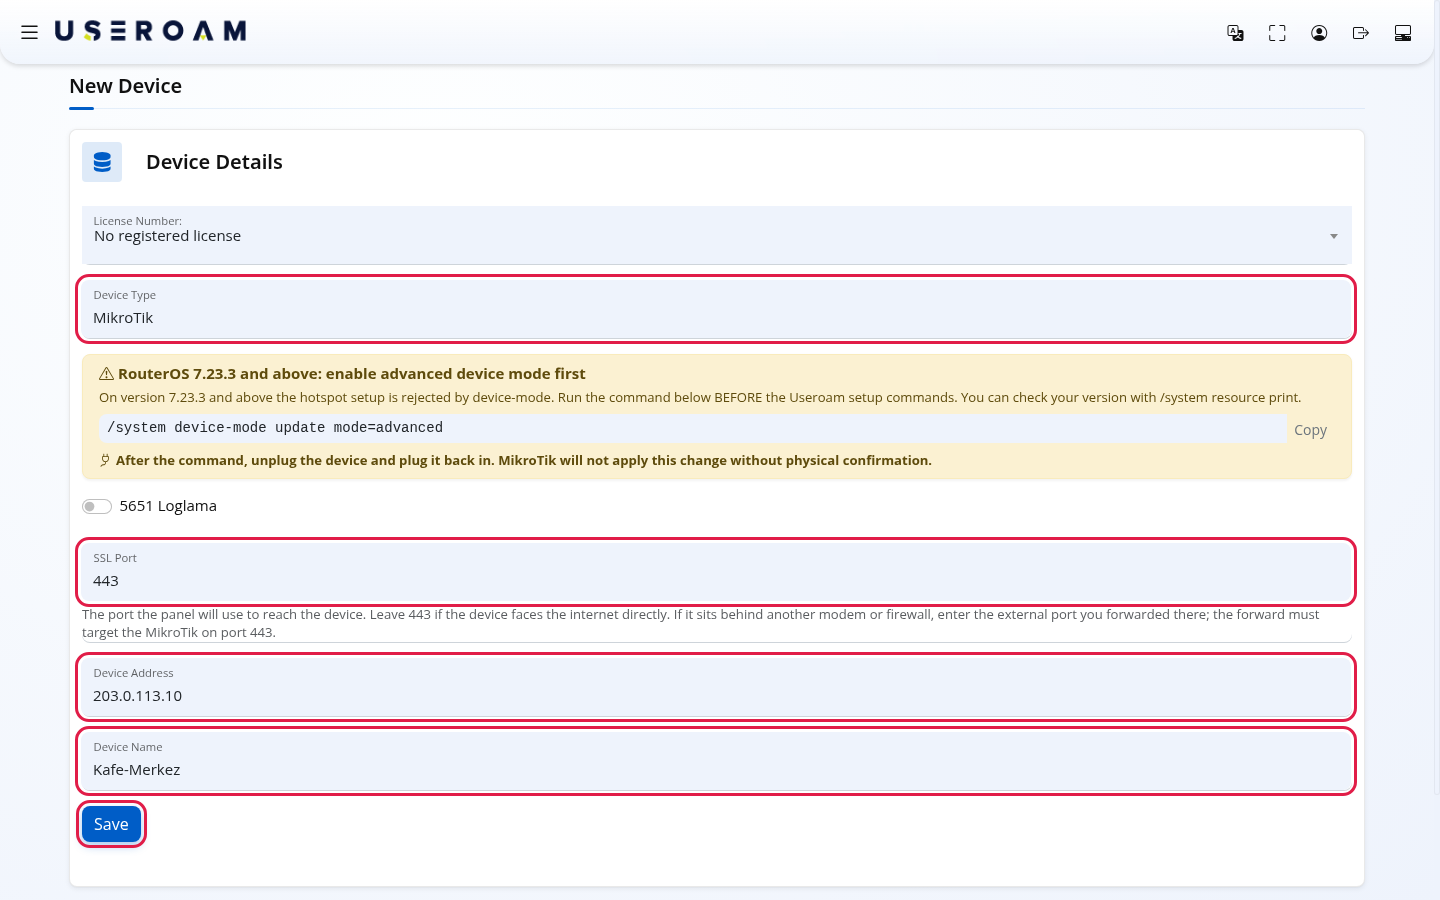
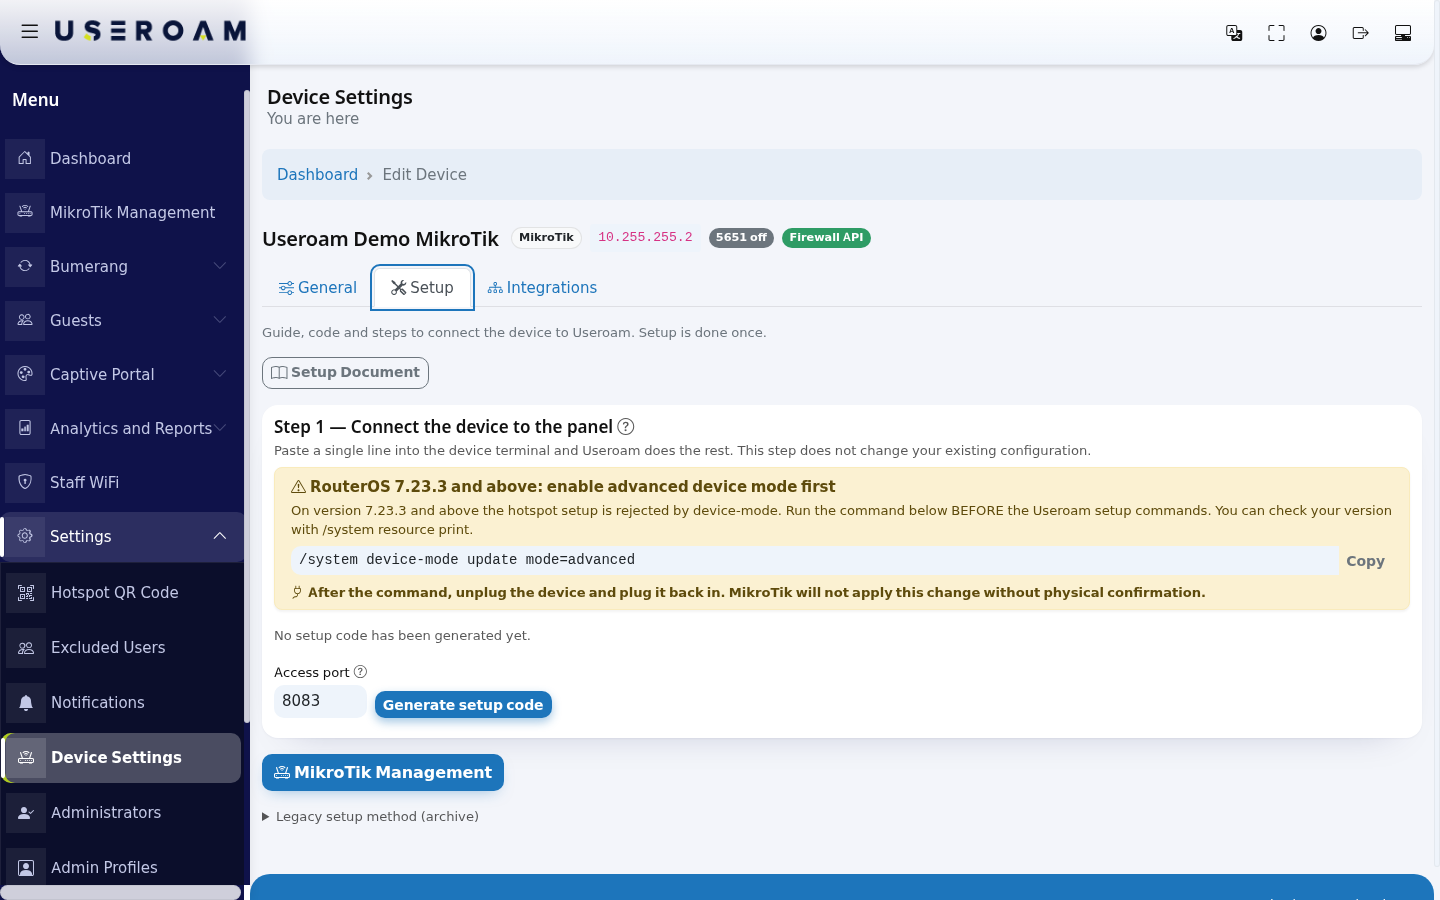
Do not press Generate setup code on the Setup tab for an offline setup. That button is for the automatic setup; if you press it, the panel starts waiting to connect to the router.
Copy the Device Password. Open Device Settings from the left menu. On the General tab, under Device connection, copy the Device Password. You will put it into the setup file in step 7. Do not change it.
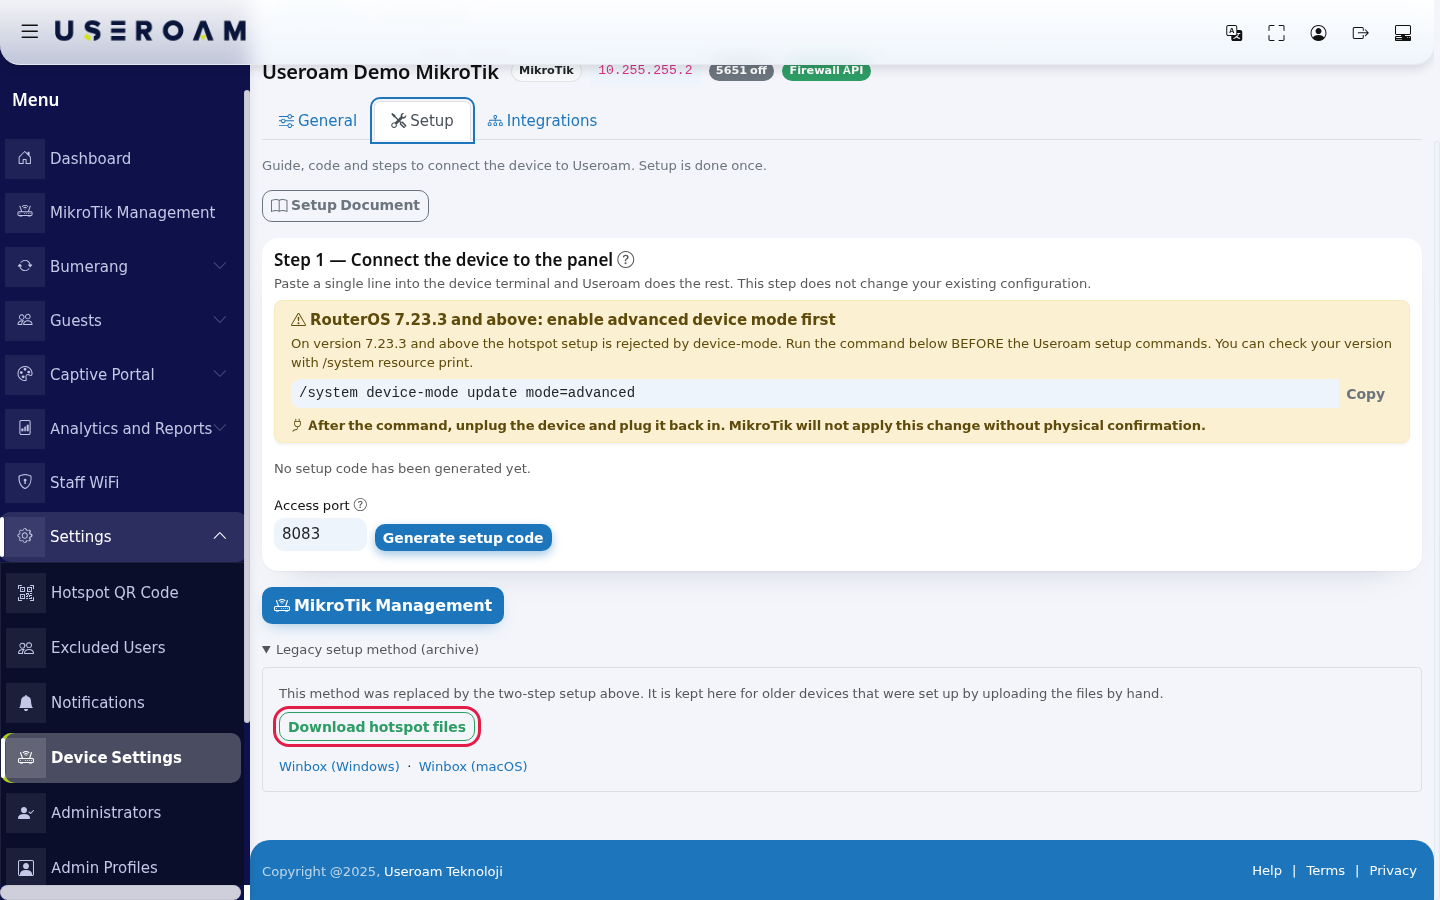
Download the welcome page files. Switch to the Setup tab. At the bottom, open Legacy setup method (archive) and press Download hotspot files. In the Your Files Are Ready window press Download. A ZIP file is saved to your computer; the welcome pages inside it are specific to this router.
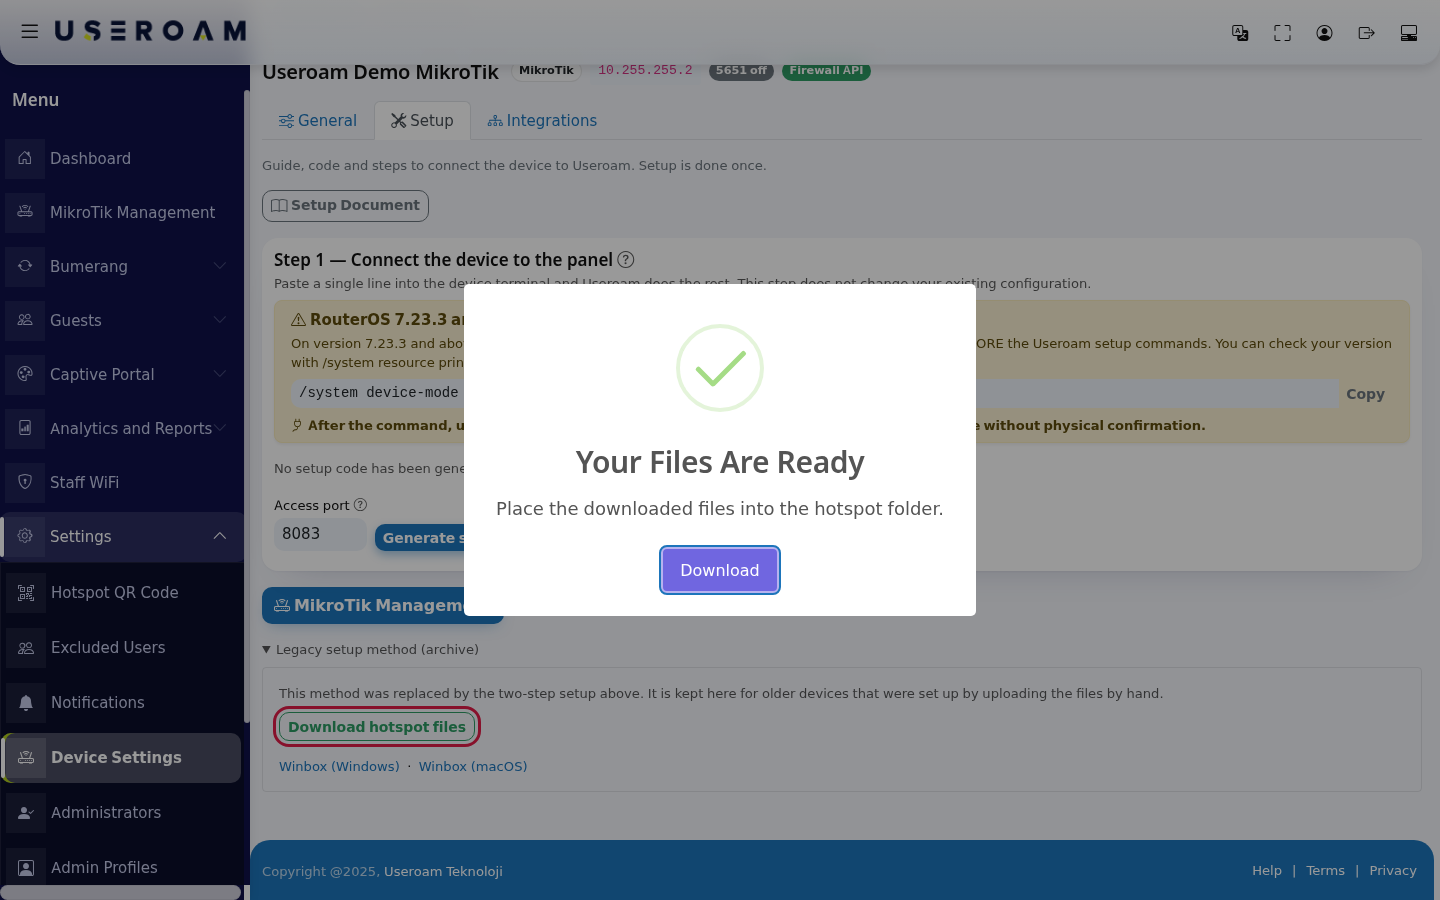
Extract the ZIP into a folder. Do not use the useroam-init.rsc file inside it: it is an old setup file, it does not set up 5651 logging and it contains settings that stop the login screen from opening on phones. The setup file on this page replaces it. You only need these 8 files from the ZIP: login.html, status.html, logout.html, error.html, rlogin.html, redirect.html, alogin.html, md5.js.
Read the router's ports. Type the lines below into the terminal one by one. They only read; nothing is changed.
/interface print /interface bridge port print /ip route print where dst-address=0.0.0.0/0 /ip address print- Internet port (WAN): in the output of the third command, the interface the active default route goes out of (for example ether1 or pppoe-out1). This name will be <WAN_ARAYUZU>.
- Guest port: the port or bridge the guest access point is connected to (for example ether3 or bridge-guest). This name will be <MISAFIR_ARAYUZU>. Do not pick a port that the second command lists as a member of a bridge; pick the bridge itself. Do not pick the internet port.
Check for an earlier setup on the router. These commands also only read.
/ip hotspot print
/radius print
/ip dhcp-server print
/system logging action print
The setup file treats existing settings like this:
If the router already has What the setup file does An IP address on the guest port Replaces it with 10.99.1.1/24. To keep your address, write it in step 7. A DHCP server on the guest port Keeps it and does not add a new one. A hotspot on the guest port Does not add another hotspot; links the existing one to the Useroam profile. RADIUS, NAT or pre-login allow entries that Useroam added earlier Deletes and re-adds them. Your other RADIUS entries are not touched. A hotspot or RADIUS setup from another company Leaves it alone; both setups stay side by side and may clash. Contact our support team first. Do not apply both the automatic setup and the offline setup to the same router. If the router was already set up automatically, you do not need this page.
Prepare the setup file. Open the Setup file box below, copy all of its content and paste it into Notepad. Replace the three values at the top with your own; keep the quotation marks, remove the angle brackets (< >):
In the file Replace with From Example <MISAFIR_ARAYUZU> Name of the guest port Step 5 bridge-guest <WAN_ARAYUZU> Name of the internet port Step 5 ether1 <CIHAZ_SIFRESI> Device Password Step 3 After the change the lines look like this:
:local ifc     "bridge-guest"
:local wan     "ether1"
:local rsecret "Your-Device-Password"
The guest network comes as 10.99.1.0/24. If this network is already used elsewhere on your router, change the gw, gwIp, net and havuz lines in the same pattern; otherwise leave them. Save the file as useroam-offline.rsc (in Notepad set Save as type to All Files so .txt is not added). The comments inside the file are in Turkish; they do not change how it works.
Setup file (press to open)
# =============================================================================
# Useroam - MikroTik internete acmadan (offline) kurulum
# Kaynak: panelin kurulum sihirbazinin urettigi script;
# panel baglantisi gerektiren iki bolum cikarildi (portal dosyalari, panele bildirim).
# Duzenlenecek 3 deger: <MISAFIR_ARAYUZU>  <WAN_ARAYUZU>  <CIHAZ_SIFRESI>
# 10.99.1.1/24 cihazda baska bir agda kullaniliyorsa gw/gwIp/net/havuz satirlarini degistirin.
#
# Ilk is mevcut yapilandirmanin yedegini alir: useroam-oncesi-manuel.rsc
# Geri donmek icin:  /system reset-configuration run-after-reset=useroam-oncesi-manuel.rsc
# =============================================================================

:local ifc     "<MISAFIR_ARAYUZU>"
:local wan     "<WAN_ARAYUZU>"
:local gw      "10.99.1.1/24"
:local gwIp    "10.99.1.1"
:local net     "10.99.1.0/24"
:local havuz   "10.99.1.10-10.99.1.254"
:local dom     "hotspot.useroam.local"
:local rsecret "<CIHAZ_SIFRESI>"
:local panelIp "104.247.174.120"
:put ""
:put "Useroam: yedek aliniyor..."
/export file=("useroam-oncesi-manuel")
:delay 3s
:put "Useroam: yedek hazir -> useroam-oncesi-manuel.rsc"

# --- 1) Misafir agi IP adresi -----------------------------------------------
# Arayuzde adres varsa DEGISTIRILIR (yukaridaki gw degeri), yoksa eklenir.
/ip address
:local mevcutAdr [find interface=$ifc]
:if ([:len $mevcutAdr] = 0) do={
    add address=$gw interface=$ifc comment="useroam-gw"
    :put "Useroam: IP eklendi $gw"
} else={
    set [:pick $mevcutAdr 0] address=$gw
    :put "Useroam: IP guncellendi $gw"
}

# --- 2) DHCP havuzu + sunucusu ----------------------------------------------
/ip pool
:if ([:len [find name="useroam-pool"]] = 0) do={
    add name=useroam-pool ranges=$havuz
} else={ set [find name="useroam-pool"] ranges=$havuz }

/ip dhcp-server
:if ([:len [find interface=$ifc]] = 0) do={
    add name=useroam-dhcp interface=$ifc address-pool=useroam-pool lease-time=1h disabled=no
    :put "Useroam: DHCP sunucusu eklendi"
} else={ :put "Useroam: mevcut DHCP sunucusu korundu" }

/ip dhcp-server network
:if ([:len [find address=$net]] = 0) do={
    add address=$net gateway=$gwIp dns-server=$gwIp comment="useroam"
}

# --- 2b) Eski captive portal API duyurusu (DHCP 114) TEMIZLENIR -------------
# CAPPORT_114_KALDIR_2026: duyurulan capport API'si "captive" degerini dogru
# soyleyemedigi surece iOS'un kendi probe'undan (captive.apple.com) KOTUDUR:
# iOS API'ye guvenir ve giris basarili olsa bile "Done" dugmesini hic gostermez
# (BlueFin'de olculdu, kaldirilinca duzeldi). Bu yuzden artik TANIMLANMIYOR ve
# eski kurulumlardan kalan kayit VARSA SILINIYOR.
# Yalnizca KENDI kaydimiz hedeflenir (useroam-capport / -set); musterinin
#    kendi DHCP secenegine ve option-set'ine DOKUNULMAZ.
# Sira zorunlu: once ag baglantisi cozulur, sonra set, sonra option
#    (kullanimdayken silinmez; yarim kalirsa ag kaydinda dangling referans kalir).

:do {
    :foreach n in=[/ip dhcp-server network find] do={
        :if ([/ip dhcp-server network get $n dhcp-option-set] = "useroam-capport-set") do={
            /ip dhcp-server network set $n dhcp-option-set=""
        }
    }
    /ip dhcp-server option sets remove [/ip dhcp-server option sets find name="useroam-capport-set"]
    /ip dhcp-server option remove [/ip dhcp-server option find name="useroam-capport"]
    :put "Useroam: eski captive portal API duyurusu (DHCP 114) temizlendi"
} on-error={ :put "Useroam: DHCP 114 temizligi atlandi (menu yok veya kayit yok)" }

# --- 3) DNS (misafirlerin cozumleme yapabilmesi + 5651 gorunurlugu) ---------
/ip dns
set allow-remote-requests=yes
:if ([:len [get servers]] = 0) do={ set servers=8.8.8.8,1.1.1.1 }

# Misafirlere DNS acmak, cihazi INTERNETE de acik cozumleyici yapar (amplification).
# WAN uzerinden gelen DNS sorgulari kapatilir.
/ip firewall filter
:if ([:len [find comment="useroam-dns-wan-drop"]] = 0) do={
    add chain=input in-interface=$wan protocol=udp dst-port=53 action=drop comment="useroam-dns-wan-drop"
    add chain=input in-interface=$wan protocol=tcp dst-port=53 action=drop comment="useroam-dns-wan-drop"
    :put "Useroam: WAN uzerinden DNS kapatildi"
}

# --- 4) Internet cikisi (NAT) -----------------------------------------------
# COKLU_WAN_NAT_2026: tek arayuze baglamak, ikinci/yedek WAN devreye girdiginde misafirin
# internetini kesiyordu. Artik WAN arayuz LISTESI kullaniliyor: kac hat olursa olsun calisir.
# Liste yoksa olusturulur, secilen WAN uye degilse eklenir (musteri sonradan hat eklerse
# yalnizca listeye uye yapmasi yeter).
:do {
    :if ([:len [/interface list find name="WAN"]] = 0) do={
        /interface list add name=WAN comment="useroam"
    }
    :if ([:len [/interface list member find list=WAN interface=$wan]] = 0) do={
        /interface list member add list=WAN interface=$wan comment="useroam"
    }
    # Eski tek-arayuzlu kural varsa yenisiyle degistirilir.
    :foreach r in=[/ip firewall nat find comment="useroam-masq"] do={ /ip firewall nat remove $r }
    /ip firewall nat add chain=srcnat action=masquerade src-address=$net out-interface-list=WAN comment="useroam-masq"
    :put "Useroam: NAT (masquerade) - tum WAN arayuzleri"
} on-error={ :put "USEROAM WARNING: NAT step failed, continuing." }

# --- 5) RADIUS --------------------------------------------------------------
# Once alan adi denenir (IP degisirse cihaz dokunmadan calismaya devam eder),
# kabul edilmezse IP'ye dusulur.
/radius
:foreach r in=[find comment="useroam-radius"] do={ remove $r }
:do {
    add address=panel.useroam.com secret=$rsecret service=hotspot timeout=5s comment="useroam-radius"
    :put "Useroam: RADIUS = alan adi"
} on-error={
    add address=$panelIp secret=$rsecret service=hotspot timeout=5s comment="useroam-radius"
    :put "Useroam: RADIUS = IP (alan adi kabul edilmedi)"
}
# RouterOS 7.2x: cevapta Message-Authenticator zorunlulugunu kapat (otomatik baglanti kurulumu ile ayni).
# Bu ayar olmayan eski surumlerde satir atlanir.
:do {
    /radius set [find comment="useroam-radius"] require-message-auth=no
    :put "Useroam: radius message-auth requirement disabled."
} on-error={ :put "Useroam: require-message-auth bu surumde yok, atlandi." }

# --- 6) Hotspot profili + sunucusu ------------------------------------------
/ip hotspot profile
:if ([:len [find name="useroam-profile"]] = 0) do={
    add name=useroam-profile hotspot-address=$gwIp dns-name=$dom html-directory=hotspot \
        login-by="http-chap,http-pap" use-radius=yes radius-interim-update=5m \
        nas-port-type=wireless-802.11 split-user-domain=no
} else={
    set [find name="useroam-profile"] hotspot-address=$gwIp dns-name=$dom html-directory=hotspot \
        login-by="http-chap,http-pap" use-radius=yes
}

/ip hotspot
:if ([:len [find interface=$ifc]] = 0) do={
    add name=useroam-hotspot interface=$ifc address-pool=useroam-pool profile=useroam-profile \
        addresses-per-mac=2 idle-timeout=30m keepalive-timeout=2m disabled=no
    :put "Useroam: hotspot sunucusu eklendi"
} else={
    set [find interface=$ifc] profile=useroam-profile disabled=no
    :put "Useroam: mevcut hotspot sunucusu Useroam profiline baglandi"
}

# --- 7) Captive portal sayfalari --------------------------------------------
# OFFLINE: dosyalar panelden indirilip Winbox Files ile hotspot klasorune elle yuklenir.

# --- 8) Walled garden (giris oncesi erisilmesi gerekenler) ------------------
# Isletim sisteminin BAGLANTI KONTROLU adresleri (captive.apple.com,
# connectivitycheck.*, msftconnecttest) BILEREK YOK: izin verilirse cihaz "internet
# var" sanar ve captive giris ekrani (iOS CNA) hic acilmaz.
# WG_CNA_2026: joker Google izinleri (*.google.com, *.gstatic.com) KALDIRILDI.
# Sebep: Android baglanti kontrolu connectivitycheck.gstatic.com ve
# connectivitycheck.google.com uzerinden yapiliyor. Joker izinli oldugunda cihaz
# "internet var" sanip GIRIS EKRANINI HIC ACMIYOR (sessiz ariza; E40'ta ayni hatayi
# Apple alan adlari icin yasamistik). Google ile giris icin gereken adresler tek tek yazildi.
/ip hotspot walled-garden
:foreach w in=[find comment="useroam-wg"] do={ remove $w }
:foreach d in={
    "*.useroam.com"; "useroam.com"; "panel.useroam.com"; "cloud.useroam.com";
    "*.wa.me"; "*.whatsapp.com"; "*.whatsapp.net"; "g.whatsapp.net"; "mmg.whatsapp.net"; "*.fbsbx.com";
    "*.facebook.com"; "*.fbcdn.net";
    "accounts.google.com"; "accounts.youtube.com"; "apis.google.com"; "ssl.gstatic.com";
    "fonts.gstatic.com"; "*.googleapis.com"; "*.recaptcha.net";
    "appleid.apple.com";
} do={ add dst-host=$d comment="useroam-wg" }

/ip hotspot walled-garden ip
:foreach w in=[find comment="useroam-wg"] do={ remove $w }
add dst-address=$panelIp action=accept comment="useroam-wg"
add dst-address=157.240.0.0/16 action=accept comment="useroam-wg"
add dst-address=31.13.0.0/16 action=accept comment="useroam-wg"

# --- 9) 5651 loglama: syslog -> Useroam ------------------------------------
:do {
    :if ([:len [/system logging action find name="useroamremote"]] = 0) do={
        /system logging action add name=useroamremote target=remote remote=$panelIp remote-port=514
    } else={
        /system logging action set [/system logging action find name="useroamremote"] remote=$panelIp remote-port=514
    }
    :foreach t in={"hotspot";"dhcp";"firewall";"hotspot,account"} do={
        :if ([:len [/system logging find topics=$t action="useroamremote"]] = 0) do={
            /system logging add topics=$t action=useroamremote
        }
    }
    :put "Useroam: 5651 syslog yonlendirmesi kuruldu"
} on-error={ :put "USEROAM WARNING: syslog step failed, continuing." }

# --- 9b) 5651 ERISIM KAYDI: her yeni misafir baglantisi loglanir ------------
# Sophos'ta firewall connection log'unun karsiligi. MikroTik "firewall" topic'i
# ancak bir kuralda log=yes/action=log varsa konusur; bu kural onu tetikler.
# action=log SONLANDIRICI DEGIL -> trafigi etkilemez, sadece kayit uretir.
# Kural listenin BASINA alinir, yoksa musterinin mevcut drop kurallari golgeler.
:do {
    :if ([:len [/ip firewall filter find comment="useroam-5651-log"]] = 0) do={
        /ip firewall filter add chain=forward src-address=$net connection-state=new action=log log-prefix="useroam5651" comment="useroam-5651-log"
    }
    :do {
        /ip firewall filter move [/ip firewall filter find comment="useroam-5651-log"] destination=0
    } on-error={ :put "USEROAM WARNING: 5651 log kurali basa TASINAMADI - kural listenin sonunda. Mevcut drop kurallariniz onu golgeleyebilir, kayit uretmeyebilir." }
    :put "Useroam: 5651 erisim kaydi kurali eklendi"
} on-error={ :put "USEROAM WARNING: 5651 access-log step failed, continuing." }
# --- 10) DNS bypass engelleme (DoH / DoT / QUIC) ---------------------------
:do {
    :if ([:len [/ip firewall nat find comment="useroam-dns-udp"]] = 0) do={
        /ip firewall nat add chain=dstnat src-address=$net protocol=udp dst-port=53 action=redirect to-ports=53 comment="useroam-dns-udp"
    }
    :if ([:len [/ip firewall nat find comment="useroam-dns-tcp"]] = 0) do={
        /ip firewall nat add chain=dstnat src-address=$net protocol=tcp dst-port=53 action=redirect to-ports=53 comment="useroam-dns-tcp"
    }
    :if ([:len [/ip firewall filter find comment="useroam-dot-tcp"]] = 0) do={
        /ip firewall filter add chain=forward src-address=$net protocol=tcp dst-port=853 action=drop comment="useroam-dot-tcp"
    }
    :if ([:len [/ip firewall filter find comment="useroam-dot-udp"]] = 0) do={
        /ip firewall filter add chain=forward src-address=$net protocol=udp dst-port=853 action=drop comment="useroam-dot-udp"
    }
    :if ([:len [/ip firewall filter find comment="useroam-quic"]] = 0) do={
        /ip firewall filter add chain=forward src-address=$net protocol=udp dst-port=443 action=drop comment="useroam-quic"
    }
    :put "Useroam: DNS bypass engelleme kuruldu"
} on-error={ :put "USEROAM WARNING: dns-hardening step failed, continuing." }
# --- 11) Misafir -> cihaz yonetimi kapali ----------------------------------
# 80/443 KASITLI OLARAK ACIK: captive portal sayfasi bu portlardan servis edilir.
:do {
    :if ([:len [/ip firewall filter find comment="useroam-mgmt-drop"]] = 0) do={
        /ip firewall filter add chain=input src-address=$net protocol=tcp dst-port=22,23,8291,8728,8729 action=drop comment="useroam-mgmt-drop" place-before=0
    }
    :put "Useroam: misafir -> yonetim portlari kapatildi"
} on-error={ :put "USEROAM WARNING: mgmt-drop step failed, continuing." }
# --- 12) Misafir -> ic aglar izolasyonu ------------------------------------
# Cihazin ic aglarini VARSAYMAK yerine ozel adres uzayinin tamami kapatilir.
# Misafir-misafir izolasyonu da bunun yan urunu olarak gelir.
:do {
    :if ([:len [/ip firewall filter find comment="useroam-izole"]] = 0) do={
        /ip firewall filter add chain=forward src-address=$net dst-address=10.0.0.0/8 action=drop comment="useroam-izole"
        /ip firewall filter add chain=forward src-address=$net dst-address=172.16.0.0/12 action=drop comment="useroam-izole"
        /ip firewall filter add chain=forward src-address=$net dst-address=192.168.0.0/16 action=drop comment="useroam-izole"
    }
    :put "Useroam: misafir -> ic ag izolasyonu kuruldu"
} on-error={ :put "USEROAM WARNING: isolation step failed, continuing." }
# --- Bitti ------------------------------------------------------------------
:put ""
:put "Useroam: kurulum komutlari tamamlandi."
:put "Simdi portal dosyalarini (login.html vb.) hotspot klasorune yukleyin."
:put "Test: connect a device to $ifc and open any web page - the Useroam portal should appear."
:put ""
Upload the file to the router. In Winbox open Files from the left menu and drag useroam-offline.rsc into the window. Check: the command below should list the file.
/file print where name~"useroam-offline"Run the setup file. Type this into the terminal and press Enter:
/import file-name=useroam-offline.rscLines starting with Useroam: scroll by. First, a backup of your current settings is written to useroam-oncesi-manuel.rsc. At the end you should see Useroam: kurulum komutlari tamamlandi. ("setup commands finished"). A line starting with USEROAM WARNING: ... step failed, continuing. means that step was not applied; note the line and contact our support team. The line Useroam: require-message-auth bu surumde yok, atlandi. ("not available in this version, skipped") is not an error.
Upload the welcome page files. The hotspot folder is created by the setup. In Winbox Files, open the hotspot folder and drag the 8 files from step 4 into it. Confirm overwriting files with the same name. To see the folder name:
/ip hotspot profile print where name=useroam-profileThe output shows html-directory=hotspot. Check:
/file print where name~"hotspot/login.html"Check the setup on the router. The commands below only read. Look for the values on the right in each output:
Command What to look for /radius printservice=hotspot, address panel.useroam.com (or 104.247.174.120), comment useroam-radius /ip hotspot printYour guest port and useroam-profile /system logging action print where name=useroamremoteremote=104.247.174.120, remote-port=514 /ip firewall filter print where comment~"useroam"The useroam-5651-log rule at the top of the list /ip firewall nat print where comment="useroam-masq"A masquerade rule for the guest network Test a guest login and check the panel. Connect a phone to the guest Wi-Fi and open any web page: the Useroam welcome page should appear. Log in. Then in the panel:
- In Guests > Active Guests the phone's session should be listed (Active Guests).
- In Analytics and Reports > 5651 Logs a record should appear for this router (5651 Logs).
What does the setup file do on the router?
The file is the same script the panel generates for the automatic setup; a plain explanation of each step is in the "What does the script do on the device?" table on the MikroTik Setup Wizard page. Differences in the offline version:
- It does not download the welcome page files from the panel; you upload them in step 10.
- It does not notify the panel when it finishes.
- It does not turn on the setting that listens for RADIUS requests from outside (disconnect requests). Useroam does not send such requests today.
- It turns off a RADIUS setting that, on RouterOS 7.2x, sends guests back to the welcome page after login (require-message-auth=no).
- All four security steps are on (5651 logging, DNS/DoT/QUIC blocking, closing management ports to guests, isolating guests from internal networks).
How do I go back?
The setup file first writes the backup useroam-oncesi-manuel.rsc. If you run the file a second time, this backup is overwritten with the current (already set up) configuration; download the first backup from Files to your computer before a second run. To go back completely:
/system reset-configuration run-after-reset=useroam-oncesi-manuel.rscThis command resets the router and reloads the backup; your connection drops while it runs. This rollback has not been tested by Useroam. Use it only when you are at the router and sure; otherwise contact our support team.
If Useroam cannot reach the router (automatic setup)
In the automatic setup the panel connects over HTTPS to the router's device address and Access port (RouterOS www-ssl service, REST API). If the connection is not made within 4 seconds, the router counts as unreachable. If the terminal shows USEROAM: device registered, but the panel could NOT connect back. or the console shows Cannot reach the device. It must run RouterOS 7.1 or newer and have the web service (www-ssl) enabled., check the following in order:
| Possible cause | How to check | Fix |
|---|---|---|
| RouterOS 6 | version in /system resource print starts with 6. | Upgrade to RouterOS 7.1 or newer, or use the offline setup. RouterOS 6 has no REST API. |
| Web service off | In /ip service print where name=www-ssl the service is disabled (marked X) or has no certificate. | Run the automatic setup line again; it turns the service and certificate on. |
| Web service limited to other addresses | In the same output the address field is filled and does not include 104.247.174.120. | Add this address to the allowed addresses. |
| Router behind a modem | In /ip address print the internet port's address starts with 10.x, 172.16-31.x or 192.168.x. | On the modem forward an external port (for example 8443) to port 443 of the MikroTik, enter that port as Access port in the panel and generate a new code. |
| Carrier shared IP (CGNAT) | The internet port's address is between 100.64 and 100.127, or the address the router sees differs from the public address in the panel. | It cannot be reached from outside. Use the offline setup, or ask your provider for a static (public) IP. |
| A firewall or the internet provider blocks 443 | Is there a /ip firewall filter print where comment="useroam-api-allow" rule at the top of the list; is incoming 443 blocked on the modem or by the provider. | If the rule is missing, run the setup line again. If the provider blocks it, use another external port. |
| The Useroam user was changed | /user print where name~"useroam" shows address=104.247.174.120/32 and group useroam-api. | Run the setup line again (generate a new code). |
| The router's certificate changed | You reset the router or changed the www-ssl certificate. If the panel stored the certificate fingerprint, it will not connect with a different certificate. | Contact our support team. |
When should I switch to the offline setup? When the router is behind CGNAT, when you cannot set up port forwarding, or when you do not want the router's management service exposed to the internet. With the offline setup, the features marked "Does not work" in the table above are not available.
Does a VPN give the panel access back? No. VPN (WireGuard) Setup is for you and your staff to reach the business's internal network from outside. The Useroam panel does not connect to the router through the VPN, and the VPN wizard itself needs the panel to reach the router.
Frequently asked questions
Does the offline setup open any port to the router from outside?
No. The setup file adds no management user, web service or inbound allow rule. It also blocks DNS queries coming from the internet side.
The welcome page does not open.
Check that the files from step 10 are in the hotspot folder. Make sure the device address in the panel is the router's real public address. On RouterOS 7.23.3 and newer, if you did not turn on device mode, the hotspot may not have been created (/ip hotspot print is empty).
Login works but the guest falls back to the welcome page.
The RADIUS part of the setup file sets the option that prevents this. In /radius print detail the Useroam entry should show require-message-auth=no.
There are no records in 5651 Logs.
Check that 5651 Logging is on in the panel, that the device address is the router's public address, and that the router can send out on UDP 514. Records are matched by the router's public address.
Can I switch to the automatic setup later?
Yes. The single line in the MikroTik Integration Guide only opens the panel connection on the router; the guest network was set up with the same names by this page, so you do not need to set it up again.
I ran useroam-init.rsc. What should I do?
Contact our support team. That file makes an old setup (it allows the phones' connectivity-check addresses and does not set up 5651 logging).