
MikroTik Integration Guide
Video walkthrough
You can watch the setup in the video first. Below the video you will find the same setup written out step by step, with screenshots.
What is it for?
This guide shows how to connect a MikroTik router to Useroam and set up guest Wi-Fi login (hotspot), the Useroam login connection (RADIUS) and 5651 legal logging. The setup has two parts:
- Connecting the device to the panel: you paste a single line into the device terminal. It only makes the minimum change needed for the panel to connect securely; your existing configuration is not touched.
- Setting up the guest network: the panel reads your device, asks which port should carry the guest network and generates a setup code made for your device. After you read and approve it, you apply it with one more line.
Do not want to expose your router to the internet? In the automatic setup described here, the panel connects to your router over the internet. If you want the router to stay closed from outside, or the panel cannot reach it, follow Setting up MikroTik without exposing it to the internet (offline) instead. On the offline path the panel asks you two questions (the names of the guest interface and the internet uplink), prepares the setup script and gives you a single line to paste into the terminal. When adding a new device, just choose Offline as the Setup method, or press Device closed to the internet? Offline setup under Device Settings > Setup.
When do you use it?
- You are connecting a new MikroTik device to Useroam for the first time.
- You set a device up the old way (uploading hotspot files by hand) and want to move it to the new setup.
- You reset or replaced the device and need to connect it again.
Before you start
- The address the device uses to reach the internet must match the Device Address saved in the panel. The setup code only accepts requests from that address. This is the most common problem. If your device sits behind another modem, the panel must hold the modem's public address.
- The panel must be able to reach your device from outside. If the device faces the internet directly nothing else is needed (port 443). If it sits behind another modem or firewall, add a port forward there: an external port (e.g. 8443) must go to port 443 of the MikroTik. You will enter the external port in the Access port field. If that is not possible (for example a carrier shared IP, CGNAT), use the offline setup.
- RouterOS 7.1 or newer is required. RouterOS 6 has no REST API, so the panel cannot manage it.
- On RouterOS 7.23.3 and above you must first enable advanced device mode and unplug and replug the device (step 3). You can check your version in the terminal with
/system resource print. - You need administrator access to the device with Winbox or SSH (to open a terminal).
- The device must be added in the panel. If it is not, start at step 1.
Step by step
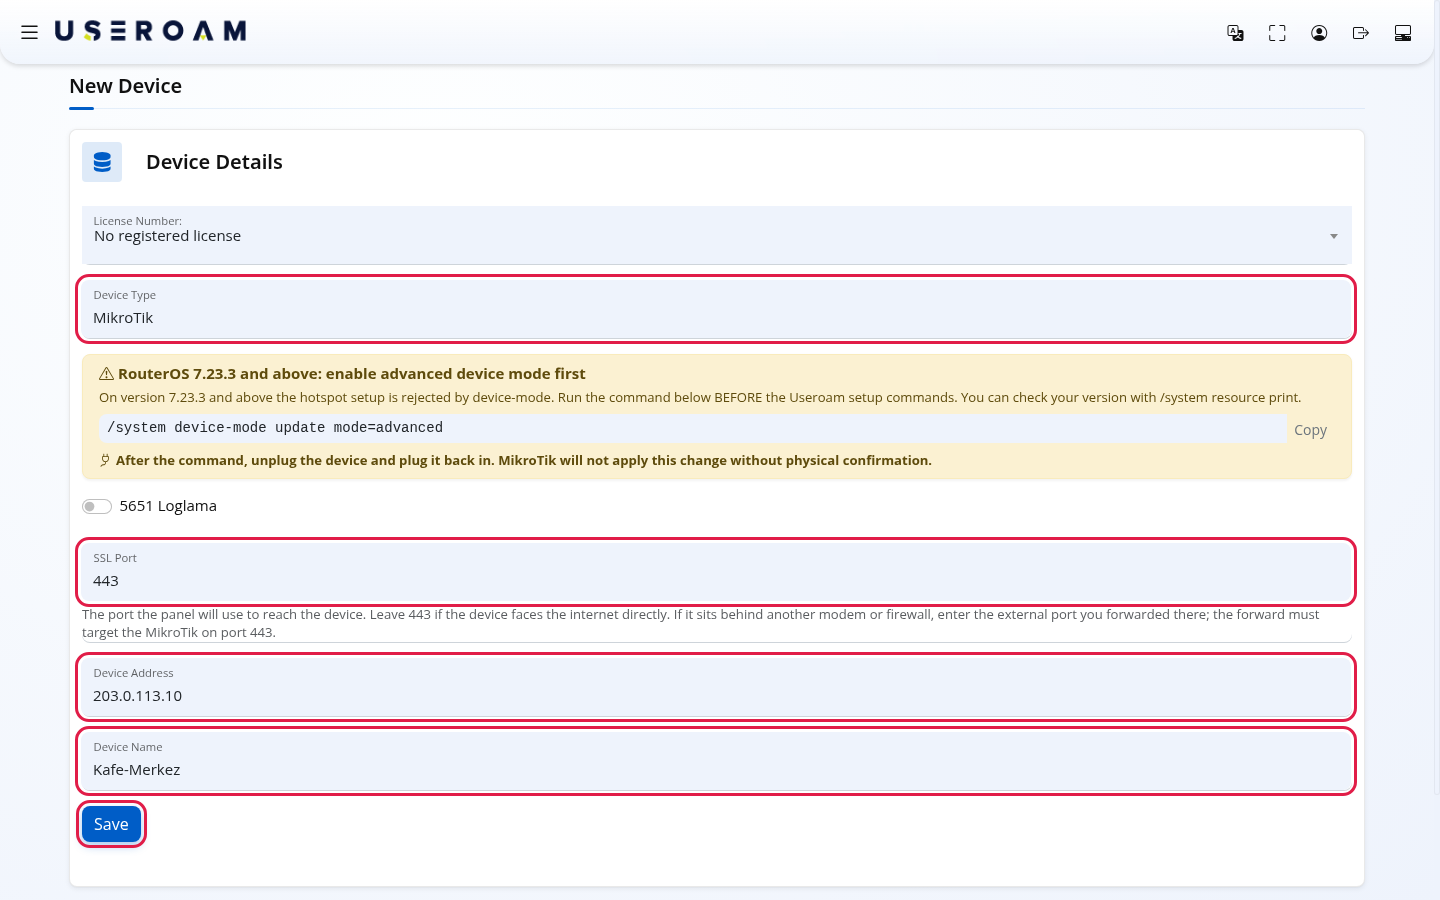
Add the device to the panel. On the Device Selection screen press New Device. Choose MikroTik as Device Type. In the Setup method that appears below it, keep Automatic selected (the path of this guide). Leave SSL Port at 443 if the device faces the internet directly, or enter the forwarded external port if it sits behind a modem. Enter the device's public IPv4 address in Device Address (e.g. 203.0.113.10) and the name you want to see in the panel in Device Name (e.g. Kafe-Merkez), switch on 5651 Loglama and press Save. All fields of this form are on the Adding a New Device page.
Generate the setup code. Open Device Settings and switch to the Setup tab. The Step 1: Connect the device to the panel card reads No setup code has been generated yet. Check the Access port field (it starts with the SSL Port from step 1) and press Generate setup code.
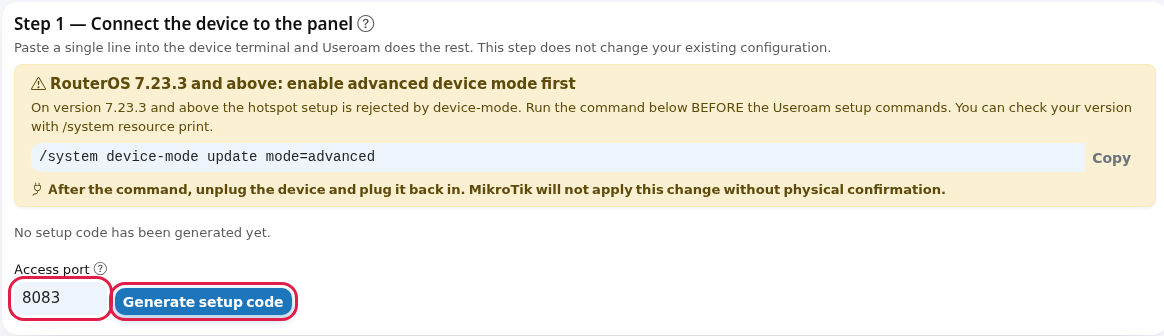
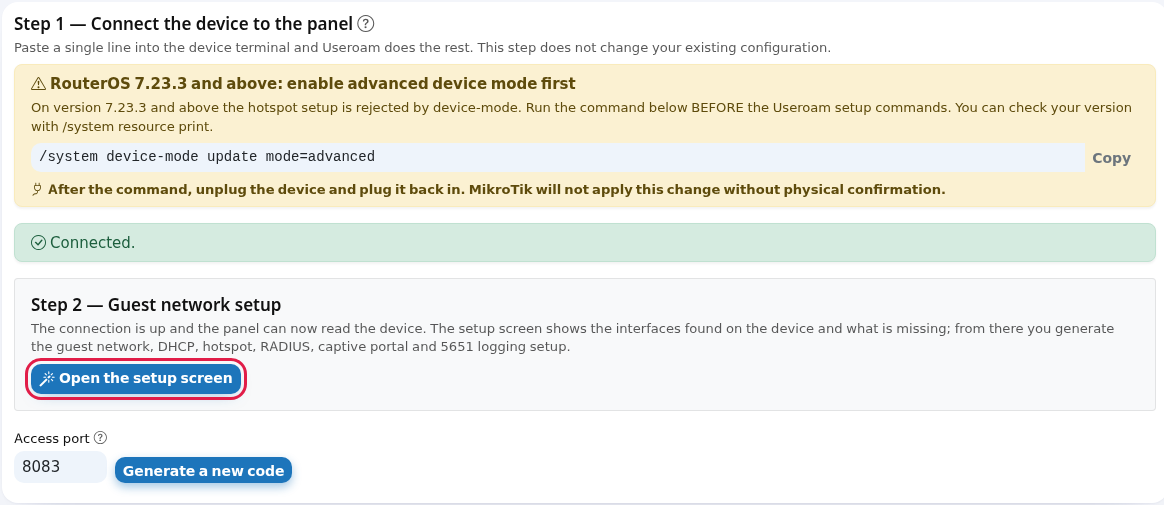
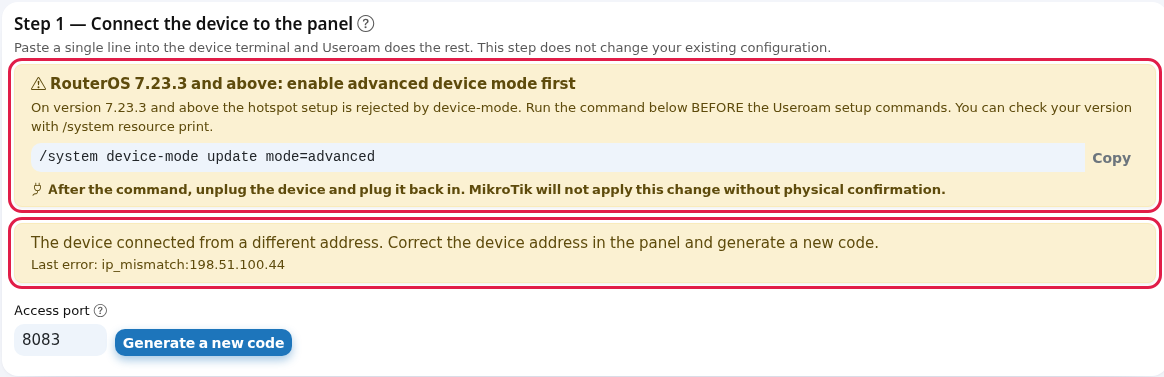
(RouterOS 7.23.3 and above only) Enable device mode. The yellow box at the top of the card reads RouterOS 7.23.3 and above: enable advanced device mode first. Press Copy, paste the command into the device terminal and press Enter. Then unplug the device and plug it back in; MikroTik will not apply this change without physical confirmation. Skip this step on older versions.
/system device-mode update mode=advanced
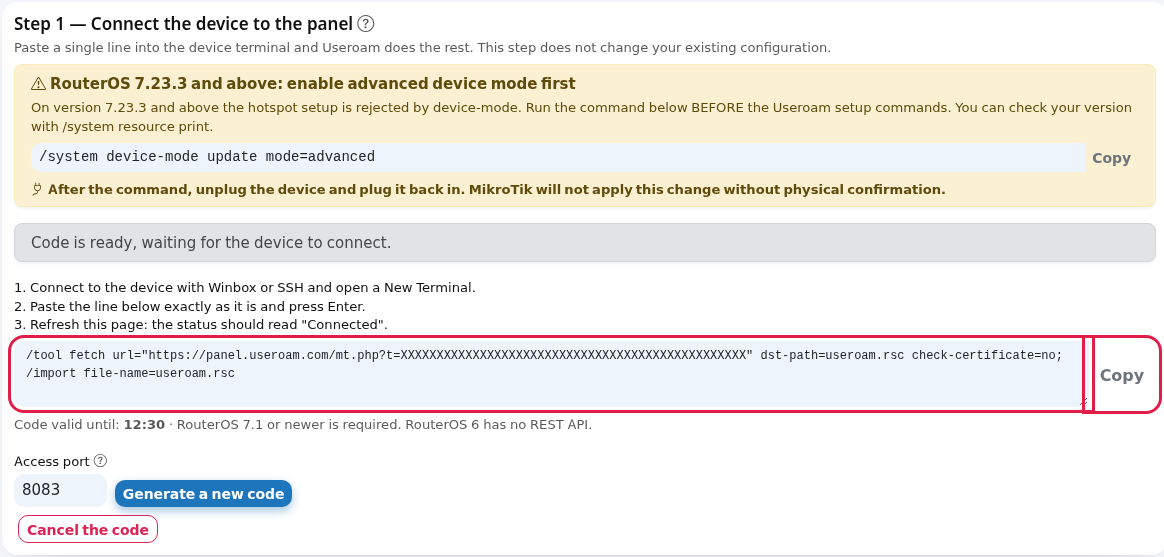
Copy the single line. Once the code is generated the card reads Code is ready, waiting for the device to connect. and shows the command below three short instructions. Press Copy. Under the command, Code valid until shows the time the code expires; it is valid for 30 minutes and can be used once.
Paste the line into the device terminal. Connect to the device with Winbox or SSH, open a New Terminal, paste the line exactly as it is and press Enter. Lines starting with Useroam: starting... scroll by; at the end, inside a frame, you should see USEROAM: connected. The panel can reach this router. Setup complete.
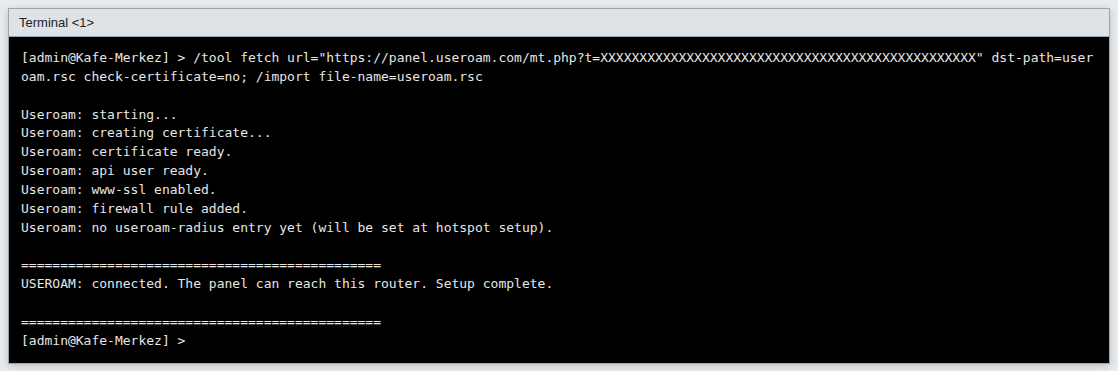
The image is a sample terminal output; the lines are the setup file's own messages. Depending on your version, RouterOS may print lines of its own as well.
Refresh the panel. Reload the Device Settings page. The card should read Connected. with a Step 2: Guest network setup box below it. Press Open the setup screen.
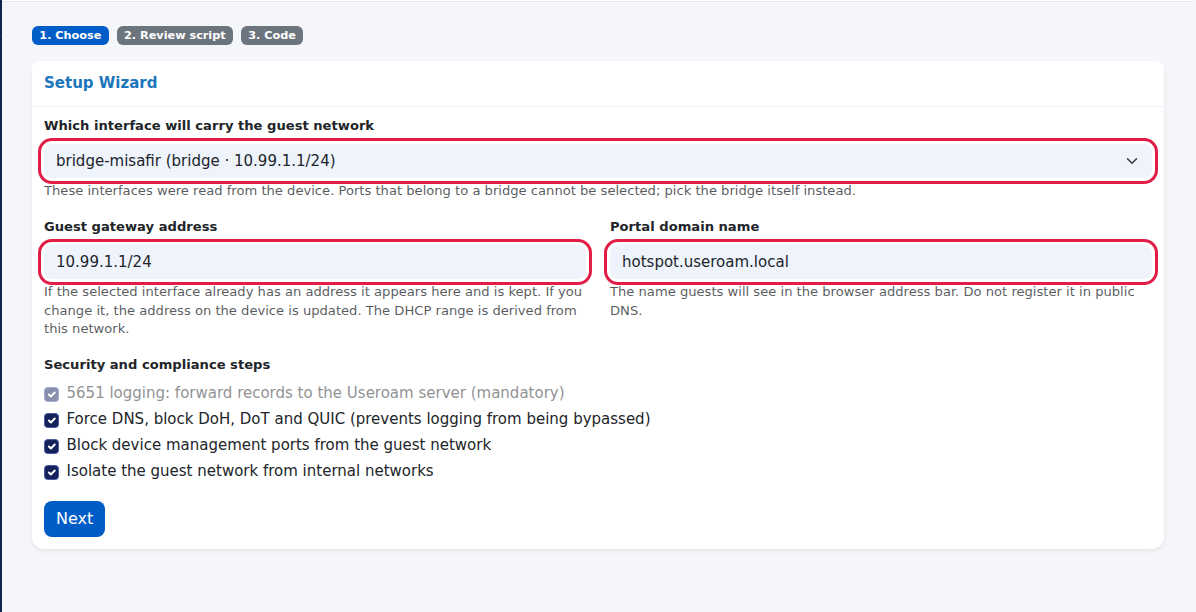
Choose the guest network. The Setup section of the MikroTik Management console opens. The Current State of the Device card shows what is present and what is missing. In the Setup Wizard card, pick the guest port or bridge from Which interface will carry the guest network and check Guest gateway address and Portal domain name.
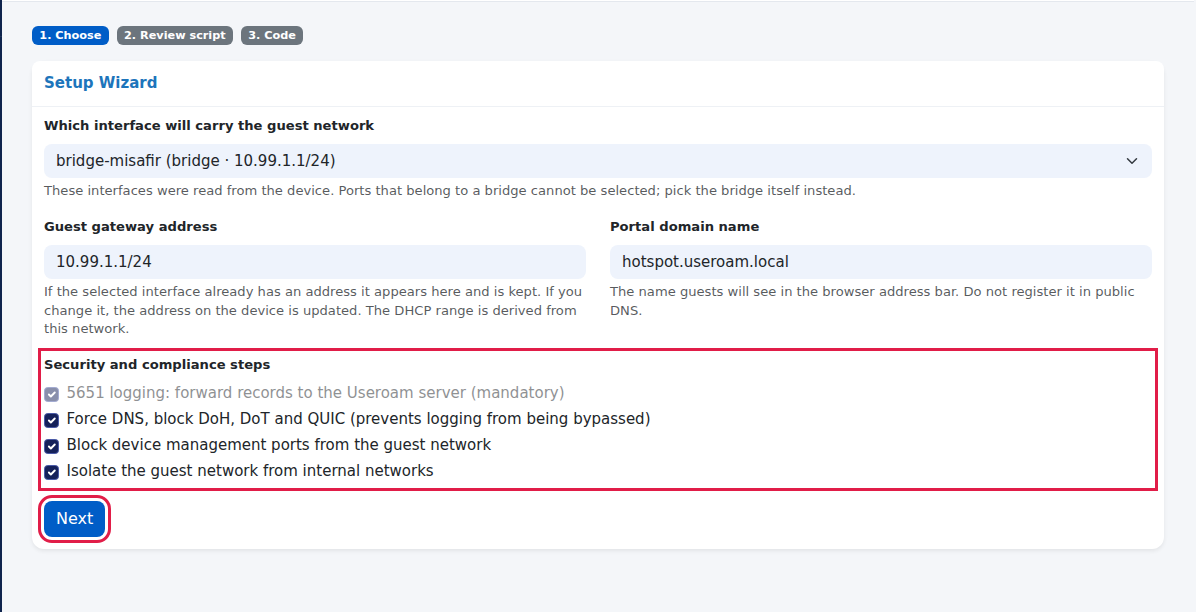
Choose the security steps and press Next. The boxes under Security and compliance steps are ticked by default; 5651 logging is mandatory and cannot be unticked. We recommend leaving them all ticked. Press Next.
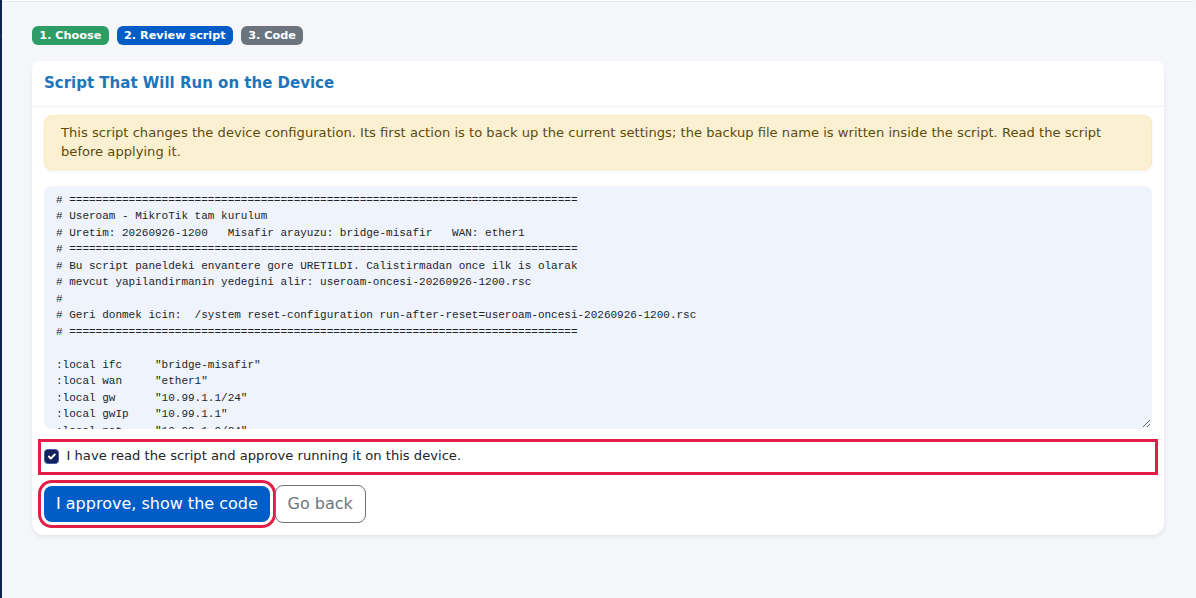
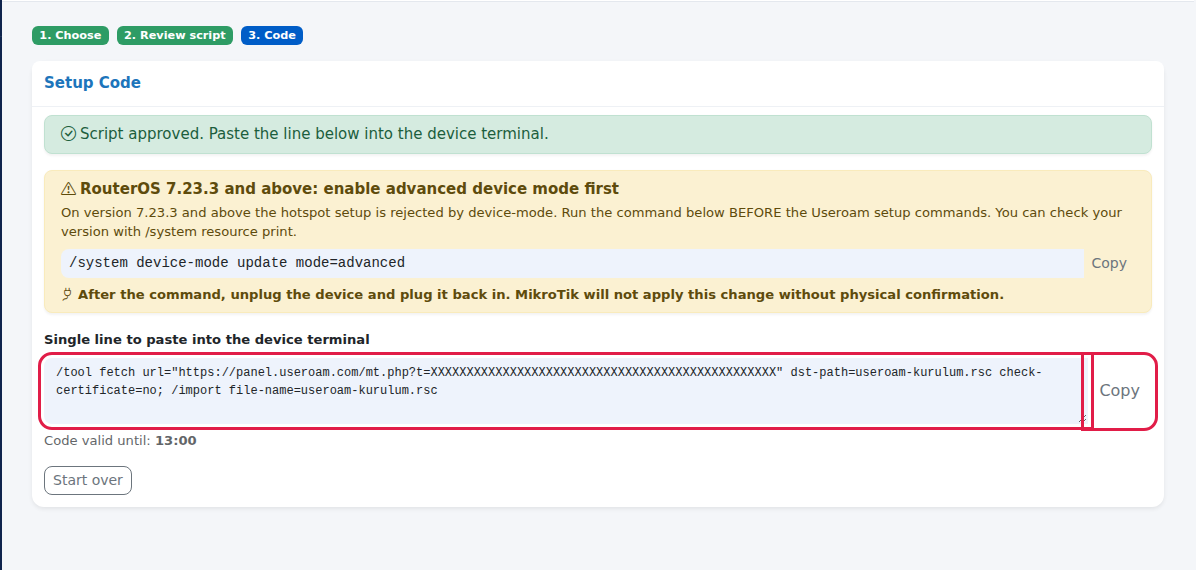
Read and approve the script. The full setup script that will run on the device is shown. Read it, tick I have read the script and approve running it on this device. and press I approve, show the code.
Paste the setup line into the device. The Single line to paste into the device terminal appears. Press Copy, paste it into the terminal as in step 5 and press Enter. The script first backs up your current settings (useroam-oncesi-...rsc), then sets up the guest network.
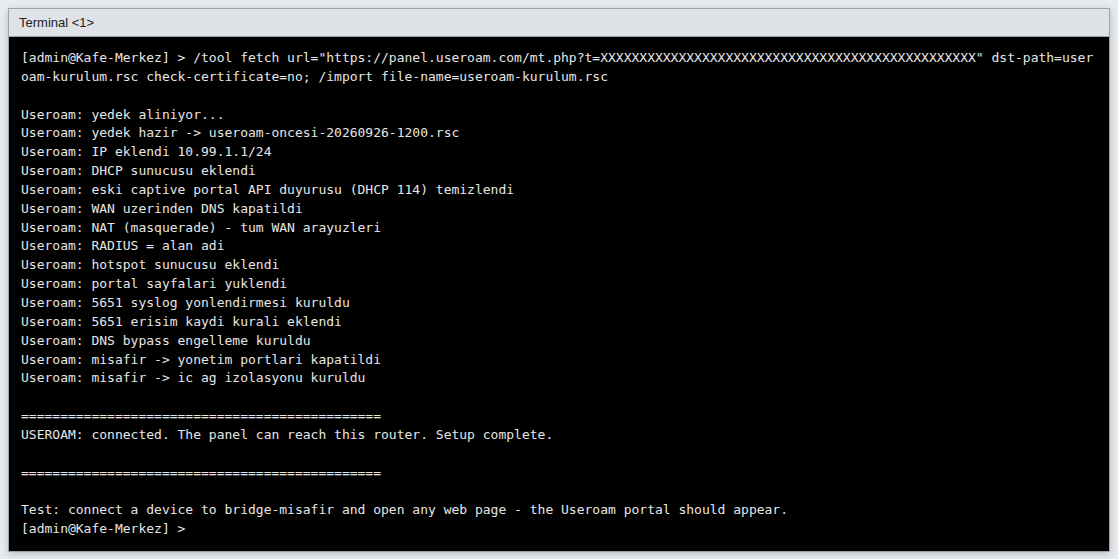
The image is a sample terminal output; the lines are the script's own messages (some are in Turkish without special characters).
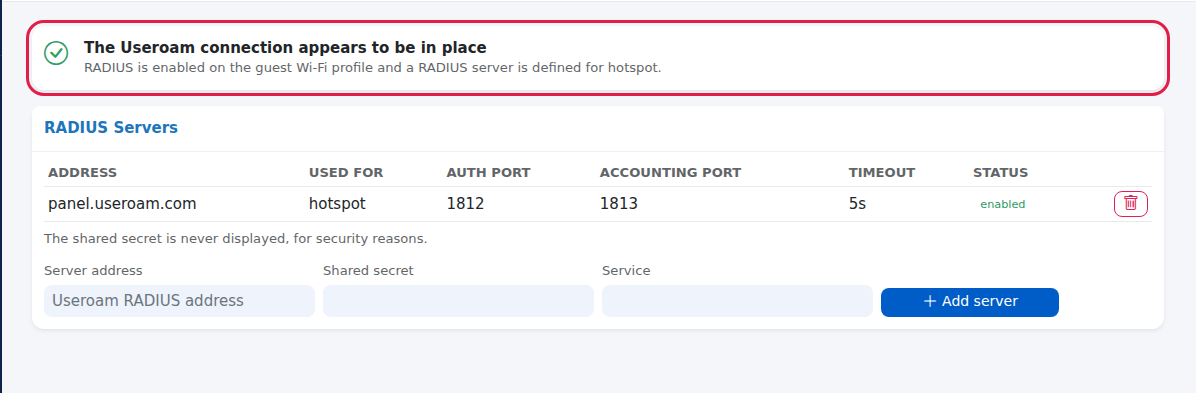
Check the result. Open the Useroam Connection section in the console. At the top it should read The Useroam connection appears to be in place. Then connect a phone to the guest network and open any web page: the Useroam welcome page should appear. The guest who logs in shows up in the Guests Online Now list of the Guest Wi-Fi section.
Card statuses
| What the card says | What it means | What to do |
|---|---|---|
| No setup code has been generated yet. | No code has been generated for this device. | Press Generate setup code. |
| Code is ready, waiting for the device to connect. | A code exists but the device has not fetched it yet. | Paste the line into the device terminal. If the time has passed, press Generate a new code. |
| The device downloaded the setup file, waiting for its confirmation. | The device downloaded the file but its "ready" message did not arrive. | Check the end of the terminal output (error table below). Wait a moment and reload the page. |
| Connected. | The panel can reach the device. | Press Open the setup screen in the Step 2 box. |
| The device connected from a different address. Correct the device address in the panel and generate a new code. with Last error: ip_mismatch:... below | The device reaches the internet from an address other than the one in the panel. The address in the last error is the device's real outgoing address. | Change the Device Address in Device Settings to that address, save, then press Generate a new code. |
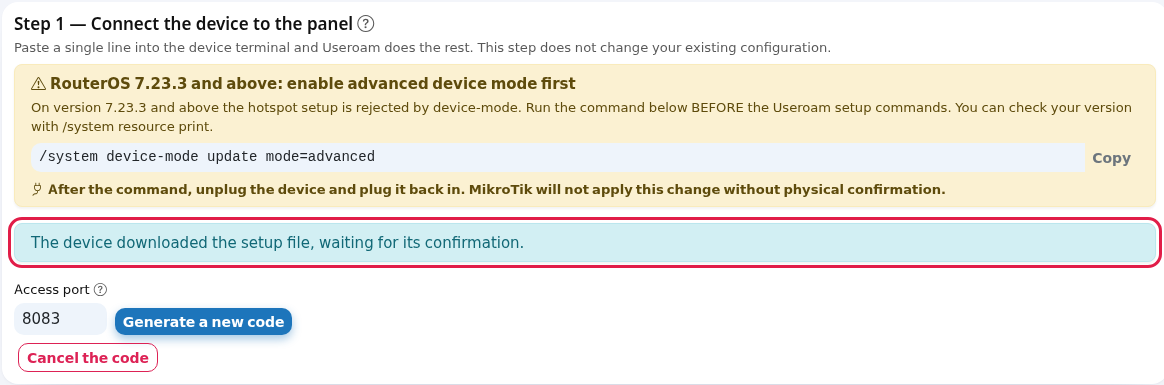
Card fields and buttons
| Field / button | What it does | Example |
|---|---|---|
| Access port | The port the panel uses to reach the device. 443 for a device facing the internet directly; behind a modem, the external port you forwarded (the forward must target the MikroTik on port 443). | 443 or 8443 |
| Generate setup code / Generate a new code | Generates a new single-use code valid for 30 minutes. A new code invalidates the old one; only one code is valid at a time. | |
| Copy | Copies the command line to the clipboard. | |
| Cancel the code | Invalidates an unused code. Use it if you shared the code with the wrong person. | |
| Setup Document | Opens the MikroTik help (on the English panel it leads to the MikroTik Management book). | |
| MikroTik Management | Opens the MikroTik console once the device is connected. | |
| Legacy setup method (archive) | The old way for devices set up by uploading hotspot files by hand. Do not use it for new setups. |
What does the single line do on the device?
The line from step 4 (connection setup) only does the following on the device; it does not touch your guest network, bridges, DHCP or existing firewall rules:
- Version check: stops on RouterOS 6.
- Creates a certificate for HTTPS management (if missing).
- Adds a user named useroam-api that can only log in from the Useroam panel address (104.247.174.120).
- Enables the device's web service (www-ssl, REST API). If you already have your own certificate, it is kept.
- Adds a single firewall accept rule for the panel address only (useroam-api-allow).
- If a Useroam RADIUS entry already exists, turns off its Message-Authenticator requirement.
- Sends a "ready" message to the panel; the panel immediately tries to connect back.
To remove this connection, run these three lines in the terminal:
/user remove [find name="useroam-api"]
/user group remove [find name="useroam-api"]
/ip firewall filter remove [find comment="useroam-api-allow"]
Error messages you may see in the terminal
| Terminal message | Meaning | What to do |
|---|---|---|
| Setup code is invalid or malformed. | The code was copied incompletely or damaged. | Copy the line again with Copy. |
| Setup code is invalid or has already been used. | The code was not recognised or was already used. | Press Generate a new code. |
| Setup code was cancelled in the panel. Generate a new one. | The code was cancelled in the panel or replaced by a newer code. | Use the latest code from the panel. |
| Setup code has expired. Generate a new one in the Useroam panel. | The code expired (connection code 30, setup code 60 minutes). | Generate a new code. |
| This device reached us from ... but the panel has ... Fix the device IP in the panel, then retry. | The device's outgoing address does not match the Device Address in the panel. | Correct the Device Address to the first address, then generate a new code. |
| This device is already connected to Useroam. | The device is already connected. | Nothing to do; go on with Open the setup screen. |
| Setup code was already used. Generate a new one in the panel. | The same code was run twice. | Generate a new code. |
| USEROAM ERROR: RouterOS 6 detected ... | The device runs RouterOS 6. | Upgrade to RouterOS 7.1 or newer. |
| USEROAM ERROR: certificate signing timed out. | The device could not create the certificate within 90 seconds. | Run the line again (a new code may be needed). |
| USEROAM: device registered, but the panel could NOT connect back. and TCP 443 from 104.247.174.120 must reach THIS router. | The device registered but the panel cannot reach it. Usually the device is behind a modem. | Forward an external port on the modem to port 443 of the MikroTik, enter the external port in Access port and generate a new code. |
| USEROAM WARNING: could not reach the Useroam panel. | The device could not reach the panel (no internet or DNS). | Check the device's internet and DNS settings, then run the line again. |
| Useroam panel could not read the generated credentials. Generate a new code. / Useroam panel database is unavailable, try again later. | A temporary problem on the panel side. | Generate a new code after a few minutes; contact support if it continues. |
Frequently asked questions
I pasted the code but the card still says "Code is ready".
Look at the terminal output. There is usually a message saying the device cannot reach the panel or that the address does not match (table above). If there is no message, reload the page.
My device is behind a modem. What should I do?
Forward an external port on the modem (e.g. 8443) to port 443 of the MikroTik. In the panel enter 8443 in Access port and press Generate a new code. The Device Address in the panel must be the modem's public address.
Will the single line break my existing settings?
No. The connection line only adds a certificate, the useroam-api user, the web service and one accept rule. The second line, which sets up the guest network, does change settings; this is why the panel first shows you the whole script and why the script takes a backup first. Details are on the Setup Wizard page.
I run RouterOS 7.23.3 and the hotspot is not set up.
Device mode was not enabled, or the device was not unplugged and replugged after the command. Do step 3.